Showing posts with label Fabric. Show all posts

Wednesday, August 19, 2015

Getting started with Nano Server for Compute and Cluster

I assume you have heard the news that Windows Server and System Center 2016 TP3 is publicly available by now.

This means you can download and play around with the bits in order to get some early hands-on experience on the available scenarios and features.

One of the key scenarios that’s available in this preview is the following:

·         Nano Server (enhanced – and covered in this blog post)
·         Windows Container (new – and very well explained by Aidan Finn at www.aidanfinn.com )
·         Storage Spaces Direct (enhanced – and covered here very soon)
·         Network Controller (new – and covered here in detail very very soon J )

So, let us start to talk about Nano Server.

During Ignite earlier this year, Nano Server was introduced by the legend himself, Mr. Snover.
Let us be very clear: Nano Server is not even comparable to Server Core, that Microsoft has been pushing since the release of it, where you run a full Windows Server without any graphical user interface. However, some of the concepts are the same and applicable when it comes to Nano.

Some of drivers for Nano Server was based on customer feedback, and you might be familiar with the following statements:

-          Reboots impact my business
Think about Windows Server in general, not just Hyper-V in a cluster context – which more or less deals with reboots.
Very often you would find yourself in a situation where you had to reboot a server due to an update – of a component you in fact wasn’t using, nor aware of was installed on the server (that’s a different topic, but you get the point).

-          What’s up with the server image? It’s way too big!
From a WAP standpoint, using VMM as the VM Cloud Provider, you have been doing plenty of VM deployments. You normally have to sit and wait for several minutes just for the data transfer to complete. Then there’s the VM customization if it’s a VM Role, and so on and so forth. Although thing has been improving over the last years with Fast-File-Copy and support of ODX, the image size is very big. And don’t forget - this affects backup, restore and DR scenarios too, in addition to the extra cost on our networking fabric infrastructure.

-          Infrastructure requires too many resources
I am running and operating a large datacenter today, where I have effectively been able to standardize on the server roles and features I only need. However, the cost per server is too high when it comes to utilization, and really make an impact on the VM density.
Higher VM density lower my costs and increases my efficiency & margins.

I just want the components I need….and nothing more… please

So speaking of which components we really need.

Nano Server is designed for the Cloud, which means it’s effective and goes along with a “Zero-footprint” model. Server Roles and optional features live outside of the Nano Server itself, and we have stand-alone packages that we adds to the image by using DISM. More about that later.
Nano Server is a “headless”, 64-bit only, deployment option for Windows Server that according to Microsoft marketing is refactored to focus on “Cloud OS Infrastructure” and “Born-in-the-cloud applications”.

The key roles and features we have today is the following:

-          Hyper-V
Yes, this is (If you ask me) the key – and the flagship when it comes to Nano Server. You might remember the stand-alone Hyper-V server that was based on the Windows Kernel but only ran the Hyper-V Role? Well, the Nano Server is much smaller and only is based on Hyper-V, sharing the exact same architecture as the Hypervisor we know from the GUI based Windows Server edition.

-          Storage (SOFS)
As you probably know already, compute without storage is quite useless, given the fact that Virtual Machines is nothing but a set of files on a disk J
With a package for storage, we are able to instantiate several Nano Servers with the storage role to act as storage nodes based on Storage Spaces Direct (shared-nothing storage). This is very cool and will of course qualify for its own blog post in the near future.

-          Clustering
Both Hyper-V and Storage (SOFS) relies (in many situations) on the Windows Failover Cluster feature. Luckily, the cluster feature servers as its own package for Nano Server and we can effectively enable critical infra roles in a HA configuration using clustering.

-          Windows Container
This is new in TP3 – and I suggest you read Aidan’s blog about the topic. However, you won’t be able to test/verify this package on Nano Server in this TP, as it is missing several of its key requirements and dependencies.

-          Guest Package
Did you think that you had to run Nano Server on your physical servers only? Remember that Nano is designed for the “born-in-the-cloud applications” too, so you can of course run them as virtual machines. However, you would have to add the Guest Package to make them aware that they are running on top of Hyper-V.

In addition, we have packages for OEM Drivers (package of all drivers in Server Core), OneCore ReverseForwarders and Defender.

Remote Management

Nano Server is all about being effective, leverage the cloud computing attributes, being effective, scalable and achieve more. In order to do so, we must understand that Nano Server is all about remote management.
With a subset of Win32 support, PowerShell Core, ASP.NET5, we aren’t able to use Nano Server for everything. But that is also the point here.

Although Nano is refactored to run on CoreCLR, we have full PowerShell language compatibility and remoting. Examples here are Invoke-Command, New-PSSession, Enter-PSSession etc.

Getting started with Nano Server for Compute

Alright, so let us get over to some practical examples on how to get started with Nano Server for Compute, and how to actually do the configuration.

Originally, this blog post was a bit longer than it is now, since Microsoft just published some new content over at TechNet. Here you will find a good guidance on how to deploy Nano: https://technet.microsoft.com/en-us/library/mt126167.aspx

I must admit, that the experience of installing and configuring Nano wasn’t state of the art in TP2.
Now, in TP3, you can see that we have the required scripts and files located on the media itself, which simplifies the process.
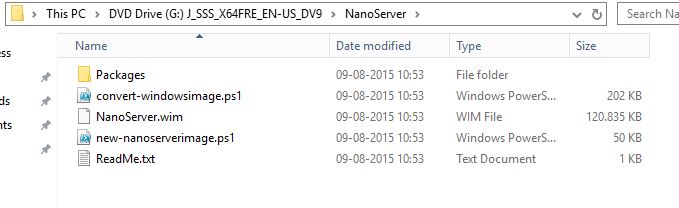


1.       Mount the media and dot-source the ‘convert-windowsimage.ps1’ and ‘new-nanoserverimage.ps1’ script in a PowerShell ISE session
2.       Next, see the following example on how to create a new image for your Nano server (this will create a VHD that you could either upload to a WDS if you want to deploy it on a physical server, or mount it to a virtual machine


3.       By running the cmdlet, you should have a new image

In our example, we uploaded the vhd to our WDS (Thanks Flemming Riis for facilitating this).

If you pay close attention to the paramhash table, you can see the following:

$paramHash = @{
MediaPath = 'G:\'
BasePath = 'C:\nano\new'
TargetPath = 'C:\Nano\compute'
AdministratorPassword = $pass
ComputerName = 'nanohosttp3'
Compute = $true
Clustering = $true
DriversPath = "c:\drivers"
EnableIPDisplayOnBoot = $True
EnableRemoteManagementPort = $True
Language = 'en-us'
DomainName = 'drinking.azurestack.coffee'
}

Compute = $true and Clustering = $true.
This means that both the compute and the clustering package will be added to the image. In addition, since we are deploying this on a physical server, we learned the hard way (thanks again Flemming) that we needed some HP drivers for networks and storage controller. We are therefore pointing to the location (DriversPath = “c:\drivers” ) where we extracted the drivers so they get added to the image.
Through this process, we are also pre-creating the computer name object in Active Directory as we want to domain join the box to “drinking.azurestack.coffee”.
If you pay attention to the guide at Technet, you can see how you can set a static IP address on your Nano Server. We have simplified the deployment process in our fabric as we are rapidly deploying and decommissioning compute on the fly, so all servers get their IP config from a DHCP server.

Once the servers were deployed (this took literally under 4 minutes!), we could move forward and very that everything was as we desired.

1)      Nano Servers were joined to domain
2)      We had remote access to the nano servers


Since Nano Server is all about remote management, we used the following PowerShell cmdlets in order to configure the compute nodes, create the cluster etc.

# Preparing your mgmt server

Install-WindowsFeature -Name RSAT-Hyper-V-Tools, Hyper-V-Tools, Hyper-V-PowerShell, RSAT-Clustering, RSAT-Clustering-MGMT, RSAT-AD-PowerShell -Verbose

# Creating Nano Compute Cluster

$clustername = "nanocltp3"
$nodes = "hvtp301, hvtp302"
$ip = "10.0.0.50"

New-Cluster -Name $clustername -Node $nodes -StaticAddress $ip -NoStorage -Verbose

# Connecting to storage server and create SMB share with proper permissions

$storage = "nanostor"

Enter-PSSession -ComputerName nanostor

MD D:\VMS
ICACLS.EXE D:\VMS --% /Grant drinking\knadm:(CI)(OI)F
ICACLS.EXE D:\VMS --% /Grant drinking\hvtp301$:(CI)(OI)F
ICACLS.EXE D:\VMS --% /Grant NTDEV\benarm-zeta$:(CI)(OI)F
ICACLS.EXE D:\VMS /Inheritance:R
New-SmbShare -Name VMS -Path D:\VMS –FullAccess drinking\knadm, drinking\hvtp301$, drinking\hvtp302$

# Configuring Constrained Delegation

Enable-SmbDelegation –SmbServer $storage –SmbClient hvtp301 -Verbose
Enable-SmbDelegation –SmbServer $storage -SmbClient hvtp302 -Verbose

# Configure Hyper-V settings for Cluster usage

$vmhosts =@("hvtp301", "hvtp302")
$vhdpath = "\\nanostor\vms\"
$vmconfigpath = "\\nanostor\vms\"
$lmsettings = "5"

foreach ($vmhost in $vmhosts)
    {
        Set-VMHost -ComputerName $vmhost -MaximumVirtualMachineMigrations $lmsettings -VirtualHardDiskPath $vhdpath -VirtualMachinePath $vmconfigpath -VirtualMachineMigrationAuthenticationType Kerberos -Verbose
    }

# Create VM based on Nano Image

$vm = "nanovm1"
$nanohost = "hvtp301"

New-VM -ComputerName $nanohost -Name $vm -MemoryStartupBytes 512mb -VHDPath \\nanostor\vms\blank1.vhd -SwitchName VMSwitch -Generation 1 -Verbose

# Make the VM highly available

Add-ClusterVirtualMachineRole -VMName $vm -Cluster $clustername -Verbose

# Start the VM

Start-VM -ComputerName hvtp301 -Name $vm -Verbose

As you can see, we are also creating a virtual machine here that is obviously based on a vhd with the guest drivers installed. We tested on how to do this manually by using DISM on an empty image.

The following example can be used in order to service your Nano vhd.

# Nano servicing

# Create a mountpoint

md mountpoint

# Mount the image into the mountpoint you just created

dism /Mount-Image /ImageFile:.\blank.vhd /Index:1 /MountDir:.\mountpoint

# Add your package. In this example, we will add packages for Storage, Cluster and Virtual Guest Services

dism /Add-Package /PackagePath:G:\NanoServer\Packages\Microsoft-NanoServer-Guest-Package.cab /Image:.\mountpoint

dism /Add-Package /PackagaPath:G:\NanoServer\Packages\Microsoft-NanoServer-FailoverCluster-Package.cab /Image:.\mountpoint

dism /Add-Package /PackagePath:G:\NanoServer\Packages\Microsoft-NanoServer-Storage-Package.cab /Image:.\mountpoint

# Commit and dismount

dism /Unmount-Image /MountDir:.\mountpoint /commit

# Copy the vhd over to the smb share for the compute cluster

Copy-Item -Path .\blank.vhd -Destination \\nanostor\vms -Verbose

The following screen shot shows the Nano Cluster that is running a virtual machine with Nano Server installed:


NB: I am aware that my PowerShell cmdlets didn’t configure any VMswitch as part of the process. In fact, I have reported that as a bug as it is not possible to do so using the Hyper-V module. The VM switch was created successfully using the Hyper-V Manager console.

Happy Nano’ing, and I will cover more later.

(I also hope that I will see you during our SCU session on this topic next week)


Sunday, February 15, 2015

SCVMM Fabric Controller - Update: No more differential disks for your VM Roles

I just assume that you have read Marc van Eijk's well described blog post about the new enhancement with Update Rollup 5 for SCVMM, where we can now effectively turn off differential disks for all our new VM Role deployments with Azure Pack.

If not, follow this link to get all the details: http://www.hyper-v.nu/archives/mvaneijk/2015/02/windows-azure-pack-vm-role-choose-between-differencing-disks-or-dedicated-disks/

As a result of this going public, I have uploaded a new version of my SCVMM Fabric Controller script, that now will add another custom property to all the IaaS Clouds in SCVMM, assuming you want static disks to be default.

You can grab the new version from here:

https://gallery.technet.microsoft.com/SCVMM-Fabric-Controller-a1edf8a7

Next, I will make this script a bit more user friendly and add some more functionality to it in the next couple of weeks.

Thanks.

-kn


Monday, January 19, 2015

Business Continuity with SCVMM and Azure Site Recovery

Business Continuity for the management stamp

Back in November, I wrote a blog post about the DR integration in Windows Azure Pack, where service providers can provide managed DR for their tenants - http://kristiannese.blogspot.no/2014/11/windows-azure-pack-with-dr-add-on-asr.html

I’ve been working with many service providers over the last months where both Azure Pack and Azure Site Recovery has been critical components.

However, looking at the relatively big footprint with the DR add-on in Update Rollup 4 for Windows Azure Pack, organizations has started in the other end in order to bring business continuity to their clouds.

For one of the larger service providers, we had to dive deep into the architecture of Hyper-V Replica, SCVMM and Azure Site Recovery before we knew how to design the optimal layout to ensure business continuity.

In each and every ASR design, you must look at your fabric and management stamp and start looking at the recovery design before you create the disaster design. Did I lost you there?

What I’m saying is that it’s relatively easy to perform the heavy lifting of the data, but once the shit hit the fans, you better know what to expect.

In this particular case, we had a common goal:

We want to ensure business continuity for the entire management stamp with a single click, so that tenants can create, manage and operate their workloads without interruption. This should be achieved in an efficient way with a minimal footprint.

When we first saw the release of Azure Site Recovery, it was called “Hyper-V Recovery Manager” and required two SCVMM management stamps to perform DR between sites. The feedback from potential customers were quite loud and clear: people wanted to leverage their existing SCVMM investment and perform DR operations with a single SCVMM management stamp. Microsoft listened and let us now perform DR between SCVMM Clouds, using the same SCVMM server.

Actually, it’s over a year ago since they made this available and diving into my archive I managed to find the following blog post: http://kristiannese.blogspot.no/2013/12/how-to-setup-hyper-v-recovery-manager.html

So IMHO, using a single SCVMM stamp is always preferred whenever it is possible, so that was also my recommendations when it came to the initial design for this case.

In this blog post, I will share my findings and workaround for making this possible, ensuring business continuity for the entire management stamp.

The initial configuration

The first step we had to make when designing the management stamp, was to plan and prepare for SQL AlwaysOn Availability Groups.
System Center 2012 R2 – Virtual Machine Manager, Service Manager, Operations Manager and Orchestrator does all support AlwaysOn Availability Groups.

Why plan for SQL AlwaysOn Availability Groups when we have the traditional SQL Cluster solution available for High-Availability?

This is a really good question – and also very important as this is the key for realizing the big goal here. AlwaysOn is a high-availability and disaster recovery solution that provides an enterprise-level alternative to database mirroring. The solution maximizes the availability of a set of user databases and supports a failover environment for those selected databases.
Compared to a traditional SQL Cluster – that can also use shared VHDXs, this was a no brainer. A shared VHDX would have given us a headache and increased the complexity with Hyper-V Replica.
SQL AlwaysOn Availability Groups let us use local storage for each VM within the cluster configuration, and enable synchronous replication between the nodes on the selected user databases.

Alright, the SQL discussion is now over, and we proceeded to the fabric design.
In total, we would have several Hyper-V Clusters for different kind of workload, such as:

·       Management
·       Edge
·       IaaS
·       DR


Since this was a Greenfield project, we had to deploy everything from scratch.
We started with the Hyper-V Management Cluster and from there we deployed two VM instances in a guest cluster configuration, installed with SQL Server for Always On Availability Groups. Our plan was to put the System Center databases – as well as WAP databases onto this database cluster.

Once we had deployed a Highly-Available SCVMM solution, including a HA library server, we performed the initial configuration on the management cluster nodes.
As stated earlier, this is really a chicken and egg scenario. Since we are working with a cluster here, it’s straightforward to configure the nodes – one at a time, putting one node in maintenance mode, move the workload and repeat the process on the remaining node(s). Our desired state configuration at this point is to deploy the logical switch with its profile settings to all nodes, and later provision more storage and define classifications within the fabric.
The description here is relatively high-level, but to summarize: we do the normal fabric stuff in VMM at this point, and prepare the infrastructure to deploy and configure the remaining hosts and clusters.

For more information around the details about the design, I used the following script that I have made available that turns SCVMM into a fabric controller for Windows Azure Pack and Azure Site Recovery integration:


Once the initial configuration was done, we deployed the NVGRE gateway hosts, DR hosts, Iaas hosts, Windows Azure Pack and the remaining System Center components in order to provide service offerings through the tenant portal.

If you are very keen to know more about this process, I recommend to read our whitepaper which covers this end-to-end:


Here’s an overview of the design after the initial configuration:


If we look at this from a different – and perhaps a more traditional perspective, mapping the different layers with each other, we have the following architecture and design of SCVMM, Windows Azure Pack, SPF and our host groups:


So far so good. The design of the stamp was finished and we were ready to proceed with the Azure Site Recovery implementation

Integrating Azure Site Recovery

To be honest, at this point we thought the hardest part of the job was done, such as ensuring HA for all the workloads as well as integrating NVGRE to the environment, spinning up complex VM roles just to improve the tenants and so on and so forth.
We added ASR to the solution and was quite confident that this would work as a charm since we had SQL AlwaysOn as part of the solution.

We soon found out that we had to do some engineering before we could celebrate.

Here’s a description of the issue we encountered.

In the Microsoft Azure portal, you configure ASR and perform the mapping between your management servers and clouds and also the VM networks.

As I described earlier in this blog post, the initial design of Azure Site Recovery in an “Enterprise 2 Enterprise” (on-prem 2 on-prem) scenario, was to leverage two SCVMM management servers. Then the administrator had the opportunity to duplicate the network artifacts (network sites, VLAN, IP pools etc) across sites, ensuring that each VM could be brought online on the secondary site with the same IP configuration as on the primary site.

Sounds quite obvious and really something you would expect, yeah?

Moving away from that design and rather use a single SCVMM management server (a single management server, that is highly-available is not the same as two SCVMM management servers), gave us some challenges.

1)      We could (of course) not create the same networking artifacts twice within a single SCVMM management server
2)      We could not create an empty logical network and map the primary network with this one. This would throw an error
3)      We could not use the primary network as our secondary as well, as this would give the VMs a new IP address from the IP pool
4)      Although we could update IP addresses in DNS, the customer required to use the exact IP configuration on the secondary site post failover


Ok, what do we do now?
At that time it felt a bit awkward to say that we were struggling to keep the same IP configuration across sites.

After a few more cups of coffee, it was time to dive into the recovery plans in ASR to look for new opportunities.

A recovery plan groups virtual machines together for the purposes of failover and recovery, and it specifies the order in which groups of VMs should fail over. We were going to create several recovery plans, so that we could easily and logically group different kind of workloads together and perform DR in a trusted way

Here’s how the recovery plan for the entire stamp looks like:


So this recovery plan would power off the VMs in a specific order, perform the failover to the secondary site and then power on the VMs again in a certain order specified by the administrator.

What was interesting for us to see, was that we could leverage our Powershell skills as part of these steps.

Each step can have an associated script and a manual task assigned.
We found out that the first thing we had to do before even shutting down the VMs, was to run a powershell script that would verify that the VMs would be connected to the proper virtual switch in Hyper-V.

Ok, but why?

Another good question. Let me explain.

Once you are replicating a virtual machine using Hyper-V Replica, you have the option to assign an alternative IP address to the replica VM. This is very interesting when you have different networks across your sites so that the VMs can be online and available immediately after a failover.
In this specific customer case, the VLAN(s) were stretched and made available on the secondary site as well, hence the requirement to keep the exact network configuration. In addition, all of the VMs had assigned static IP addresses from the SCVMM IP Pools.

However, since we didn’t do any mapping at the end in the portal, just to avoid the errors and the wrong outcome, we decided to handle this with powershell.

When enabling replication on a virtual machine in this environment, and not mapping to a specific VM network, the replica VM would have the following configuration:


As you can see, we are connected to a certain switch, but the “Failover TCP/IP” checkbox was enabled with no info. You probably know what this means? Yes, the VM will come up with an APIPA configuration. No good.

What we did

We created a powershell script that:

a)       Detected the active Replica hosts before failover (using the Hyper-V Powershell API)
b)      Ensured that the VM(s) were connected to the right virtual switch on Hyper-V (using the Hyper-V Powershell API)
c)       Disabled the Failover TCP/IP settings on every VM
a.       Of all of the above were successful, the recovery plan could continue to perform the failover
b.       If any of the above were failing, the recovery plan was aborted


For this to work, you have to ensure that the following pre-reqs are met:

·        Ensure that you have at least one library server in your SCVMM deployment
·        If you have a HA SCVMM server deployment as we had, you also have a remote library share (example: \\fileserver.domain.local\libraryshare ). This is where you store your powershell script (nameofscript.ps1)  Then you must configure the share as follow:
a.       Open the Registry editor
b.       Navigate to HKEY_LOCAL_MACHINE_SOFTWARE\Microsoft\Microsoft System Center Virtual Machine Manager Server\DRAdaper/Registration
c.        Edit the value ScriptLibraryPath
d.       Place the value as \\fileserver.domain.local\libraryshare\. Specify the full fully qualified domain name (FQDN).
e.       Provide permission to the share location

This registry setting will replicate across your SCVMM nodes, so you only have to do this once.

Once the script has been placed in the library and the registry changes are implemented, you can associate the script with one or more tasks within a recovery plan as showed below.


Performing the recovery plan(s) now would ensure that every VM that was part of the plan, was brought up at the recovery site with the same IP configuration as on the primary site.

With this, we had a “single-button” DR solution for the entire management stamp, including Windows Azure Pack and its resource providers.


-kn

Tuesday, December 30, 2014

SCVMM Fabric Controller Script – Update

Some weeks ago, I wrote this blog post (http://kristiannese.blogspot.no/2014/12/scvmm-fabric-controller-script.html ) to let you know that my demo script for creating management stamps and turning SCVMM into a fabric controller is now available for download.

I’ve made some updates to the SCVMM Fabric Controller script during the Holidays – and you can download the Powershell script from TechNet Gallery:


In this update, you’ll get:

More flexibility
Error handling
3 locations – which is the level of abstraction for your host groups. Rename these to fit your environment.
Each location contain all the main function host groups, like DR, Edge, IaaS and Fabric Management
Each IaaS host group has its corresponding Cloud
Native Uplink Profile for the main location will be created
A global Logical Switch with Uplink Port profile and Virtual Port Profiles will be created with a default virtual port profile for VM Roles
Custom property for each cloud (CreateHighlyAvailableVMRoles = true) to ensure HA for VM roles deployed through Windows Azure Pack

Please note, that you have to add hosts to your host groups before you can associate logical networks with each cloud created in SCVMM, so this is considered as a post deployment task.

I’ve received some questions since the first draft was uploaded to TechNet Gallery, as well as from my colleagues who have tested the new version:

·         Is this best practice and recommendation from your side when it comes to production design for SCVMM as a fabric controller?

Yes, it is. Especially now where the script more or less create the entire design.
If you have read our whitepaper on Hybrid Cloud with NVGRE (Cloud OS) (https://gallery.technet.microsoft.com/Hybrid-Cloud-with-NVGRE-aa6e1e9a ), then you can see that we are following the same principals there – which helped us to democratize software-defined networking for the community.

·         I don’t think I need all the host groups, such as “DR” and “Edge”. I am only using SCVMM for managing my fabric

Although SCVMM can be seen as the primary management tool for your fabric – and not only a fabric controller when adding Azure Pack to the mix, I would like to point out that things might change in your environment. It is always a good idea to have the artifacts in place in case you will grow, scale or add more functionality as you move forward. This script will lay the foundation for you to use whatever fabric scenario you would like, and at the same time keep things structured according to access, intelligent placement and functionality. Changing a SCVMM design over time isn’t straightforward, and in many cases you will end up with a “legacy” SCVMM design that you can’t add into Windows Azure Pack for obvious reasons.


Have fun and let me know what you think.

Sunday, December 14, 2014

SCVMM Fabric Controller Script

We are reaching the holidays, and besides public speaking, I am trying to slow down a bit in order to prepare for the arrival of my baby girl early in January.

However, I haven’t been all that lazy, and in this blog post I would like to share a script with you.

During 2014, I have presented several times on subjects like “management stamp”, “Windows Azure Pack”, “SCVMM” and “Networking”.

All of these subjects have something in common, and that is a proper design of the fabric in SCVMM to leverage the cloud computing characteristics that Azure Pack is bringing to the table.
I have been visiting too many customers and partners over the last months just to see that the design of the fabric in VMM is not scalable or designed in a way that gives some meaning at all.

As a result of this, I had to create a Powershell script that easily could show how it should be designed, based on one criteria: turning SCVMM into a universal fabric controller for all your datacenters and locations.

This means that the relationship between the host groups and the logical networks and network definitions need to be planned carefully.
If you don’t design this properly, you can potentially have no control over where the VMs are deployed. And that is not a good thing.

This is the first version of this script and the plan is to add more and more stuff to it once I have the time.

The script can be found at downloaded here:


Please note that this script should only be executed in an empty SCVMM environment (lab), and you should change the variables to fit your environment.

Once the script has completed, you can add more subnets and link these to the right host groups.

The idea with this version is really just to give you a better understanding of how it should be designed and how you can continue using this design. 


Friday, February 28, 2014

Network Virtualization - Troubleshooting and FAQ


It’s been a while since we published our whitepaper based on Windows Server 2012 R2, Hyper-V and System Center 2012 R2.

http://gallery.technet.microsoft.com/Hybrid-Cloud-with-NVGRE-aa6e1e9a

What I can say, is that we are working on something new and exciting related to this, and hopefully you will stay tuned to embrace it once it is available.

Besides that, we have been working on many, both small and huge projects where NVGRE is a part of the mix, and seen a thread or two in the forums as well.
As a result of this, we have ran into many challenges, been troubleshooting the bits and bytes and learned a lot.
I would like to say that there is not a thing I haven’t seen yet, nor discussed with customers, but I believe it’s more to come.

Network Virtualization is especially interesting for service providers, but also enterprises seems to adopt this technology. The experience so far is that Windows Azure Pack is a natural consequence of this technology, either for the internal IT department for provisioning and configuration, or for those who would like to offer IaaS or having their test/development environment available from anywhere.

The questions are many, and the complexity is enormous.

Hence I would like to announce that we will update the whitepaper shortly with a troubleshooting section (extended) and also add a FAQ.
This experience is based on late nights, hours, days, weeks and months, stuck at different airports, on small hotel rooms and a huge amount of coffee.

I hope you will appreciate it more than my girlfriend will.


See you all next week.

Sunday, October 20, 2013

How to deploy Scale-Out File Server Clusters with SCVMM 2012 R2

How to deploy Scale-Out File Server Clusters with SCVMM 2012 R2

This blog post is meant to show you how easy you can deploy scale-units with SCVMM 2012 R2.

Storage is – of course, a critical component in the cloud, no matter if it’s private, public or the service provided cloud.

SCVMM is able to cover the entire aspect of your cloud infrastructure, and storage is one of them.

New in SCVMM 2012 R2 is that we now (finally) have an end-to-end solution for deploying scale-out file server clusters, using this System Center component.

From before, you may be familiar with bare-metal deployment of Hyper-V hosts. This is a good thing where you only need to rack your servers, give them Ethernet and power and SCVMM will pick them up to deploy the operating system and enable the hypervisor, in addition to deploy logical switches if that’s is applicable.

Now, we can use the same framework to provision physical computer nodes in a scale-out file server cluster, or we can fetch our already existing Windows file servers intended for this scenario, cluster them, and use them in our cloud infrastructure.

First, here’s an overview of my environment

Storage 02 – this is my storage appliance, running Windows Server 2012 R2 with JBOD, and I am truly levering the capabilities of Storage Spaces in this scenario.

Scale1 and Scale2 is my physical servers, running Windows Server 2012 R2 and should be nodes in my scale-out file server cluster. These servers are connected to my storage through iSCSI and this is done prior to picking up SCVMM.


1)      Navigate to the Fabric, and from the ribbon menu, click ‘Create’ and ‘File Server Cluster’


2)      Assign a cluster name (scale-out file server cluster name) and a file server name (this would be the name of the file cluster, running the scale-out role). Also, the cluster need one or more IP addresses, so specify them in order to succeed.


3)      In my example, I have already my servers present in the infrastructure. Therefore, I will choose ‘Use existing servers running Windows Server 2012 R2’. The requirements is that they are in the same domain and must use the same Run As Account. Also note that they should not have the Hyper-V role installed. In an ideal world, I would have servers ready to be managed out of band. This is not the case here, and therefore I am not able to demonstrate how to provision bare-metal computers with a new operating system by using a file server profile. I select my Run As Account and also choose to skip the cluster validation, since this is a lab. Please remember to validate everything prior to putting it into production. Click next


4)      On the next page, I click add to add my file servers. I will add both ‘scale1’ and ‘scale2’.


5)      Last but not least, you will get a summary view of your configuration. Make sure everything is correct before clicking finish.

Once you hit finish, the following will happen:

SCVMM will prepare the storage node, install VMM agents on every server, install the failover cluster feature, create the cluster, the scale-out role, publish DNS records and discover storage.

Now, after the job is completed, we can see that we have a new provider in our fabric


In my next blog post, I will show how to configure storage pools from SCVMM and create and assign file shares to my production cluster.