Showing posts with label Hyper-V. Show all posts

Monday, September 7, 2015

Explaining Windows Server Containers – Part Two

In Part One, I covered the concept of Containers, compared to server virtualization in a Microsoft context.

Today, I want to highlight the architecture of container images and how you can use them as building blocks to speed up deployment.

Before we start

If you have a background in Server Virtualization, you are probably very familiar with VM templates.
A VM template is a sysprep’d image that is generalized and can be deployed over and over again. It is normally configure with its required components and applications and kept up to date with the latest patches.
A VM template contains the complete operating system (and eventually its associated data disk(s)) and has been used by administrators and developers for years when they want do rapidly be able to test and deploy their applications on top of those VMs.

With Containers, this is a bit different. In the previous blog post I explained that Containers are basically what we call “OS Virtualization” and with Windows Server Containers the kernel is shared between the container host and its containers.
So, a container image is not the same as a VM image.

Container Image

Think of a container image as a snapshot/checkpoint of a running container that can be re-deployed many times, isolated in its own user mode with namespace virtualization.
Since the kernel is shared, it is no need for the container image to contain the OS partition

When you have a running container, you can either stop and discard the container once you are done with it, or you can stop and capture the state and modifications you have made by transforming it into a container image.

We have two types of container images. A Container OS image is the first layer in potentially many image layers that make up a container. This image contains the OS environment and is also immutable – which means it cannot be modified.
A container image is stored in its local repository so that you can re-use the images as many times you’d like on the container host. It is also possible to store the images in a remote repository, making them available for multiple container hosts.

Let us see how the image creation process works with Windows Server Containers

Working with Container Images

In the current release, Windows Server Containers can be managed by Docker client and PowerShell.
This blog post will focus on the PowerShell experience and show which cmdlets you need to run in order to build images, just as easy as you would do by playing with Lego J

First, we will explore the properties of a Container Image. An Image contains a Name, Publisher and a version 


We are executing - and storing the following cmdlet in a variable: $conimage = Get-ContainerImage -Name "WinSrvCore" 


Next, we create a new container based on this image by executing - and storing the following cmdlet in a variable: $con = New-Container -Name "Demo" -ContainerImage $conimage -SwitchName "VM". 


Once the container is deployed, we will start it and invoke a command that installs the Web-Server role within this container ( Invoke-Command -ContainerId $con.ContainerId -RunAsAdministrator { Install-WindowsFeature -Name Web-Server } ). You can see that the picture below shows that the blue Lego block is now on top of the brown one (as in layers). 


As described earlier in this blog post, we can stop the running container and create an image if we want to keep the state. We are doing that by executing New-ContainerImage -Container $con -Name Web -Publisher KRN -Version 1.0


If we now executes Get-ContainerImage, we have two images. One that has only the ServerCore, and another one that has ServerCore and the Web-Server Role installed. 


We will repeat the process and create a new container based on the newly created Container Image.


In this container, we will install a web application too. The grey Lego block on top of the blue shows that this is an additional layer.


We are then stopping the running container again and creates another container image, containing the web application too.


In the local repository, we have now three different container images in a layered architecture.


Hopefully you found this useful, and I will soon be back with part three of this blog series.
Perhaps you will see more Lego as well .... :-) 

-kn


Sunday, September 6, 2015

Explaining Windows Server Containers – Part One

You have heard a lot about it lately, Microsoft is speeding up on their container investment and we can see the early beginning in Windows Server 2016 Technical Preview 3.

But before we start to go deep into the container technology in TP3, I would like to add some more context so that you more easily can absorb and understand what exactly is going on here.

Server Virtualization

Container technologies belongs to the virtualization category, but before we explain the concept and technology that gives us “containerization”, we will take a few steps back and see where we are coming from.

Server (virtual machine) virtualization is finally mainstream for the majority of the industry by now.
We have been using virtualization in order to provide an isolated environment for guest instances on a host to increase machine density, enable new scenarios, speed up test & development etc.

Server virtualization gave us an abstraction where every virtual machine were in the belief of that they had their own CPU, I/O resources, memory and networking.
In the Microsoft world, we first started with server virtualization using a type 2 hypervisor, such as Virtual Server and Virtual PC – where all the hardware access was emulated through the operating system itself, meaning that the virtualization software was running in user mode, just as every other application on that machine.
So a type 2 Hypervisor have in essence two hardware abstraction layers, turning them all into bad candidates for real world workloads.

This changed with Hyper-V in Windows Server 2008, where Microsoft introduced their first type 1 hypervisor.
Hyper-V is a microkernelized hypervisor that implements a shared virtualization stack and a distributed driver model that is very flexible and secure.
With this approach, Microsoft had finally a hypervisor that could run workloads considered as “always-on” and also based on x64 architecture.

I don’t have to go through the entire story of Hyper-V, but to summarize: Hyper-V in these days reminds you a bit of VMware – only it is better!

As stated earlier, server virtualization is key and a common requirement for cloud computing. In fact, Microsoft wouldn’t have such a good story today if it wasn’t for the investment they made in Hyper-V.
If you look closely, the Cloud OS vision with the entire “cloud consistency” approach derives from the hypervisor itself.

Empowering IaaS

In Azure today, we have many sophisticated offerings around the Infrastrucutre as a Service delivery model, focusing on core compute, networking and storage capabilities. Also, they have taken this a step further where we can use something called VM extensions in our virtual machines, so that during provisioning time – or post deployment, we can interact with the virtual machine operating system to perform some really advanced stuff. Examples here could be deployment and configuration of a complex LoB application.

Microsoft Azure and Windows Azure Pack (Azure technologies on-prem) has been focusing on IaaS for a long time, and today we have literally everything we need to use any of these cloud environments to rapidly instantiate new test & dev environments, spinning up virtual machine instances in isolated networks and fully leverage the software-defined datacenter model that Microsoft provides.

But what do we do when virtual machines aren’t enough? What if we want to be even more agile? What if we don’t want to sit down and wait for the VM to be deployed, configured and available before we can verify our test results? What if we want to maximize our investments even further and increase the hw utilization to the maximum?

This is where containers comes handy and provides us with OS virtualization.

OS Virtualization

Many people have already started to compare Windows Server Containers with technologies such as Server App-V and App-V (for desktops).
Neither of these comparisons are really true, as Windows Server Containers covers a lot more and has some fundamental differences when looking at the architecture and use cases. 
The concept, however, might be similar, as App-V technologies (both for server and desktop) aimed to deliver isolated application environments, in its own sandbox. Things could either be executed locally or streamed from a server. 

Microsoft will give us two options when it comes to container technology:
Windows Server Containers and Hyper-V Containers.

Before you get confused or starts to raise questions: You can run both Windows Server Containers and Hyper-V Containers within a VM (where the VM is the Container host). However, using Hyper-V Containers would require that Hyper-V is installed.

In Windows Server Container, the container is a process that executes in its own isolated user mode of the operating system, but where the kernel is shared between the container host and all of its containers.
To achieve isolation between the Containers and the Container Hosts, namespace virtualization is used to provide independent session namespace and kernel object namespace isolation per container
In addition, each container is isolated behind a network compartment using NAT (meaning that the container host has a Hyper-V Virtual Switch configured, connected to the containers).

For applications executing in a container process, all file and registry changes are captured through their respective drivers (file filter driver and registry filter). System state are shown as read-only to the application.

With this architecture of Windows Server Containers, it is very likely that this is an ideal approach for applications within the same trust boundary since the host kernel and APIs are shared among the containers. Windows Server Containers is the most optimized solution when reduced start-up time is important to you.

On the other hand, we also have something called Hyper-V Containers (this is not available in Technical Preview 3).
A Hyper-V Container provides the same capabilities as Windows Server Containers, but has its own (isolated) copy of the Windows kernel and memory directly assigned to them. There is of course pros and considerations with every type of technology, and with Hyper-V Containers you will achieve more isolation and better security, but have a less efficient start-up and density compared to Windows Server Containers.

The following two pictures shows the difference between server virtualization and OS virtualization (Windows Server Containers)

Server Virtualization

OS Virtualization

So, what are the use cases for Windows Server Containers?

It is still early days with Windows Server 2016 Technical Preview 3 so things are subject to change.
However, there are things we need to start to think about right now when it comes to how to leverage containers.

If you take a closer look at Docker (which has been doing this for a long time already), you might get a hint of what you can achieve using container technology.

Containers aren’t necessarily the right solution for all kind of applications, scenarios and tools you may think of, but gives you a unique opportunity to speed up testing, development and to effectively enable DevOps scenarios that embraces continuous delivery.

Containers can be spun up in seconds and we all know that having multiple new “objects” in our environment can also lead to a demand of control and management that also introduces us for a new toolset.

I am eager to share more of my learning of Windows Server Containers with you, and will shortly publish part two of this blog series.


Thursday, April 30, 2015

VM Checkpoints in Windows Azure Pack

Fresh from the factory, Update Rollup 6 has been released and shipped by Microsoft.

This isn’t a blog post that will point out all the bug fixes and the amazing work all of the teams has been doing, but rather point you towards a highly requested feature, that finally made its way to the tenant portal in Windows Azure Pack.

With Update Rollup 6, we now supports creation and restore of Hyper-V checkpoints on virtual machines, provided by the VM Cloud Resource Provider.

Tenants that have deployed virtual machines may now create checkpoints and restore them on their own, without any interaction from the cloud provider.

Let us have a closer look at how this actually works, how to configure it and what additional steps you might want to take as part of this implementation.

Enabling create, view and restore of virtual machine checkpoints at the Hosting Plan level

Once the UR6 is installed for WAP and the underlying resource provider, you will notice some changes in the admin portal.

First, navigate to a Hosting Plan of yours – that contains the VM Cloud Resource Provider.
When you scroll down, you can see that we have some settings related to checkpoints.


Create, view and restore virtual machine checkpoints – will let the tenants that has subscriptions based on this hosting plan, be able to perform these actions on their virtual machines.

View and restore virtual machine checkpoints – let the tenants view and restore virtual machine checkpoints, but not create them. This can for example be performed by the cloud provider on an agreed schedule.

When you enable either of these options, an update job is taking place at the plan level and communicates the changes back to VMM, ensuring that the tenants will have permissions to take these actions in the tenant portal once it has completed.


If we switch over to the tenant portal, we can see that when we drill into one of the existing VMs (click on the VMàDashboard) we have some new actions available.


If you would manage checkpoints for your VM Roles, you can of course do that too, but you then have to drill into each specific instance, as the VM role potentially can have multiple instances when supporting scale-out.


To create a new checkpoint, simply click on Checkpoint and type the name of the checkpoint and eventually a description.


If we switch back to the fabric and VMM, we can see that a VMM job has completed with details about the checkpoint process for this specific tenant, with the name and description we typed.


If we would like to perform the same operation again, creating an additional checkpoint on the same virtual machine, we get a message telling us that the existing checkpoint will be deleted.


This is because that the current checkpoint integration in WAP will only keep one checkpoint, and avoid the scenario where you could potentially have a long chain of differential disks.

When we create the second checkpoint, we can switch back to VMM to see what’s actually happening:

First, a new checkpoint is created.
Second, the previous checkpoint is deleted.


When we explore the checkpoints settings on the VM itself afterwards, we see that we only have the latest checkpoint listed.


Regarding the restore process, we can also perform this from the same view in the tenant portal.
Once you click on the restore button, the tenant portal will show you the metadata of the available checkpoint, such as name, description and when it was created. Once you click the confirm button, the restore process will start in VMM.


Now what?

If you are familiar with how checkpoints in Hyper-V works, then you know that each static disk will  be either .vhd or .vhdx – depending on the format you are using (.vhdx was introduced with Windows Server 2012 and should be the preferred format, but Azure is still using .vhd).
Once you create a checkpoint, a new disk (.avhd or .avhdx) will be created– a differential disk, containing all the new write operations, while read operations will occur on both the parent disk (vhdx) and the newly created differential disk. 


To summarize, this might not be an ideal situation when it comes to performance, life-cycle management and storage optimization.

Since we don’t have any action in the tenant portal to perform a delete operation, this can be scary in some scenarios.
The fact that the VM will always run on a checkpoint once a checkpoint is created, means you will always be able to restore to your latest checkpoint from the portal.

In order to solve this challenge, we can leverage the integration of Service Management Automation in Azure Pack.
One of the best things with Azure Pack and the VM Cloud resource provider, is that we can extend it and create valued added solutions and services by linking certain actions happening in the tenant portal, to automated tasks that are executed by a SMA runbook in the backend.

The following screenshot shows that there’s an event related to creation of VMM Checkpoints performed by the tenant, which can easily be linked to a runbook.


Here’s an example of a runbook that will check for checkpoints created on VMs belonging to a specific VMM Cloud that is used in a Hosting Plan in WAP. If there’s any checkpoints that exists, they will be deleted and the VMs will have their disks merged back to a static disk (.vhd/.vhdx).
<#
   
.SYNOPSIS
Wokflow to check for - and eventually delete old VM checkpoints
  #> 

 workflow delete-scvmcheckpoint  
    # Connection to access VMM server. 
  
    $VmmConnection = Get-AutomationConnection -Name 'SCVMM'  
    $VmmServerName = $VmmConnection.ComputerName  
    
    inlinescript
{  

 # Import VMM module. 
Import-Module virtualmachinemanager  
         
# Connect to VMM server. 
Get-SCVMMServer -ComputerName $Using:VmmServerName  

$vms = Get-SCVirtualMachine | Where-Object {$_.Cloud -like "*Copenhagen IaaS*" -and  $_.VMCheckpoints }
      
       foreach ($vm in $vms)
    {
      
Get-SCVMCheckpoint -VM $vm | Remove-SCVMCheckpoint -RunAsynchronously
            
    }   

}-PSComputerName $VmmServerName -PSCredential $VmmCredential 

This simple code can so be added to a schedule that will execute this runbook on a daily basis – as an example, ensuring that no VMs in the cloud will run on a checkpoint on a long term.

Thanks for reading!


Sunday, October 5, 2014

Scratching the surface of Networking in vNext

The technical previews of both Windows Server and System Center is now available for download.
What’s really interesting to see, is that we are making huge progress when it comes to core infrastructure components such as compute (Hyper-V, Failover Clustering), storage and networking.

What I would like to talk a bit about in this blog post, is the new things in networking in the context of cloud computing.

Network Controller

As you already know, in vCurrent (Windows Server 2012 R2 and System Center 2012 R2), Virtual Machine Manager act as the network controller for your cloud infrastructure. The reasons for this have been obvious so far, but has also lead to some challenges regarding high availability, scalability and extensibility.
In the technical preview, we have a new role in Windows Server, “Network Controller”.


This is a highly available and scalable server role that provides the point of automation (REST API) that allows you to configure, monitor and troubleshoot the following aspects of a datacenter stamp or cluster:

·         Virtual networks
·         Network services
·         Physical networks
·         Network topology
·         IP Address Management

A management application – such as VMM vNext can manage the controller to perform configuration, monitoring, programming and troubleshooting on the network infrastructure under its control.
In addition, the network controller can expose infrastructure to network aware applications such as Lync and Skype.

GRE Tunneling in Windows Server

Working a lot with cloud computing (private and service provider clouds), we have now and then ran into challenges for very specific scenarios where the service providers want to provide their tenants with hybrid connectivity into the service provider infrastructure.

A typical example is that you have a tenant running VMs on NVGRE, but the same tenant also wants access to some shared services in the service provider fabric.
The workaround for this have never been pretty, but due to GRE tunneling in Windows Server, we have many new features that can leverage the lightweight tunneling protocol of GRE.

GRE tunnels are useful in many scenarios, such as:

·         High speed connectivity
This enables a scalable way to provide high speed connectivity from the tenant on premise network to their virtual network located in the service provider cloud network. A tenant connects via MPLS where a GRE tunnel is established between the hosting service provider’s edge router and the multitenant gateway to the tenant’s virtual network

·         Integration with VLAN based isolation
You can now integrate VLAN based isolation with NVGRE. A physical network on the service provider network contains a load balancer using VLAN-based isolation. A multitenant gateway establishes GRE tunnels between the load balancer on the physical network and the multitenant gateway on the virtual network.

·         Access from a tenant virtual networks to tenant physical networks
Finally, we can provide access from a tenant virtual network to tenant physical networks located in the service provider fabrics. A GRE tunnel endpoint is established on the multitenant gateway, the other GRE tunnel endpoint is established on a third-party device on the physical network. Layer-3 traffic is routed between the VMs in the virtual network and the third-party device on the physical network


No matter if you are an enterprise or a service provider, you will have plenty of new scenarios made available in the next release that will make you more flexible, agile and dynamic than ever before.
For hybrid connectivity – which is the essence of hybrid cloud, it is time to start investigate on how to make this work for you, your organization and customers.

Monday, September 1, 2014

Presenting at TechEd Barcelona 2014 - Windows Azure Pack

Hi everyone.
I just want to inform you that I will be presenting at TechEd in Barcelona in October.
This is truly an honor and I am really looking forward to meet my friends from all around the globe.

I have one session that is titled “Planning and Designing Management Stamps for Windows Azure Pack”.


This session will indeed focus on the underlying stamp that we turn into a resource provider for the VM Cloud in Azure Pack.
Throughout the entire session, I will share best practices, things you would like to know and also things you should already know.
This is where you will get the inside tips on how to design and build a management stamp to serve cloud computing with WAP, designed to scale and be fault tolerant.
In essence, I will be explaining and demonstrating my bread and butter and what I have done the last 12 months.

I really hope to see you there and if you have any questions upfront and would like to have answered during the session, please let me know.


Sunday, June 22, 2014

Microsoft Azure Site Recovery

In January, we had a new and interesting service available in Microsoft Azure, called “Hyper-V Recovery Manager”. I blogged about it and explained how to configure this on-premises using a single VMM management server. For details you can read this blog post: http://kristiannese.blogspot.no/2013/12/how-to-setup-hyper-v-recovery-manager.html

Hyper-V Recovery Manager provided organizations using Hyper-V and System Center with automated protection and orchestrating of accurate recovery of virtualized workloads between private clouds, leveraging the asynchronous replication engine in Hyper-V – Hyper – V Replica.

In other words, no data were sent to Azure except the metadata from the VMM clouds.
This has now changed and the service is renamed to Microsoft Azure Site Recovery that finally let you replicate between private clouds and public clouds (Microsoft Azure).

This means that we are still able to utilize the automatic protection of workloads that we are familiar with through the service, but now we can use Azure as the target in addition to private clouds.
This is also a door opener for migration scenarios where organizations considering moving VMs to the cloud, can easily do this with almost no downtime using Azure Site Recovery.

Topology

In our environment, we will use a dedicated Hyper-V cluster with Hyper-V Replica. This means we have added the Hyper-V Replica Broker role to the cluster. This cluster is located in its own host group in VMM and the only host group we have added to a cloud called “E2A”. Microsoft Azure Site Recovery requires System Center Virtual Machine Manager, which will be responsible for the communication and aggregation of the desired instructions made by the administrator in the Azure portal.


Pre-reqs

-          You must have an Azure account and add Recovery Services to your subscription
-          Certificate (.cer) that you upload to the management portal and register to the vault. Each vault has a single .cer certificate associated with it and it’s used when registering VMM servers in the vault.
-          Certificate (.pfx) that you import on each VMM server. When you install the Azure Site Recovery Provider on the VMM server, you must use this .pfx certificate.
-          Azure Storage account, where you will store the replicas replicated to Azure. The storage account needs geo-replication enabled and should be in the same region as the Azure Site Recovery service and associated with the same subscription
-          VMM Cloud(s). A cloud must be created in VMM that contains Hyper-V hosts in a host group enabled with Hyper-V Replica

-          Azure Site Recovery Provider must be installed on the VMM management server(s)
In our case, we had already implemented “Hyper-V Recovery Manager”, so we were able to do an in-place upgrade of the ASR Provider.
-          Azure Recovery Services agent must be installed on every Hyper-V host that will replicate to Microsoft Azure. Make sure you install this agent on all hosts located in the host group that you are using in your VMM cloud.

Once we had enabled all of this in our environment, we were ready to proceed and to the configuration of our site recovery setup.

Configuration


Login to the Azure management portal and navigate to recovery services to get the details around your vault, and see the instructions on how to get started.

We will jump to “Configure cloud for protection” as the fabric in VMM is already configured and ready to go.
The provider installed on the VMM management server is exposing the details of our VMM clouds to Azure, so we can easily pick “E2A” – which is the dedicated cloud for this setup. This is where we will configure our site recovery to target Microsoft Azure.


Click on the cloud and configure protection settings.


On target, select Microsoft Azure. Also note that you are able to setup protection and recovery using another VMM Cloud or VMM management server.


For the configuration part, we are able to specify some options when Azure is the target.

Target: Azure. We are now replicating from our private cloud to Microsoft Azure’s public cloud.
Storage Account: If none is present, then you need to create a storage account before you are able to proceed. If you have several storage accounts, then choose the accounts that are in the same region as your recovery vault.
Encrypt stored data: This is default set to “on”, and not possible to change in the preview.
Copy frequency: Since we are using Hyper-V 2012 R2 in our fabric – that introduced us for additional capabilities related to copy frequencies, we can select 30 seconds, 5 minutes and 15 minutes. We will use the “default” that is 5 minutes in this setup.
Retain recovery points: Hyper-V Replica is able to create additional recovery points (crash consistent snapshots) so that you can have a more flexible recovery option for your virtual workload. We don’t need any additional recovery points for our workloads, so we will leave this to 0.
Frequency of application consistent snapshots: If you want app consistent snapshots (ideally for SQL servers, which will create VSS snapshots) then you can enable this and specify it here.
Replication settings: This is set to “immediately” which means that every time a new VM is deployed to our “E2A” cloud in VMM with protection enabled, will automatically start the initial replication from on-premises to Microsoft Azure. For large deployments, we would normally recommend to schedule this.

Once you are happy with the configuration, you can click ‘save’.


Now, Azure Site Recovery will configure this for your VMM cloud. This means that – through the provider, the hosts/clusters will be configured with these settings automatically from Azure.
-          Firewall rules used by Azure Site Recovery are configured so that ports for replication traffic are opened
-          Certificates required for replication are installed
-          Hyper-V Replica Settings are configured
 Cool!

You will have a job view in Azure that shows every step during the actions you perform. We can see that protection has been successfully enabled for our VMM Cloud.


If we look at the cloud in VMM, we also see that protection is enabled and Microsoft Azure is the target.


Configuring resources

In Azure, you have had the option to create virtualized networks for many years now. We can of course use them in this context, to map with our VM networks present in VMM.
To ensure business continuity it is important that the VMs that failover to Azure are able to be reached over the network – and that RDP is enabled within the guest. We are mapping our management VM network to a corresponding network in Azure.


VM Deployment

Important things to note:
In preview, there are some requirements for using Site Recovery with your virtual machines in the private cloud.

Only support for Gen1 virtual machines!
This means that the virtual machines must have their OS partition attached to an IDE controller. The disk can be vhd or vhdx, and you can even attach data disks that you want to replicate. Please note that Microsoft Azure does not support VHDX format (introduced in Hyper-V 2012), but will convert the VHDX to VHD during initial replication in Azure. In other words, virtual machines using VHDX on premises will run on VHD’s when you failover to Azure. If you failback to on-premises, VHDX will be used as expected.

Next, we will deploy a new VM in VMM. When we enable protection on the hardware profile and want to deploy to a Cloud, intelligent placement will kick in and find the appropriate cloud that contains Hyper-V hosts/clusters that meet the requirements for replica.


After the deployment, the virtual machine should immediately start with an initial replication to Microsoft Azure, as we configured this on the protection settings for our cloud in Azure. We can see the details of the job in the portal and monitor the process. Once it is done, we can see – at a lower level that we are actually replicating to Microsoft Azure directly on the VM level.


After a while (depending on available bandwidth), we have finally replicated to Azure and the VM is protected.


Enabling protection on already existing VMs in the VMM cloud

Also note that you can enable this directly from Azure. If you have a virtual machine running in the VMM cloud enabled for protection, but the VM itself is not enabled in VMM, then Azure can pick this up and configure it directly from the portal.


If you prefer to achieve this by using VMM, it is easy by open the properties of the VM and enable for protection.


One last option is to use the VMM powershell module to enable this on many VMs at once.

Set-SCVirtualMachine –VM “VMName” –DRProtectionRequired $true –RecoveryPointObjective 300

Test Failover

One of the best things with Hyper-V Replica is that complex workflows, such as test failovers, planned failovers and unplanned failovers are integrated into the solution. This is also exposed and made available in the Azure portal, so that you easily can perform a test failover on your workloads. Once a VM is protected – meaning that the VM has successfully completed the initial replication to Azure, we can perform a test failover. This will create a copy based on the recovery point you select and boot that virtual machine in Microsoft Azure.


Once you are satisfied with the test, you can complete the test failover from the portal.
This will power off the test virtual machine and delete it from Azure. Please note that this process will not interfere with the ongoing replication from private cloud to Azure.


Planned failover

You can use planned failover in Azure Site Recovery for more than just failover. Consider a migration scenario where you actually want to move your existing on-premises workload to Azure, planned failover will be the preferred option. This will ensure minimal downtime during the process and start up the virtual machine in Azure afterwards.
In our case, we wanted to simulate planned maintenance in our private cloud, and therefore perform a planned failover to Azure.


Click on the virtual machine you want to failover, and click planned failover in the portal.
Note that if the virtual machine has not performed a test failover, we are recommending you to do so before an actual failover.
Since this is a test, we are ready to proceed with the planned failover.


When the job has started, we are drilling down to the lowest level again, Hyper-V Replica, to see what’s going on. We can see that the VM is preparing for planned failover where Azure is the target.


In the management portal, we can see the details for the planned failover job.


Once done, we have a running virtual machine in Microsoft Azure, that appears in the 
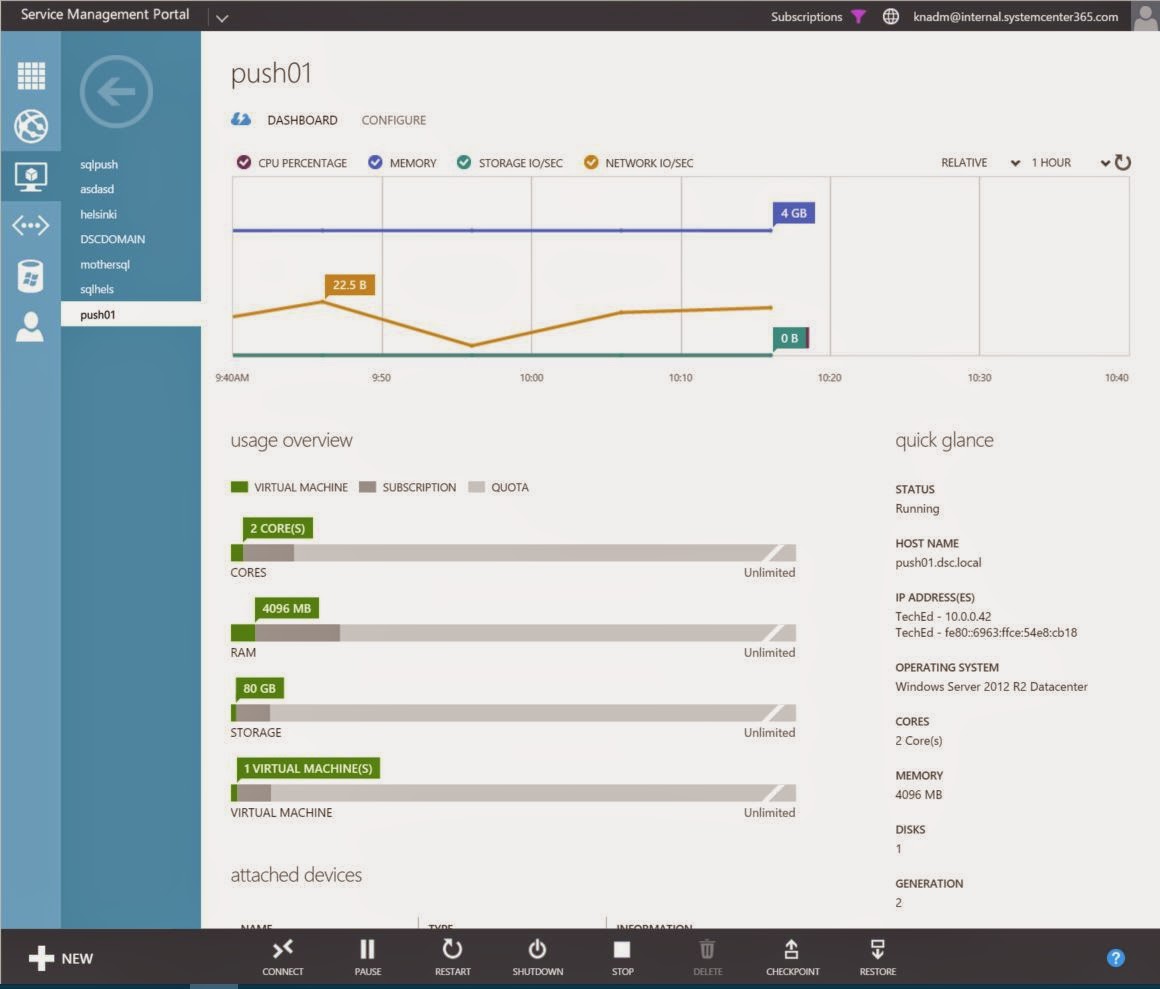
Virtual Machine list.


If we go back to the protected clouds in Azure, we see that our virtual machine “Azure01” has “Microsoft Azure” as its active location.


If we click on the VMs and drill into the details, we can see that we are able to change the name and the size of the virtual machine in Azure.


We have now successfully performed a planned failover from our private cloud to Microsoft Azure!

Failback from Microsoft Azure

When we were done with our planned maintenance in our fabric, it was time to failback the running virtual machine in Azure to our VMM Cloud.
Click on the virtual machine that is running in Azure that is protected, and click planned failover.
We have two options for the data synchronization. We can either use “Synchronize data before failover” that will perform something similar as “re-initializing replication” to our private cloud. This means synchronization will be performed without shutting down the virtual machine, leading to minimal downtime during the process.
The other option “Synchronize data during failover only” will minimize synchronization data but have more downtime as the shutdown will begin immediately. Synchronization will start after shutdown to complete the failover.
We are aiming for minimal downtime, so option 1 is preferred.


When the job is started, you can monitor the process in Azure portal.


Once the sync is complete, we must complete the failover from the portal so that this will go ahead and start the VM in our private cloud.
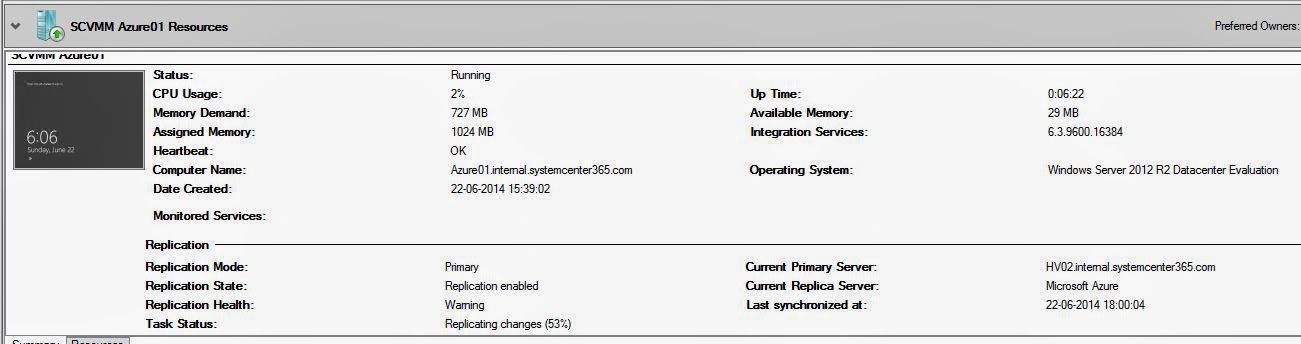


Checking Hyper-V Replica again, we can see that the state is set to “failback in progress” and that we currently have no primary server.


The job has now completed all the required steps in Azure.


Moving back to Hyper-V Replica, we can see that the VM is again replicating to Microsoft Azure, and that the primary server is one of our Hyper-V nodes.


In VMM, our virtual machine “Azure01” is running again in the “E2A” cloud


In the Azure management portal in the virtual machines list, our VM is still present but stopped.

Thanks for joining us on this guided tour on how to work with Azure Site Recovery.
Next time we will explore the scenarios we can achieve by using recovery plans in Azure Site Recovery, to streamline failover of multi-tier applications, LOB applications and much more.