Showing posts with label Networking. Show all posts

Monday, February 23, 2015

When your WAPack tenants are using VLANs instead of SDN

When your tenants are using VLANs instead of SDN

Ever since the release of Windows Azure Pack, I’ve been a strong believer of software-defined datacenters powered by Microsoft technologies. Especially the story around NVGRE has been interesting and something that Windows Server, System Center and Azure Pack are really embracing.

If you want to learn and read more about NVGRE in this context, I recommend having a look at our whitepaper: https://gallery.technet.microsoft.com/Hybrid-Cloud-with-NVGRE-aa6e1e9a

Also, if you want to learn how to design a scalable management stamp and turn SCVMM into a fabric controller for your multi-tenant cloud, where NVGRE is essential, have a look at this session: http://channel9.msdn.com/Events/TechEd/Europe/2014/CDP-B327

The objective of this blog post is to:

·        Show how you should design VMM to deliver – and use dedicated VLANs to your tenants
·        Show how to structure and design your hosting plans in Azure
·        Customize the plan settings to avoid confusion

How to design VMM to deliver – and use dedicated VLANs to your tenants

Designing and implementing a solid networking structure in VMM can be quite a challenging task.
We normally see that during setup and installation of VMM, people don’t have all the information they need. As a result, they have already started to deploy a couple of hosts before they are actually paying attention to:
1)      Host groups
2)      Logical networks
3)      Storage classifications
Needless to say, it is very difficult to make changes to this afterwards when you have several objects in VMM with dependencies and deep relationship.

So let us just assume that we are able to follow the guidelines and pattern I’ve been using in this script:

The fabric controller script will create host groups based on physical locations with child host groups that contains different functions.
For all the logical networks in that script, I am using “one connected network” as the network type.


This will create a 1:Many mapping of the VM network to each logical network and simplify scalability and management.

For the VLANs networks though, I will not use the network type of “one connected network”, but rather use “VLAN-based independent networks”.

This will effectively let me create a 1:1 mapping of a VM network to a specific VLAN/subnet within this logical network.

The following screenshot shows the mapping and the design in our fabric.


Now the big question: why VLAN-based independent network with a 1:1 mapping of VM network and VLAN?

As I will show you really soon, the type of logical network we use for our tenant VLANs gives us more flexibility due to isolation.

When we are adding the newly created logical network to a VMM Cloud, we simply have to select the entire logical network.
But when we are creating Hosting Plans in Azure Pack admin portal/API, we can now select the single and preferred VM Network (based on VLAN) for our tenants.

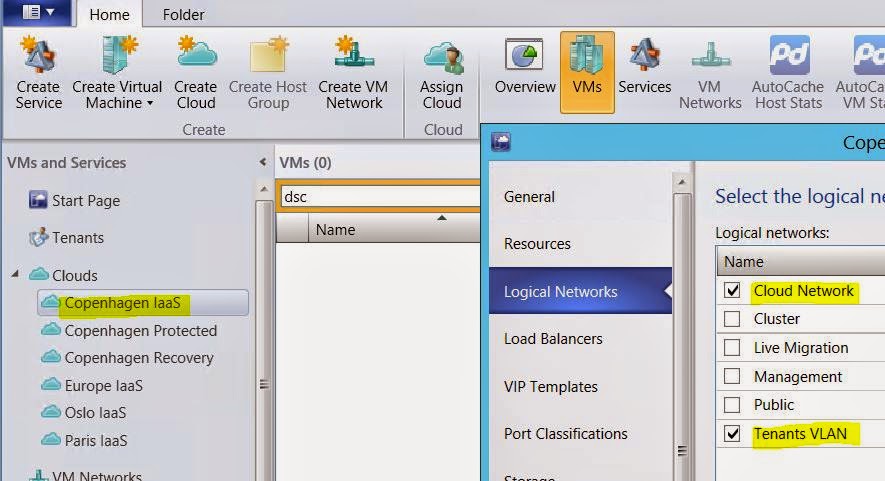
The following screenshot from VMM shows our Cloud that is using both the Cloud Network (PA network space for NVGRE) and Tenants VLAN.


So once we have the logical network enabled at the cloud level in VMM, we can move into the Azure Pack section of this blog post.

Azure Pack is multi-tenant by definition and let you – together with VMM and the VM Cloud resource provider, scale and modify the environment to fit your needs.

When using NVGRE as the foundation for our tenants, we are able to use Azure Pack “out of the box” and have a single hosting plan – based on the VMM Cloud where we added our logical network for NVGRE, and tenants can create and manage their own software-defined networks. For this, we only need a single hosting plan as every tenant is isolated on their own virtualized network.
Of course – there might be other valid reasons to have different hosting plans, such as SLA’s, VM Roles and other service offerings. But for NVGRE, everyone can live in the same plan.

This changes once you are using VLANs. If you have a dedicated VLAN per customer, you must add the dedicated VLAN to the hosting plan in Azure Pack. This will effectively force you to create a hosting plan per tenant, so that they are not able to see/share the same VLAN configuration.

The following architecture shows how this scales.


In the hosting plan in Azure Pack, you simply add the dedicated VLAN to the plan and it will be available once the tenant subscribe to this subscription.


Bonus info:

With the update rollup 5 of Azure Pack, we have now a new setting that simplifies the life for all the VLAN tenants out there!

I’ve always said that “if you give people too much information, they’ll ask too many questions”.
It seems like the Azure Pack product group agree on this, and we have now a new setting at the plan level in WAP that says “disable built-in network extension for tenants”.


So let us see how this looks like in the tenant portal when we are accessing a hosting plan that:

a)      Provides VM Clouds
b)      Has the option “disable built-in network extension for tenants” enabled


This will ease on the confusion for these tenants, as they were not able to manage any network artefacts in Azure Pack when VLAN was used. However, they will of course be able to deploy virtual machines/roles into the VLAN(s) that are available in their hosting plan.


Sunday, October 5, 2014

Scratching the surface of Networking in vNext

The technical previews of both Windows Server and System Center is now available for download.
What’s really interesting to see, is that we are making huge progress when it comes to core infrastructure components such as compute (Hyper-V, Failover Clustering), storage and networking.

What I would like to talk a bit about in this blog post, is the new things in networking in the context of cloud computing.

Network Controller

As you already know, in vCurrent (Windows Server 2012 R2 and System Center 2012 R2), Virtual Machine Manager act as the network controller for your cloud infrastructure. The reasons for this have been obvious so far, but has also lead to some challenges regarding high availability, scalability and extensibility.
In the technical preview, we have a new role in Windows Server, “Network Controller”.


This is a highly available and scalable server role that provides the point of automation (REST API) that allows you to configure, monitor and troubleshoot the following aspects of a datacenter stamp or cluster:

·         Virtual networks
·         Network services
·         Physical networks
·         Network topology
·         IP Address Management

A management application – such as VMM vNext can manage the controller to perform configuration, monitoring, programming and troubleshooting on the network infrastructure under its control.
In addition, the network controller can expose infrastructure to network aware applications such as Lync and Skype.

GRE Tunneling in Windows Server

Working a lot with cloud computing (private and service provider clouds), we have now and then ran into challenges for very specific scenarios where the service providers want to provide their tenants with hybrid connectivity into the service provider infrastructure.

A typical example is that you have a tenant running VMs on NVGRE, but the same tenant also wants access to some shared services in the service provider fabric.
The workaround for this have never been pretty, but due to GRE tunneling in Windows Server, we have many new features that can leverage the lightweight tunneling protocol of GRE.

GRE tunnels are useful in many scenarios, such as:

·         High speed connectivity
This enables a scalable way to provide high speed connectivity from the tenant on premise network to their virtual network located in the service provider cloud network. A tenant connects via MPLS where a GRE tunnel is established between the hosting service provider’s edge router and the multitenant gateway to the tenant’s virtual network

·         Integration with VLAN based isolation
You can now integrate VLAN based isolation with NVGRE. A physical network on the service provider network contains a load balancer using VLAN-based isolation. A multitenant gateway establishes GRE tunnels between the load balancer on the physical network and the multitenant gateway on the virtual network.

·         Access from a tenant virtual networks to tenant physical networks
Finally, we can provide access from a tenant virtual network to tenant physical networks located in the service provider fabrics. A GRE tunnel endpoint is established on the multitenant gateway, the other GRE tunnel endpoint is established on a third-party device on the physical network. Layer-3 traffic is routed between the VMs in the virtual network and the third-party device on the physical network


No matter if you are an enterprise or a service provider, you will have plenty of new scenarios made available in the next release that will make you more flexible, agile and dynamic than ever before.
For hybrid connectivity – which is the essence of hybrid cloud, it is time to start investigate on how to make this work for you, your organization and customers.

Wednesday, April 9, 2014

Hybrid Cloud with NVGRE (Cloud OS) - Updated Whitepaper

Hi everyone!

It's been quite the last weeks, right? But hopefully you should be able to understand why, after looking into our updated whitepaper.

We have published our updated whitepaper that also covers Windows Azure Pack!

You can download the whitepaper by using the same link as always, available here:

http://gallery.technet.microsoft.com/Hybrid-Cloud-with-NVGRE-aa6e1e9a

Looking forward to your feedback!

A big thank you to Marc, Flemming, Stan, Daniel and Damian!

Monday, February 24, 2014

Configuring Metrics and Static Routes for your virtualization gateways

After we published our whitepaper, I have been working with many enterprise organizations and service providers in order to deliver a successfully NVGRE implementation.
The journey has been great and interesting, and I know for sure that the whitepaper should get updated very soon with additional tricks & tips.

Recently, we had a scenario where the gateway VMs would require default gateways for both management and front-end.
This caused some issues at first, and the result is as follow:

If you have default gateway configured on the routable management network, VMM and the gateway VM can communicate and is quite happy with that.

If you have default gateway configured on the front-end network (the one that faces the internet), then the tenants should get internet access and are quite happy with that.
The problem is that the gateway VM without any metric is not able to determine the correct route every time, so your tenants will most likely not get a successful connection to internet.

A quick cmdlet to check the routes on your gateway VM ( route print) should show you the desired route to 0.0.0.0. if this is the management network, you will have problems.
The solution is to add metrics so that the gateway VM can ensure connectivity to the right networks.

Metric for management gateway: 300
Metric for front-end gateway: 200

In addition, we ended up with static routes for the gateway VM, for the different networks.
This lead to a stabile NVGRE environment where the gateway VM could continue to be managed by VMM, and the tenants could have a stable internet connection.

Management
route add 10.0.0.0 mask 255.255.255.0 10.0.0.1 METRIC 300

Front-end

route add 0.0.0.0 mask 0.0.0.0 77.233.248.1 METRIC 200

Wednesday, September 4, 2013

Announcing the "Hybrid Cloud - with NVGRE (WS SC 2012 R2)" white paper

Announcing the NVGRE white paper

Ever since WS 2012 was in preview, the Hyper-V fans have been celebrating the opportunities for network virtualization.
First in VMM 2012 SP1 Beta, we saw there were two options to manage and implement network virtualization. IP-rewrite and NVGRE. Now, NVGRE is the standard that is implemented with Windows Server 2012 and System Center 2012 SP1 – Virtual Machine Manager.
However, the hybrid cloud story wasn’t complete. A critical component was missing to make the scenario production ready.

As Microsoft announced during TechEd this year, we will have a native virtualization gateway shipped together with Windows Server 2012 R2. The entire network virtualization can be implemented and managed by Virtual Machine Manager in System Center 2012 R2.
This did indeed increase the interest around network virtualization with technology from Microsoft, with no need for third party solutions to fulfill the story. Many users from around the world have been asking questions in the forums related to network virtualization in the past, and especially about virtualization gateway since this is available in Windows Server 2012 R2. To address this to the community, we decided to write a white paper that should be helpful for real world implementations.

Together with some fellow MVP’s, Flemming Riis and Stanislav Zhelyazkov, we started to deploy a new datacenter with the R2 preview bits in order to fulfill the Hybrid Cloud story.
We have not only deployed the solution, but we have also been breaking it apart to detect dependencies, eventual bugs, and concerns related to real world scenarios.

We are looking forward to finish the document in a couple of days, and we hope you will find it useful.

Wednesday, July 3, 2013

Building the Network Virtualization Gateway - Service Template (SCVMM 2012 R2)

As I promised, I will show how easy you can create a service template for the native virtualization gateway in Windows Server 2012 R2, and deploy it with SCVMM 2012 R2 in this blog post.

First of all, you’ll need a sysprep’ed virtual machine with Windows Server 2012 R2.
This is the basic building block you will use for this service.

Next, follow this recipe to create you network virtualization gateway Service Template.

1)      Navigate to the Library pane in your SCVMM console.

2)      Click on Service Templates, and ‘create service template’ from the ribbon menu. This will launch the service template designer for you.

3)      Assign a name to your service template, version, and the pattern you would like to use. As you can see, you can have some directions from Microsoft regarding how to create a multi-tier service or simply start with a blank service template. In my case, I would like to start with a blank service, and add the needed VM template directly in the designer (drag and drop in the canvas)


4)      Make sure your VM template has enough NICs presented, for connecting both to the internet and the management network. Ideally, the service template should have three NICs. Connect the to the right VM networks.


5)      Next, we must leverage the powerful settings within the guest OS profile, so click on your service tier instance in the canvas, and navigate to the OS configuration


6)      Assign a name to the tier (use double hash for being able to increment as you plan to scale).


7)      Click on Roles and Features to configure the actual Windows Server. To configure this as a network virtualization gateway, we must enable the following roles:
Remote Access > DirectAccess and VPN (RAS), Routing


8)      Second, we must enable the following features:
Remote Access Management Tools > Remote Access GUI and Command-Line Tools, Remote Access module for Windows PowerShell

9)      Clic save and validate before you continue, as this will check the service for any errors and misconfiguration.

10)   Click ‘Configure Deployment’ from the ribbon. Choose destination for this service and assign a service name. (Remember that you must deploy this service on a dedicated physical Hyper-V host). Click OK and continue.

11)   If any errors appear on this screen (complaining about there is no suitable host, please click on the tier and then ‘ratings’ to get the details. Eventually go back to the canvas and fix these errors before you proceed with your deployment. If everything is in order, you can click ‘Deploy service’.

12)   When the deployment has completed, please follow this guide on how to add your virtualization gateway to your fabric in SCVMM: http://kristiannese.blogspot.no/2013/06/how-to-add-your-virtualization-gateways.html

We could always use some powershell scripts together with this service, to have consistent naming of NICs and so on, but please consider this blog post as 'fast publishing'. More details will come.

-kn

Tuesday, July 2, 2013

How to integrate IPAM with SCVMM 2012 R2

Integrating IPAM with SCVMM 2012 R2

This blog post will show how to integrate your IPAM infrastructure together with System Center Virtual Machine Manager 2012 R2.

For us who have been working quite a bit with the cloud infrastructure and fabric over the years, have noticed absence of integrated IP management. During projects, you will at some point need to know about the fabric infrastructure, and which IP’s, subnets, VLANs and so on to use.
It’s possible to model everything within VMM and have a single view into the relevant portions of your network infrastructure, however, the other way around has been painful.
So at one point, the network guys and the virtualization/cloud guys must sit down and have a chat with each other about this subject.

IPAM offers a unified, centralized administrative experience for network administrators to manage IP address space on a corporate network and in Microsoft-powered cloud networks.
The integration between IPAM and SCVMM 2012 R2 provides end-tp-end IP address space automation for your cloud networks. This means that a single IPAM server can detect and prevent IP address space conflicts, duplicates, and overlaps across multiple instances of SCVMM 2012 R2 deployed in the large datacenters (think fabric stamps).

1)     Navigate to the Fabric pane within the SCVMM console, right click on Network service and add a net Network service.

2)     Assign a name to your network service and eventually a description. Click next to continue.

3)     Specify manufacturer and model of network service. In this case the manufacturer is Microsoft, and the model is Microsoft Windows Server IP Address Management. Click next to proceed.


4)     Specify a Run as account that have access to your IPAM server role and continue by clicking next.


5)     The connection string should be the FQDN of your IPAM server. Click next.


6)     Test the configuration provider and ensure that the tests are passed for being able to add your IPAM server.


7)     Associate the network service with your desired host groups, and click next and finish to complete the wizard.


We have now integrated SCVMM 2012 R2 with IPAM, and can switch over to our IPAM server to see the data here.


As we can see, I have now all my logical networks and VM networks exposed in IPAM, and is also able to manage them from IPAM. This integration is bi-directional, and let the network admins have better control and view into the virtualization environment.


I will work in this area from now on to explore some of the possibilities here. Stay tunes.

Sunday, June 30, 2013

How to add your virtualization gateways to SCVMM 2012 R2

Network Management with datacenter abstraction layer (SCVMM 2012 R2)

This blog post will show some of the cool new stuff related to network virtualization, and especially the support of network virtualization gateways through standard based management with SCVMM 2012 R2 and Windows Server 2012 R2.

The Software Defined Datacenter story was alright, but not good with Windows Server 2012  and System Center 2012 SP1.
My personal take on that, was mostly because of the third party requirements for virtualization gateways. Cisco have been working on some stuff, and so have many others.
However, Microsoft has listened to the feedback from their partners and customers, and made this native in both products.
You can now have your own virtualization gateway running in a VM (Windows Server 2012 R2) and manage it, end-to-end with Virtual Machine Manager 2012 R2.

First of all: You must have a dedicated physical Hyper-V server for this in your fabric, which is hosting the virtual machines with the RRAS role installed.
This Hyper-V host should be considered as an edge server, and not joined to the domain.
The virtual machines hosting the RRAS role should be joined to the domain and can be highly available in a cluster, and this is quite critical for production environments.

If you have structured your host groups in VMM very well, it could look something like this:

Next, let us add the Network Virtualization Gateway to the fabric in VMM.

1.       Navigate to the fabric pane in the VMM console, expand Network and right click Network Service to add a new network service


2.       Give your network service a name and a proper description.


3.       Specify manufacturer and model of the network service. Default, this is Microsoft and we must select the proper Model. You can see from the drop down list that you can add Microsoft Standards-Based Network switches, that will let you manage your switches and TOR switches. Microsoft Windows Server IP Address Management (IPAM) for a better integration with your entire Windows network infrastructure, and last but not least; Microsoft Windows Server Gateway.


4.       Specify your Run As account that have permission on the VM to install the VMM agent and configure the network service


5.       Specify the connection string. You can see the example in this step of the wizard. We need the VM host (in my case, it is TomWaits), and the RRASServer, which is the name of the virtual machine with the RRAS role installed. My RRAS server is NVGRE. Click next to proceed.


6.       If the connection string would have included any ports for SSL, a certificate may have been required. In my case, this doesn’t apply.


7.       Test and validate the network service configuration provider. This will run basic validation tests of the provider. Click test and verify that the critical tests are passed, and the others are implemented. Click next to proceed.


8.       Specify the host groups for which the network service will be available. In my case, I want all of my hosts groups to have access to this service. Click next twice, and VMM will add the network service to fabric.


9.       The last step that needs to be done, is to specify the configuration of each network connection on the virtualization gateway.

10.   Go back to fabric, network service and right-click on your virtualization gateway to list the properties. Click on connectivity and select both front end connection and back end connection. We will dive more into this in the next blog post.


Hopefully, this blog post shown how easy it was to leverage the standard based management experience of network virtualization gateways with SCVMM 2012 R2.

My next blog post will focus more on network virtualization gateways, and how to create the service template for network virtualization gateways.


Sunday, February 10, 2013

Configure NIC teaming and QoS with VMM 2012 SP1

This is a hot topic in these days.

Windows Server 2012 supports NIC teaming out of the box, and this gives us finally some flexible design options when it comes to Hyper-V and Hyper-V Clustering.

In a nutshell, NIC teaming gives us:

·         Load Balancing

·         Failover

·         Redundancy

·         Optimization

·         Simplicity

·         Bandwidth Aggregation

·         Scalability

Requirements for NIC teaming in Windows Server 2012

NIC Teaming requires at least one single Ethernet network adapter, that can be used for separating traffic that is using VLANs. If you require failover, at least two Ethernet network adapters must be present. Up till 32 NICs is supported in Windows Server 2012 NIC teaming.

Configuration

The basic algorithms that’s used for NIC teaming is switch-independent mode where the switch doesn’t know or care that the NIC adapter is participating in a team. The NICs in the team can be connected to different switches.

Switch-dependent mode require that all NIC adapters of the team are connected to the same switch. The common choices for switch-dependent mode is Generic or static teaming (IEEE 802.3ad draft v1) that requires configuration on the switch and computer to identify which links form the team. This is a static configuration so there is no additional assistance to detect incorrectly plugged cables or odd behavior.

Dynamic teaming (IEE 802.1ax, LACP) uses the Link Aggregation Control Protocol to dynamically identify links between the switch and the computer, which gives you the opportunity to automatically create the team, as well as reduce and expand the team.

Traffic distribution algorithms

There are two different distributions methods that Windows Server 2012 supports.

Hashing and Hyper-V switch port.

Hyper-V switch port

When virtual machines have independent MAC addresses, the MAC address provides the basis for dividing traffic. Since the switch can determine the specific source MAC address is on only one connected network adapter, the switch will be able to balance the load (traffic from the switch to the computer) on multiple links, based on the destination MAC address for the VM.

Hashing

Hashing algorithm creates a hash based on components of the packet, and assign packets with the hash value to one of the available network adapters. This ensures that packets from the same TCP stream are kept on the network adapter.

Components that can be used as inputs to the hashing functions include the following:

·         Source and destination IP addresses, with or without considering the MAC addresses (2-tuple hash)

·         Source and destination TCP ports, usually together with the IP addresses (4-tuple hash)

·         Source and destination MAC addresses.

To use NIC teaming in a Hyper-V environment, there are some nice new features available in powershell to separate the traffic with QoS.

More information about this can be found at http://technet.microsoft.com/en-us/library/jj735302.aspx

The scenario I’ll demonstrate in VMM is using NIC teaming with two 2GBe modules on the server.

Overview

·         We will create a single team on the host

·         We will create several virtual NICs for different traffic, like SMB, Live Migration, Management, Cluster and Guests

System Center Virtual Machine Manager is the management layer for your virtualization hosts, and Service Pack 1 will support management of Hyper-V hosts in Windows Server 2012. This will also include the concept of converged fabric and network virtualization.

The catch is that you must create the team with Virtual Machine Manager. If the team is created outside of VMM, VMM will not be able to import the configuration properly, and reflect the changes you make.

Pre-requisites

Create LACP trunk on physical switches

Set default VLAN if not 1

Allow required VLANs on trunk

Configure Logical Networks in Fabric

This is the first mandatory step.

1.       Create logical networks for all the actual networks you will be using. This means management, cluster, live migration, iSCSI, SMB and so on. Configure sites, VLAN/Subnet and eventually IP Pools for those networks, so that VMM can assign IP addresses to the vNics you will create.

For all your routable networks, configure default gateway, DNS suffix and DNS in the pool.

2.       Associate the logical networks with your physical network adapters on your hosts

Configure VM Networks using the Logical Networks created in Fabric

1.       Navigate to VMs and Services within the VMM console

2.       Right click on VM Networks and select create VM Networks


3.       Assign the VM Network a name, reflecting the actual logical network you are using, available from the drop down list and click next

4.       Select No Isolation, since we will be using the actual network as the basis in this configuration

5.       Click finish, and repeat the process for every network your will use in your configuration

Configure Native Port Profiles

We will create Native Port Profiles both for the physical NICs used in the team, and the vNics, and group the profiles in a logical switch that we will apply to the hosts.

Creating Uplink Port Profile

1.       Navigate to Native Port Profiles in Fabric, right click and create new Native Port Profile

2.       Select ‘Uplink Port Profile’ first and choose algorithms for configuration and distribution. I will use switch independent and HyperVPort

3.       Select the appropriate network sites, and enable network virtualization if that’s a requirement. This will instruct the team that network virtualization should be supported, and enable the network virtualization filter driver on the adapter.

4.       Click finish

Creating virtual network adapter port profile

1.       Repeat the process, and create a new Native Port Profile

2.       Select ‘Virtual network adapter port profile’ and assign a name. We will repeat this process for every vNIC we will need in our configuration, reflecting the operation we did with VM networks earlier

3.       Go through the wizard and select offload settings and security settings for the vNIC you will use for virtual machines, and specify bandwidth (QoS) for the different workloads 

Repeat this process for every vNIC

Creating Port Classifications

1.       We need to classify the different vNICs, so navigate to Port Classification in Fabric, right click, and select ‘Create new Port Classification’.

2.       Assign a name and eventually a description.

Repeat this process for every vNIC

Creating Logical Switch

The logical switch will group our configuration, and simply the creation of NIC teaming and vNICs on the hosts.

1.       In Fabric, right click on Logical Switch, and select ‘Create new Logical Switch’.

2.       Assign a name and click next

3.       Choose the extensions you want, and click next

4.       Specify which uplink profiles that should be available for this logical switch. Here you can decide if the logical switch should support teaming. If so, enable ‘team’ and add the uplink profile you created earlier, and click next.

5.       Specify the port classifications for virtual ports part of this logical switch. Add the virtual network adapter port profiles, with their corresponding port classifications you created earlier, in this step of the wizard. Click next and finish.

You have now created a logical switch that you will apply to your Hyper-V hosts

Creating a Logical Switch and virtual network adapters on your Hyper-V hosts

Navigate to your hosts in Fabric, right click and click properties.

1.       Navigate to ‘Virtual Switches’ on the left, and click ‘New Virtual Switch’ and select ‘New Logical Switch’.

2.       Select the Logical Switch you created earlier in the drop down list, and add the physical adapters that should be joining this team.

3.       Click ‘New Virtual Network Adapter’ and give the vNIC a name, select VM Network for connectivity (created earlier), enable VLAN, assign IP configuration (choose static if you want VMM to handle this from the IP pool), and select port profile.

Repeat this process and create a new virtual network adapter for all your vNICs and map them to their corresponding networks and profiles.
Important: If you want to transfer the IP address that's currently used as management IP to a virtual network adapter, remember to mark the option 'This virtual network adapter inherits settings from the physical management adapter'.

 Once you have configured this, click ‘OK’ and VMM will create the team and it’s vNICs on the host.

For the management vNIC, you can assign the IP address you are currently using on the physical NIC, and VMM will place this on the vNIC during creation.

You have now created converged fabric using VMM, and enabled your hosts to leverage network virtualization.

I would like to thank Hans Vredevoort for the healthy discussions we're having on the topic, and providing me with insight and tips for the configuration. Hans Vredevoort is a Virtual Machine MVP based in Holland and is one of the most experienced fellow I know when it comes to Fabric (servers, storage and networking). He was formerly a Cluster MVP, but has now devoted his spare time to participate in the VM community. Read his useful blogs at hyper-v.nu