Hyper-V Recovery Manager with single VMM server topology
Recently, Microsoft announced that a single VMM server
will be sufficient in order to take advantage of Hyper-V Replica – a software
as a service offering from Windows Azure, that will orchestrate DR workflows in
your on-premise cloud infrastructures, managed by System Center 2012 R2 –
Virtual Machine Manager.
This is a huge step in the right direction, in order to
ensure HVR adoption for customers and partners.
The requirement of having two VMM infrastructures would
not only be an additional cost, but also lead to administrative overhead and
complexity, since a Hyper-V host can only be managed by a single VMM management
server at a time.
This blog post will focus on:
·
Setup of the HVR agent on the VMM Management
server
·
Creation of DR Cloud within VMM
·
Configuration of DR in HVR
·
Orchestration with HVR and VMM
Setup of the HVR
agent on the VMM Management server
Before we can go ahead and deploy HVR into our
environment, the following requirements must be met.
Hyper-V Recovery Manager prerequisites:
·
Windows Azure account. You will need an Azure
account with the recovery services feature enabled.
·
.CER certificate that must be uploaded as a management
certificate containing the public key to the Hyper-V Recovery vault, so that
the VMM server can be registered with this vault. Each vault has a single .cer
certificate that complies with the certificate prerequisites.
·
.PFX file. The .cer certificate must be exported
as a .PFX file (with the private key), and you will import it on each VMM
server that contains virtual machines that you want to protect. This blog post
will only use a single VMM server.
VMM server prerequisites:
·
At least one VMM server running on System Center
2012 SP1 or System Center 2012 R2 (this blog post will demonstrate 2012 R2)
·
If you are running one VMM server, it will need
two clouds configured (where the DR will occur between the clouds). If you have
two or more VMM servers, at least one cloud should be configured on the source
VMM server you want to protect, and one cloud on the destination VMM server
that you will use for recover. The primary cloud you want to protect must
contain the following:
o One
or more VMM host groups
o One
or more Hyper-V hosts servers in each host group
o One
or more Hyper-V virtual machines on each Hyper-V host
·
If you want virtual machines to be connected to
a VM network after failover, you configure network mapping in Hyper-V Recovery
Manager.
Once the certificate is uploaded to HVR, you can download
the latest provider that you should install on your VMM management server
The installation process will require that you stop the
System Center Virtual Machine Manager service prior to install, as there will
be changes made to the GUI as well as extra functionality on the server
During the installation, you must point to the .pfx file
of your .cer certificate and map it with the vault created in Windows Azure
Hyper-V Recovery Manager.
Specify the VMM server name, and enable ‘Synchronize
cloud data with the vault’. For you information, there will only be metadata
that is shipped from VMM to Windows Azure.
Once the setup has completed, the setup can start the VMM
server service again, and you can open the VMM console.
The next thing we will do, is to create clouds in VMM.
Creation of DR
Cloud within VMM
A cloud is an abstraction of your physical fabric
resources, like virtualization hosts (host groups), networks, storage, library
resources, port classifications, load balancers and eventually the user actions
that you permits.
Create at least two clouds (one for production and one
for DR) where you enable DR on both of them. This option is available when you
assign a cloud name and a description
Also, please note that the capability profile that
contains ‘Hyper-V’ should be selected as part of the cloud. This is a
requirement so that only virtual machines tagged for Hyper-V, can participate
in the DR workflows that is solely depending on Hyper-V as the hypervisor.
Now, if we look at the HVR service in Windows Azure
again, under protected items, we should see both of our clouds listed
Note that there are currently no virtual machines enabled
for protection, although there could be virtual machines running in these
clouds.
If we check the clouds in VMM, we can see that status for
protection shows ‘disabled’
Configuration of
DR in HVR
To complete the configuration of the HVR service, we must
continue to work in the Windows Azure Portal.
Click on your cloud under protected items, that should be
seen as the primary cloud (running the primary workload).
In order to complete the configuration, click configure
protection settings.
This will let you configure the replication location and frequency.
If you are familiar with Hyper-V Replica, you will
recognize the options here.
Target location:
this will be your VMM server
Target cloud:
this will be the DR cloud you created in VMM, that will receive replication
from the primary cloud, running the primary workload.
Copy frequency:
Choose between 5 minutes (default, 30 seconds and 15 minutes – which was
introduced with Windows Server 2012 R2 – Hyper-V.
Additional
recovery points: Default is zero, but you can have in total 15 recover
points.
Frequency of
application-consistent snapshots: Hyper-V Replica does also support app-consistent snapshots in addition to
crash consistent snapshots. This is ideally for SQL servers and other critical
applications enabled for DR with HVR.
Data transfer
compression: default is ON, so
that the data is compressed during replication.
Authentication:
Certificate and Kerberos is the option. HVR will let you use certificates so
you can replicate between different domains if you would like, without any
trust.
Port: 8084 is
the default port, and a firewall rule will be enabled on the Hyper-V hosts in
primary and recovery clouds to allow access to this port
Replication
Method: Over the network is default – and recommended, but offline is also
an option.
Replication start
time: Immediately – which is good when you have the bandwidth. An initial
replication will copy and replicate the entire virtual machine (with its
virtual hard disks) to the recovery site. A good idea might be to schedule this
to happen during night, for example.
Once you have completed the configuration, click ‘Save’.
This will initiate a job in your VMM and Hyper-V
infrastructure that will pair clouds, prepare the VMM server(s) and clouds for
protection configuration, and configure the settings for the clouds to start
protecting virtual machines.
Once the job has completed, go back to protected items in
the Azure portal and verify that DR is enabled for your clouds.
We must also map some resources in order to streamline
the potential failovers between our cloud.
If you have worked with Hyper-V Replica, you may remember
that after you have enabled initial replication on a new virtual machine, the
wizard will send you to the virtual NIC interface on the hardware profile, so
that you can configure an alternative IP configuration for the VM.
This setting in HVR let us do this at scale, so that
network A on the primary cloud could always be mapped to network A2 on the DR
cloud, for instance.
Click on ‘resources’ in the portal, and map your
networks.
It is important that these networks are available in the
cloud configuration in VMM in order to show up here.
Next, let us enable DR on our virtual machines running in
the primary cloud.
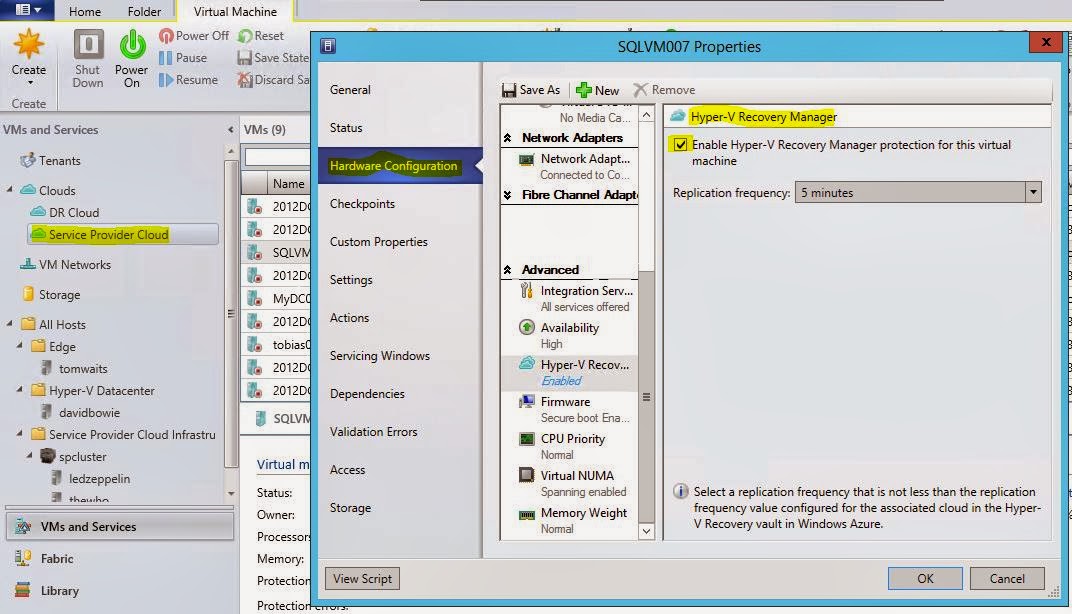
In VMM, we will notice a new option under ‘Advanced’ on
the hardware tab on the virtual machines.
The screenshot below shows a virtual machine running in
my ‘Service Provider Cloud’ which is the primary cloud, where I enable DR.
Once this has completed, the virtual machine’s metadata
should be exposed in HVR and ready to use in a recovery plan.
Note: if DR
should be considered as mandatory in your environment, a good tip would be to
tag the hardware profiles on your templates to be enabled for Hyper-V on the
capability profile, as well as DR enabled under advanced. Then all newly
created virtual machines based on your templates, will be available in the
recovery plans in HVR. Also note that if Hyper-V Replica Broker is in use (in a
Hyper-V Cluster), you can’t use protection on VMs that are not configured as
highly available, running locally on one of the nodes.
Back in the portal, we must create a recovery plan.
Creating Recovery
Plans in HVR
Now that we have a VM enabled for protection, it is time
to create one or several recovery plans.
A recovery plan gathers virtual machines into groups and
specifies the order in which the groups fail over. Virtual machines you select
will be added to the default group (Group 1). After you create the recovery
plan, you can customize it and add additional groups.
This is very useful if you have distributed applications
(everyone have this!) or specific workload you would like to group. The power
of HVR is the ability to orchestrate and facilitate the failovers.
Click on recovery plans in the portal, and start the
wizard to create a new one.
First, you must select source and target. In my example,
since using only a single VMM server, I can use the same on both source and
target. Specify a name and continue.
Select virtual machines that should participate in the
recovery plan. We can see the VM I enabled previously at this stage.
Once the job has completed, you should have successfully
enabled a recovery plan for the virtual machine(s) and is able to perform the
workflows like failover (planned, unplanned) and test failover.
Thanks for reading – and in the next blog post or so, we
will look closer at DR operations at scale and how to use groups together with
recovery plans to meet critical business requirements.
Happy new year!