Showing posts with label Orchestrator. Show all posts

Wednesday, February 27, 2013

Windows Azure Services for Windows Server 2012 - We're getting there!


Windows Azure Services for Windows Server 2012 – Useful

A couple of months ago, I blogget about project “Katal” – or Windows Azure Services for Windows Server 2012 as it’s officially called.


I’ve been working close with a couple of service providers lately, and many of them have shown deep interest of this beautiful portal with such a rich user experience.

To get it straight, it is the same experience as you get on windowsazure.com

This blog post is just a teaser to get you interested to play with it on your own, showing how the tenant portal presents stuffs to the tenant administrator, while Orchestrator with SPF, Virtual Machine Manager and Windows Server 2012 with Hyper-V are running the show in the background.

First of all, the tenants access the portal and signs-up using one of my available stamps that I have made public.
They will get an e-mail with logon information – and yes, I can secure this so that they would have to authenticate themselves prior to getting access.

Once this is done, they can logon to the portal, getting the same guidance as you would get the first time you logon to windowsazure.com
As an experienced cloud guy, I would start by creating a virtual network before I deploy some virtual machines.


As you can see, I am planning to scale a bit, so I got just a few IP addresses there ;-)
 

Next, I’ll deploy a virtual machine based on a template I have created in VMM and made available as part of my stamp.

As you can see, I have created VM network and is currently deploying a virtual machine.
 

What’s going on under the hood?

If we take a look at the VMM side, we can first look for some new user roles.

The portal creates these when the tenants have signed up for a stamp.

Next, we can see at our VM networks. We have now a new VM network that is based on a logical network. This is something the VMM administrator will configure during the network fabric setup.
 

And last, the virtual machine is deployed to the cloud we have made available in the portal.
 
That's all for now, but I will cover the details over the next blog posts, to hopefully get you started with Windows Azure Services for Windows Server 2012. If you have any questions, feel free to comment on this post.
 
-kn

Wednesday, October 24, 2012

SQL 2012 AlwaysOn + IP for Azure in Orchestrator 2012 SP1


Just a quick heads up for something interesting in this blog post.

1.       Learn how to configure SQL 2012 AlwaysOn for your VMM 2012 SP1 database


2.       Download and test the Integration Pack for Orchestrator 2012 SP1 that let you manage your virtual machines, services etc in Windows Azure.


Overview

​The Integration Pack for Windows Azure enables you to automate Windows Azure operations related to certificates, deployments, hosted services, storage, and virtual machines.

Feature Summary
The Integration Pack includes the following activities:

  • Azure Certificates- the Azure Certificates activity is used in a runbook to add, delete, and list management and service certificates
  • Azure Deployments- the Azure Deployments activity is used in a runbook to create, delete, get, and swap deployments, change deployment configurations, update deployment statuses, rollback an update or upgrade, get and change deployment operating systems, upgrade deployments, walk upgrade domains, and reboot and reimage role instances
  • Azure Cloud Services- the Azure Cloud Services activity is used in a runbook to create, delete, and get cloud services, check cloud service name availability, and create affinity groups
  • Azure Storage- The Azure Storage activity is used in a runbook to create, delete, update, and list storage accounts, get storage account properties, get and regenerate storage account keys, create, list, and delete containers, and put, copy, delete, list, snapshot, and download blobs
  • Azure Virtual Machine Disks- the Azure Virtual Machine Disks activity is used in a runbook to add, delete, update, and list virtual machine disks and virtual machine data disks
  • Azure Virtual Machine Images- the Azure Virtual Machine Images activity is used in a runbook to add, delete, update, and list virtual machine operating system images
  • Azure Virtual Machines- the Azure Virtual Machines activity is used in a runbook to create virtual machine deployments, download virtual machine remote desktop files, as well as get, delete, start, restart, shutdown, capture, and update virtual machine roles


Monday, October 22, 2012

Working with runbooks in Orchestrator


Working with runbooks

With the new kind of science, which you get from Orchestrator, people are often amazed when they see this engine in action for the first time.
It’s a standard reply to all questions related to Orchestrator, and that is ‘yes’. Your imagination is the limit.

In this blog post, I will show to simple runbooks that does something you might find boring and repetitive if you are working as a sysadmin today.

The first runbook will create a new user in my Active Directory domain, and enable the account.

The second will create a new virtual machine in my cloud.

Yes, as I said. Two very simple runbooks. Although you can create workflows that integrates all from hardware, software – and even human resources, it’s often best to start with small chunks to remove the typical tasks that you’re not paid for anyhow. You should be focusing on much more important tasks than these two, but that would be the next phase.

Background:

System Center 2012 has a component called Orchestrator. This is the glue in the System Center stack, orchestrating the most simple – and also the most complex tasks in your environment. The workflows that you create could be a combination of activities and scripts, running on your terms.
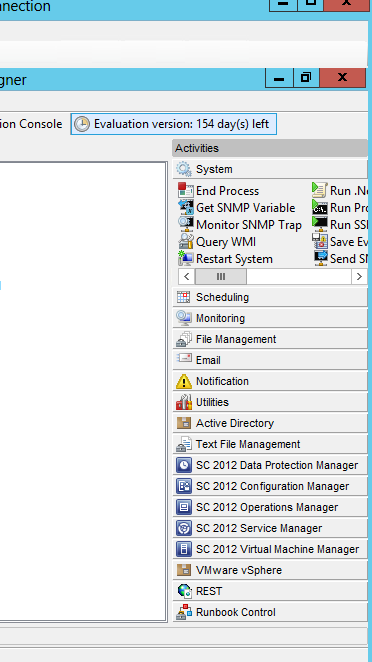
Orchestrator has a bunch of existing activities when you’re opening the runbook designer for the first time.

If you take a closer look at the picture, you will also find well-known Microsoft products and components as well as third parties. System Center 2012 has activities to each and every component, so that you can create extended functionality in your infrastructure, as well as automated tasks initiated by your users and customers, in conjunction with Service Manager’s self-service portal.


If you look closely, you can also see that I have imported an Integration Pack that integrates with VMware. But that’s another blog posts, and most likely it’s written by someone else.

Creating runbooks

Create a new Active Directory user

There are several ways to create runbooks. Some runbooks could be solely dedicated to system tasks, that runs either on a schedule, or is initiated by some system events and so on.

But if you want to create a runbook that should be presented to their users through some self-service mechanism, you would normally follow these steps:

1.       Initialize data

This activity will let you define parameters/inputs with different data types. For example, a user can specify user name, display name and other related information for a user object in Active Directory that will flow over the data bus to the next activity, which actually creates a new user based on the input in initialize data.

2.       Leveraging the activities from Active Directory Integration pack, will let you mix and match the most common tasks you would normally do manually. In this example, we will use the activity called Create User. The activity is connected to a domain controller in your environment. This is something you configure in the runbook designer itself, and also on each activity. The activities have several options related to them, and you can also add extras if you’d like. So the questions is: How can we get the data from the first activity and map them into the correct options in the next one?
 
In each option, you have the possibility to ‘subscribe’ on published data. Right click and click subscribe. This will let you map and address the data.  

3.       Enable the user is the last activity in this runbook. So once the user is created based on the input in the first activity, the account will be enabled.

Now, if you look at this runbook, you might think it’s simple, easy and not much of a hazzle to get things up and running.

However, I would like to stress that you should design your runbooks properly with some logging, alternative routes in case if an activity is failing and so on.

So let’s take a look at my second runbook.

Create a new virtual machine

We will start with the same task, initialize data. We want to combine this with a Service Offering in Service Manager, so that the users should be able to access this by themselves, with no need to access the actual management tools to perform this. (This is the beuty of self-service).

1.       Initialize data

I want my users to be able to create and deploy their virtual machines by themselves, without having the IT organization to interact each time. In addition, this must be as simple as possible, where the users have no idea of the underlying resources, or where it’s actually placed.

The only thing they should determine, is the name of the virtual machine – so that they can recognize it afterwards. 

2.       Create a VM from Template is the activity I will use. I have already create the sysprep’d VM, stored it in my library, and associated some profiles to make this magic happen.

3.       Start the Virtual Machine is the last activity, so they will be able to connect and access their resources once it’s comlpeted.

Again, a very simple runbook. But if you take a look at the data buses in this workflow, you can see I have differentiated them by using different colors. The blue ones are representing the data buses that went ok, and the red ones are related to errors.

To summarize, in case of an error during the process, the runbook will head over to the activity called ‘Send e-mail’ to notify some admins about what happen.

Hopefully, you got some ideas on how to get started with Orchestrator by now.

Use your imagination and try to start with the most boring tasks first thing first.

Next time, we’ll see how we can take this a step further with Service Manager.

Monday, February 20, 2012

SC 2012 Integration Packs - VMM

What do you get if you give steroids to the Windows Task Scheduler?

-          System Center Orchestrator


Orchestrator empowers IT pros as well as developers to easily develop Runbook that interoperate with 3rd party systems to automate datacenter workloads. With a simple drag and drop interface, you`re able to do whatever you want, and a little bit more.

System Center 2012 will play a major role for the IT pro, and Orchestrator will be another mind shift in the cloud stack, with reference to automation and best practice.

Orchestrator includes over 41 built-in workflow standard activities that perform a wide variety of functions and tasks. For the integration with 3rd paty platforms and products, and of course also Microsoft products, you can install integration packs (IPs) which will contain additional activities that extend the functionality of Orchestrator.

To summarize: System Center 2012 – Orchestrator is the glue in your private cloud.


How to register an Integration Pack

After the download, you have to register the IP with the Orchestrator management server and then deploy it to a runbook server that has the Runbook Designer installed.

1.       Start the Deployment Manager, expand Orchestrator Management Server, right click Integration Packs to select Register IP with the Management Server. This will start the Integration Pack Registration Wizard. Click Next.


2.       In the Select Integration Packs or Hotfixes dialog box, click Add, locate the .OIP files, click Open and then Next. Finish the wizard and accept the End User Agreement (after you`ve read the Microsoft Software License Terms)


How to deploy the integration pack

1.       In the very same Deployment Manager as mentioned above, righ click Integration Packs and click Deploy IP to Action Server or Client. Select integration packs you want to deploy and click Next. Enter the name of your runbook server, add, and click next.


2.       Choose a time to deploy, select Schedule Installation and finish the wizard. If you don`t schedule an installation time, the IP will be deployed immediately after the wizard.

 Getting started with the VMM IP

1.       Logon to your runbook server and click Options and SC 2012 Virtual Machine Manager


2.       Type a name for the connection and select the proper type (in this case, Virtual Machine Manager).


3.       Configure the connector by specifying VMM configuration data and authentication. (Make sure that you have configured the authentication you choose in your environment prior to this, or else it might fail).


4.       Once this is done, you have several new options to the right in the Runbook Designer.


5.       Have fun!