Thursday, February 6, 2014

Configuring Remote Console for Windows Azure Pack


Configuring Remote Console for Windows Azure Pack

This is a blog post that is part of my Windows Azure Pack findings.
Lately, I have been very dirty on my hands, trying to break, fix and stress test Windows Azure Pack and its resource providers.
Today, I will explain how we configure Remote Desktop as part of our VM Cloud resource provider, to give console access to the virtual machines running on a multi-tenant infrastructure.

Background

Windows Server 2012 R2 – Hyper-V introduced us for many new innovations, and a thing called “Ehanced VM session mode”, or “RDP via VMBus” was a feature that no one really cared about at first.

To put it simple: The traditional VMConnect session you initiate when connecting to a virtual machine (on port 2179 to the host, that then exposes the virtual machine) now supports redirecting local resources to a virtual machine session. This has not been possible before, unless you are going through a TCP/IP RDP connection directly to the guest – that indeed required network access to the guest.

Hyper-V’s architecture has something called “VMBus” which is a communication mechanism (high-speed memory) used for interpatition communication and device enumeration on systems with multiple active virtualized partitions. If you do not install the Hyper-V role, the VMBus is not used for anything. But when Hyper-V is installed, the VMBus are responsible for communication between parent/child with the Integration Services installed.
The virtual machines (guests/child partitions) do not have direct access to the physical hardware on the host. They are only presented with virtual views (synthetic devices). The synthetic devices take advantages when Integration Services is installed for storage, networking, graphics, and input system. The Integration Services is a very special virtualization aware implementation, which utilizes the VMBus directly, and bypasses any device emulation layer.

In other words:

The enhanced session mode connection uses a Remote Desktop Connection session via the VMBus, so no network connection to the virtual machine is required.

What problems does this really solve?

·         Hyper-V Manager let you connect to the VM without any network connectivity, and copy files between the host and VM.
·         Using USB with the virtual machine
·         Printing from a virtual machine to a local printer
·         Take advantage of all of the above, without any network connectivity

·         Deliver 100% IaaS to customers/tenants

The last point is important.

If you look at the service models in the cloud computing definition, Infrastructure as a Service will give the tenants the opportunity to deploy virtual machines, virtual storage and virtual networks.
In other words, all of the fabric content is managed by the service provider (Networking, Storage, Hypervisor) and the tenants simply get an operating system within a virtual machine.
Now, to truly deliver that, through the power of self-service, without any interaction from the service provider, we must also support that the tenants can do whatever they want with this particular virtual machine.
A part of the operating system is also the networking stack. (Remember that abstraction is key here, so the tenant should also manage – and be responsible for networking within their virtual machines, not only their applications). So to let tenants have full access to their virtual machines, without any network dependencies, Remote Desktop via VMBus is the solution.


Ok, so now you know where we’re heading, and will use RDP via VMBus together with System Center 2012 R2 and Windows Azure Pack. This feature is referred to as “Remote Console” in this context, and provides the tenants with the ability to access the console of their virtual machines in scenarios where other remote tools (or RDP) are unavailable. Tenants can use Remote Console to access virtual machines when the virtual machine is on an isolated network, an untrusted network, or across the internet.

Requirements

Windows Server 2012 R2 – Hyper-V
System Center 2012 R2 – Virtual Machine Manager
System Center 2012 R2 – Service Provider Foundation (which was introduced in SP1)
Windows Azure Pack
Remote Desktop Gateway

The Remote Desktop Gateway in this context will act (almost similar) like it does for the VDI solution, signing connections from MSTSC ro the gateway, but rather redirect to VMBus and not a VDI guest.

After you have installed, configured and deployed the fabric, you can add the Remote Desktop Gateway to your VM Cloud resource provider. You can either add this in the same operation as when you add your VMM server(s), or do it afterwards. (This requires that you have installed a VM with the RDGateway role, configured SSL certificates, both for VMMàHost->RDGW communication, and CA cert for external access).


Before we start to explain about the required configuration steps, I would like to mention some important things.
This has been a valuable learning experience, and I have been collaborated with Marc Van Eijk (Azure MVP), Richard Rundle (PM at MS), Stanislav Zhelyazkov (Cloud MVP), and last but not least, Flemming Riis (Cloud MVP).
Thanks for all the input and valuable discussions, guys!

As part of this journey, I have been struggling with certificates to get everything up and running. As you may be aware of, I am not a PKI master, and I am not planning to become one either, but it is nice to have a clear understanding of the requirements in this setup.

1)      The certificate you need for your VMM server(s), Hyper-V hosts (that is a part of a host group that is in a VMM cloud, that is further exposed through SPF to a Plan in WAP) and the RD Gateway can be self-signed. I bet many will try to configure this with self-signed certificates in their lab, and feel free to do so. But you must configure it properly. I’ve been burned here. Many times.
2)      The certificate you need to access this remotely should be from a CA. If you want to demonstrate or use this in a real world deployment, this is an absolute requirement. This certificate is then only needed on the RD Gateway, and should represent the public FQDN on the RD Gateway that is accessible on port 443 from the outside.
3)      I suggest you repeat step 1 and 2 before you proceed.
4)      I also suggest you to get your hands on a trusted certificate so that you don’t have to stress with the Hyper-V host configuration, as described later in this guide

Configuring certificates on VMM

If you are using self-signed certificates, you should start by creating a self-signed certificate that meets the requirement for this scenario.

1)      The certificate must not be expired
2)      The Key Usage field must contain a digital signature
3)      The Enhanced Key Usage field must contain the following Client Authentication object identifier: (1.3.6.1.5.5.7.3.2)
4)      The root certificate for the certification authority (CA) that issued the certificate must be installed in the Trusted Root Certification Authorities certificate store
5)      The cryptographic service provider for the certificate must support SHA256

You can download makecert, and run the following cmdlet to create a working certificate:

makecert -n "CN=Remote Console Connect" -r -pe -a sha256 -e <mm/dd/yyyy> -len 2048 -sky signature -eku 1.3.6.1.5.5.7.3.2 -ss My -sy 24 "remoteconsole.cer"

Once this is done, open MMC and add the certificate snap-in and connect to local user.
Under personal, you will find these certificates.

1)      Export the certificate (.cer) to a folder.
2)      Export the private key (.pfx) to a folder – and create a password

For the VMM server, we load the pfx into the VMM database so that VMM doesn’t need to rely on the certs being in the cert store of each node. You shouldn’t need to do anything on the VMM server except import the pfx into the VMM database using Set-SCVMMServer cmdlet. The VMM server is responsible for creating tokens.
Now, open VMM and launch the VMM Powershell module, and execute these cmdlets, since we also must import the PFX to the VMM database:

$mypwd = ConvertTo-SecureString "password" -AsPlainText -Force
$cert = Get-ChildItem .\RemoteConsoleConnect.pfx
$VMMServer = VMMServer01.Contoso.com
Set-SCVMMServer -VMConnectGatewayCertificatePassword $mypwd -VMConnectGatewayCertificatePath $cert -VMConnectHostIdentificationMode FQDN -VMConnectHyperVCertificatePassword $mypwd -VMConnectHyperVCertificatePath $cert -VMConnectTimeToLiveInMinutes 2 -VMMServer $VMMServer

This will import the pfx, and configure VMM to setup the VMConnectGateway password, certificate, the host identification mode (which is FQDN) and the time to live in minutes.

Once this is done, you can either wait for VMM to refresh the Hyper-V hosts in each host group – to deploy the certificates, or trigger this manually through powershell with this cmdlet:

Get-SCVMHost -VMMServer "VMMServer01.Contoso.com" | Read-SCVMHost

Once each host is refreshed in VMM, it installs the certificate in the Personal certificate store of the Hyper-V hosts and configure the Hyper-V host to validate tokens by using the certificate.

The downside of using a self-signed certificate in this setup, is that we have to do some manual actions on the hosts afterwards:

Configuring certificates on the Hyper-V hosts

Hyper-V will accept tokens that are signed by using specific certificates and hash algorithms. VMM performs the required configuration for the Hyper-V hosts.

Since using a self-signed certificate, we must import the public key (not the private key) of the certificate to the Trusted Root Certificateion Authorities certificate store for the Hyper-V hosts. The following script will perform this for you:

Import-Certificate -CertStoreLocation cert:\LocalMachine\Root -Filepath "<certificate path>.cer"

You must restart the Hyper-V Virtual Machine Management service if you install a certificate after you configure Virtual Machine Manager. (If you have running virtual machines on the hosts, put one host at a time in maintenance mode with VMM, wait till it is empty, reboot, and perform the same action on every other hosts before you proceed. Yes, we are getting punished for using self-signed certificates here).

Please note:
This part, where the Hyper-V Virtual Machine Management Service requires a restart, is very critical. If remote console is not working at all, then it could have been due to the timing of when the self-signed certificate was added to the trusted root on the Hyper-V hosts. If the certificate is added to the trusted root after VMM has pushed the certificate, Hyper-V won’t recognize the self-signed cert as trusted since it queries the cert store on process startup, and not for each token it issues.

Now we need to verify that the certificate is really installed in the Personal certificate store of the Hyper-V hosts, using the following cmdlet:

dir cert:\localmachine\My\ | Where-Object { $_.subject -eq "CN=Remote Console Connect" }


Also, we must check the hash configuration for the trusted issuer certificate by running this cmdlet:

$Server = “nameofyourFQDNHost”

$TSData = Get-WmiObject -computername $Server -NameSpace "root\virtualization\v2" -Class "Msvm_TerminalServiceSettingData"

$TSData


Great, we are now done with both VMM and our Hyper-V hosts.

Configuring certificates on the Remote Desktop Gateway

This Remote Desktop Gateway can only be used for Remote Console once it is configured for this. A configuration change will occur, which makes the gateway unusable for other purposes, as we will install an authentication plug-in from VMM media to this server.

In order to support federated authentication, VMM has a VMM Console Connect Gateway which is located at CDLayout.EVAL\amd64\Setup\msi\RDGatewayFedAuth.

For a HA scenario, you can install multiple quantities of RD Gateways with the Console Connect Gateway behind a load balancer.

Once you have installed and configured the RD Gateway with a trusted certificate from a CA for the front-end part (the public FQDN that is added to the VM Cloud resource provider in WAP), you can move forward and import the public key of the certificate into the Personal certificate store on each RD Gateway server, using the following cmdlet:

C:\> Import-Certificate -CertStoreLocation cert:\LocalMachine\My -Filepath "<certificate path>.cer"

Since we are using a self-signed certificate in this setup, we must do the same for the trusted root certification authorities certificate store for the machine account with the following cmdlet:

C:\> Import-Certificate -CertStoreLocation cert:\LocalMachine\Root -Filepath "<certificate path>.cer"

When the RD Gateway is authenticating tokens, it accepts only tokens that are signed by using specific certificates and hash algorithms. This configuration is performed by setting the TrustedIssuerCertificateHashes and the AllowedHashAlgorithms properties in the WMI FedAuthSettings class

Use the following cmdlet to set the TrustedIssuerCertificateHashes property:

$Server = “rdconnect.internal.systemcenter365.com”
$Thumbprint = “thumbrpint of your certificate”
$Tsdata = Get-WmiObject –computername $Server –NameSpace “root\TSGatewayFedAuth2” –Class “FedauthSettings”
$TSData.TrustedIssuerCertificates = $Thumbprint
$TSData.Put()

Now, make sure that the RD Gateway is configured to use the Console Connect Gateway (VMM plug-in) for authentication and authorization, by running the following cmdlet:

C:\> Get-WmiObject -Namespace root\CIMV2\TerminalServices -Class Win32_TSGatewayServerSettings


Next, we must make sure that the certificate has been installed in the personal certificate store for the machine account, by running the following command:

Dir cert:\localmachine\My\ | where-Object { $_.subject –eq “CN=Remote Console Connect” }


And last, check the configuration of the Console Connect Gateway, by running this cmdlet:

Get-WmiObject –computername $Server –NameSpace “root\TSGatewayFedAuth2” –Class “FedAuthSettings”

s


Now, if you have added your RD Gateway to Windows Azure Pack, you can deploy virtual machines after subscribing to a plan, and test the Remote Console Connect feature.


Tuesday, January 28, 2014

Troubleshooting Windows Azure Pack - Re-register a Resource Provider

 As I highlighted in a blog post last week, we have gone under the hood of Windows Azure in order to understand this business critical solution.
This includes:

·         Architecture
·         Dependencies
·         Performance bottlenecks
·         Configuration

As a result of all this investigation, we had to “rebuild” the WAP solution several times.
When I say rebuild, I do not necessarily mean a complete rebuild, installing SPF, VMM and WAP all over again, but remove the connected dependencies and so on.
This has indeed been an interesting and valuable learning.

The situation:

You have a WAP environment that you want to restart, by flushing the configuration in the portal.
For some reason, you have lost the connection to your resource provider, so that the VM Cloud show 0, empty, nada.

You are unable to register the VMM server(s) again, and by looking at the Odata Management logs on the SPF server (where all the magic is really happening), will find out that something is complaining about an item with the same key has already been added. So to summarize, we know it's there, but it is not showing.


Before you proceed – verify the following:

Your VMM service is running, available and actually working. Make sure that VMM is not complaining about anything critical, as this is key for SPF/WAP to work correctly in this context.
Also, you must ensure that no one has touched any of the dedicated user accounts for the setup, as well as DNS is working as expected. We have seen odd behavior in conjunction with a bad DNS server.

Removing the VM Cloud resource provider in WAP with MgmtSvC-cmdlets

The portal will not let you remove the Service Provider Foundation  endpoint – but only update the settings. So, if you are not pointing to another SPF connection string, this one is currently locked at the current resource provider.

We must use powershell on the Admin WAP server to proceed:

$Credential = Get-Credential
$Token = Get-MgmtSvcToken –Type Windows –AuthenticationSite https://yourauthenticationsite:30072 – ClientRealm http://azureservices/AdminSite -User $Credential -DisableCertificateValidation

Get-MgmtSvcResourceProvider -AdminUri "https://localhost:30004" -Token $Token -DisableCertificateValidation -name "systemcenter"
Remove-MgmtSvcResourceProvider -AdminUri "https://localhost:30004" -Token $Token -DisableCertificateValidation -Name "systemcenter" -InstanceId "the instance ID you got from Get-MgmtSvcResourceProvider"

Removing the mapping in SPF

Service Provider Foundation contains the configuration for the VMM cloud towards the WAP environment, and is responsible for exposing this to the service management API.

If we run the following powershell cmdlet on the SPF server, we will see information about the resource provider:

Get-SCSPFServer


We want to clean this up, so we will run the the following cmdlet in order to remove our resource provider:

Get-SCSPFServer –Name “nameoftheVMMserverFQDN” | Remove-SCSPFServer


Once this is done, we are able to register the resource provider for our VM Cloud in WAP again.

This will require that the Plans created in WAP must undergo a re-sync process before continuing to service the tenants.


Thursday, January 23, 2014

Troubleshooting Windows Azure Pack

I have now some really dirty fingers after I've been playing around with Windows Azure Pack for the last weeks.
Together with a fellow MVP, Marc van Eijk, we have done some huge investment in Windows Azure Pack to detect pitfalls and gotchas.

Windows Azure Pack is key when you would like to offer sophisticated services to your tenants, and therefore is very critical in this context. In order to understand how everything is working together, we have been cracking, destroying and fighting with this beast to be better prepared if anything happens in a real world deployment.

The findings so far have been very valuable and we are happy share it with you during some blog posts in the near future.

Note: In the MVP community, we have been discussing several stuff with the product groups around our findings. As a result of this, MS has now published a "Windows Azure Troubleshooting" section at TechNet which can be found here http://technet.microsoft.com/en-us/library/dn554311.aspx


Stay tuned :-)

Sunday, January 19, 2014

Presentations from NIC 2014

During this year conference, I had two sessions:


If you want to see and learn the future of service delivery and automation, you should definitively join this session to see how you can leverage new technology like network virtualization with GRE (NVGRE) and self-service deployment of complex workloads with Windows Azure Pack. Automation is key to maximize your investment in Windows Server and System Center, which Windows Azure Pack is all about. This session is tailored at service providers, enterprises and for the general public who wants to learn more about the future of cloud computing

Hybrid Cloud with Network Virtualization in WSSC 2012 R2 (based on the whitepaper) - http://www.slideshare.net/kristiannese/nic-hybrid-cloud-with-nvgre-level-400

Join a true VMM Ninja and learn about network virtualization in a practical way.
This session will walk-through the configuration parts required and also explain what happens, and more important – why and how it happens.
Windows Server and System Center are using Network Virtualization with GRE in order to fulfill the story around the Cloud OS, and must be considered as mandatory to have hybrid cloud solutions, no matter if it’s in the enterprise or as part of a hosting plan with Windows Azure Pack.
VMM is responsible for deploying, maintaining and configure the NVGRE policies across your cloud infrastructure, so everything will be performed from this single console. (Yes, you will learn a lot about networking in VMM in general during this session too).

Use the links to download the pptx’s – and hopefully they will be useful.

Thank you for everyone who joined my sessions during these two days, and I really enjoyed all the discussions afterwards, and especially the possibilities around Service Management API in Windows Azure Pack.

I will (hopefully in the next couple of days) provide you with a detailed blog post about the current environment where I will explain how to setup the remote desktop console feature in Windows Azure Pack.


Friday, January 3, 2014

Windows Azure Pack - Forcing VM Roles to be Highly Available


Windows Azure Pack - Forcing VM Roles to be Highly Available

This is just a short blog post on how to force your VM Roles deployed with Windows Azure Pack, to be highly available.

Perhaps you have received an error while deploying your VM Roles, or just simply discovered that they are not HA and is located directly on one of the hosts local storage.

The solution is simple, but for most people it is a hidden one.

The VM cloud in VMM must have a custom property called CreateHighlyAvailableVmRoles with its value set to true in order for the VM Roles to be configured as highly available.

Since the VM Roles is created outside of VMM, we are not able to tag corresponding Hardware and Guest profiles or the templates itself.

1.       In VMM Console, select VMs and Services
2.       Right Click on the cloud that the Plan in Windows Azure Pack is using and select properties
3.       Select the Custom Properties tab and click Manage Custom Properties
4.       Select Cloud for Object Type, and click Create to create a new property
5.       Name the property CreateHighlyAvailableVmRoles and click OK
6.       Select the new property and click Add
7.       Click OK
8.       Type true for the property value
9.       Click OK


Now, log back to the service management portal and refresh the browser. The next deployment should succeed, and place the VM Roles on shared storage (either SMB3.0 or CSV) and the VMs should be highly available.


Tuesday, December 31, 2013

How to Setup Hyper-V Recovery Manager with a Single VMM server topology

Hyper-V Recovery Manager with single VMM server topology

Recently, Microsoft announced that a single VMM server will be sufficient in order to take advantage of Hyper-V Replica – a software as a service offering from Windows Azure, that will orchestrate DR workflows in your on-premise cloud infrastructures, managed by System Center 2012 R2 – Virtual Machine Manager.
This is a huge step in the right direction, in order to ensure HVR adoption for customers and partners.
The requirement of having two VMM infrastructures would not only be an additional cost, but also lead to administrative overhead and complexity, since a Hyper-V host can only be managed by a single VMM management server at a time.


This blog post will focus on:

·         Setup of the HVR agent on the VMM Management server
·         Creation of DR Cloud within VMM
·         Configuration of DR in HVR
·         Orchestration with HVR and VMM

Setup of the HVR agent on the VMM Management server

Before we can go ahead and deploy HVR into our environment, the following requirements must be met.

Hyper-V Recovery Manager prerequisites:

·         Windows Azure account. You will need an Azure account with the recovery services feature enabled.
·         .CER certificate that must be uploaded as a management certificate containing the public key to the Hyper-V Recovery vault, so that the VMM server can be registered with this vault. Each vault has a single .cer certificate that complies with the certificate prerequisites.
·         .PFX file. The .cer certificate must be exported as a .PFX file (with the private key), and you will import it on each VMM server that contains virtual machines that you want to protect. This blog post will only use a single VMM server.

VMM server prerequisites:

·         At least one VMM server running on System Center 2012 SP1 or System Center 2012 R2 (this blog post will demonstrate 2012 R2)
·         If you are running one VMM server, it will need two clouds configured (where the DR will occur between the clouds). If you have two or more VMM servers, at least one cloud should be configured on the source VMM server you want to protect, and one cloud on the destination VMM server that you will use for recover. The primary cloud you want to protect must contain the following:
o   One or more VMM host groups
o   One or more Hyper-V hosts servers in each host group
o   One or more Hyper-V virtual machines on each Hyper-V host
·         If you want virtual machines to be connected to a VM network after failover, you configure network mapping in Hyper-V Recovery Manager.

Once the certificate is uploaded to HVR, you can download the latest provider that you should install on your VMM management server


The installation process will require that you stop the System Center Virtual Machine Manager service prior to install, as there will be changes made to the GUI as well as extra functionality on the server

During the installation, you must point to the .pfx file of your .cer certificate and map it with the vault created in Windows Azure Hyper-V Recovery Manager.


Specify the VMM server name, and enable ‘Synchronize cloud data with the vault’. For you information, there will only be metadata that is shipped from VMM to Windows Azure.

Once the setup has completed, the setup can start the VMM server service again, and you can open the VMM console.


The next thing we will do, is to create clouds in VMM.

Creation of DR Cloud within VMM

 A cloud is an abstraction of your physical fabric resources, like virtualization hosts (host groups), networks, storage, library resources, port classifications, load balancers and eventually the user actions that you permits.

Create at least two clouds (one for production and one for DR) where you enable DR on both of them. This option is available when you assign a cloud name and a description


Also, please note that the capability profile that contains ‘Hyper-V’ should be selected as part of the cloud. This is a requirement so that only virtual machines tagged for Hyper-V, can participate in the DR workflows that is solely depending on Hyper-V as the hypervisor.


Now, if we look at the HVR service in Windows Azure again, under protected items, we should see both of our clouds listed


Note that there are currently no virtual machines enabled for protection, although there could be virtual machines running in these clouds.
If we check the clouds in VMM, we can see that status for protection shows ‘disabled’


Configuration of DR in HVR

To complete the configuration of the HVR service, we must continue to work in the Windows Azure Portal.
Click on your cloud under protected items, that should be seen as the primary cloud (running the primary workload).


In order to complete the configuration, click configure protection settings.


This will let you configure the replication location and frequency.
If you are familiar with Hyper-V Replica, you will recognize the options here.

Target location: this will be your VMM server

Target cloud: this will be the DR cloud you created in VMM, that will receive replication from the primary cloud, running the primary workload.

Copy frequency: Choose between 5 minutes (default, 30 seconds and 15 minutes – which was introduced with Windows Server 2012 R2 – Hyper-V.

Additional recovery points: Default is zero, but you can have in total 15 recover points.

Frequency of application-consistent snapshots: Hyper-V Replica does also support app-consistent snapshots in addition to crash consistent snapshots. This is ideally for SQL servers and other critical applications enabled for DR with HVR.

Data transfer compression: default is ON, so that the data is compressed during replication.

Authentication: Certificate and Kerberos is the option. HVR will let you use certificates so you can replicate between different domains if you would like, without any trust.

Port: 8084 is the default port, and a firewall rule will be enabled on the Hyper-V hosts in primary and recovery clouds to allow access to this port

Replication Method: Over the network is default – and recommended, but offline is also an option.

Replication start time: Immediately – which is good when you have the bandwidth. An initial replication will copy and replicate the entire virtual machine (with its virtual hard disks) to the recovery site. A good idea might be to schedule this to happen during night, for example.

Once you have completed the configuration, click ‘Save’.

This will initiate a job in your VMM and Hyper-V infrastructure that will pair clouds, prepare the VMM server(s) and clouds for protection configuration, and configure the settings for the clouds to start protecting virtual machines.

Once the job has completed, go back to protected items in the Azure portal and verify that DR is enabled for your clouds.


We must also map some resources in order to streamline the potential failovers between our cloud.
If you have worked with Hyper-V Replica, you may remember that after you have enabled initial replication on a new virtual machine, the wizard will send you to the virtual NIC interface on the hardware profile, so that you can configure an alternative IP configuration for the VM.
This setting in HVR let us do this at scale, so that network A on the primary cloud could always be mapped to network A2 on the DR cloud, for instance.

Click on ‘resources’ in the portal, and map your networks.
It is important that these networks are available in the cloud configuration in VMM in order to show up here.


Next, let us enable DR on our virtual machines running in the primary cloud.
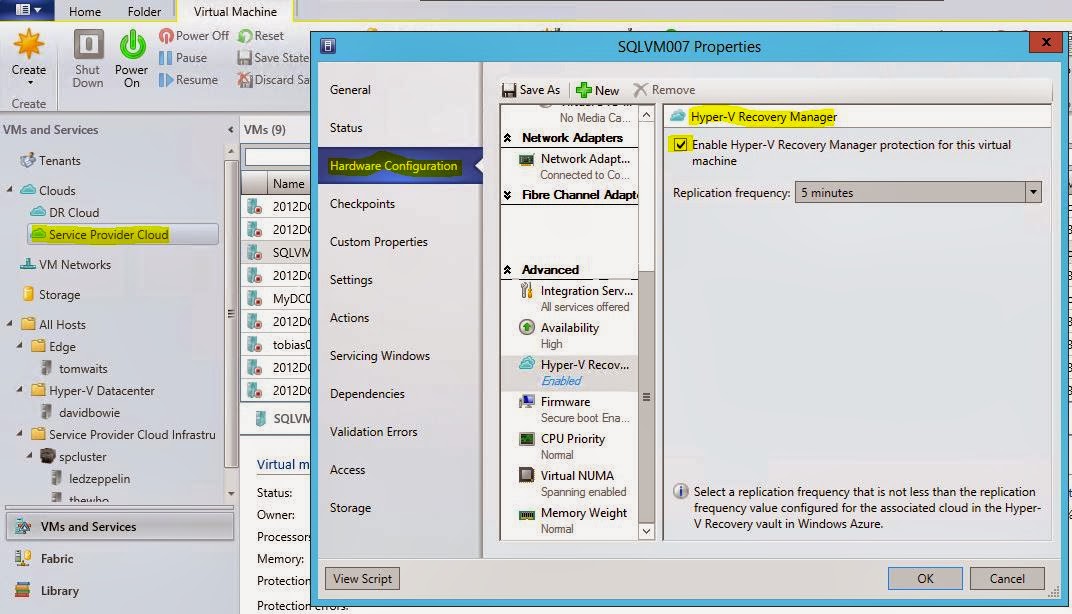
In VMM, we will notice a new option under ‘Advanced’ on the hardware tab on the virtual machines.
The screenshot below shows a virtual machine running in my ‘Service Provider Cloud’ which is the primary cloud, where I enable DR.


Once this has completed, the virtual machine’s metadata should be exposed in HVR and ready to use in a recovery plan.

Note: if DR should be considered as mandatory in your environment, a good tip would be to tag the hardware profiles on your templates to be enabled for Hyper-V on the capability profile, as well as DR enabled under advanced. Then all newly created virtual machines based on your templates, will be available in the recovery plans in HVR. Also note that if Hyper-V Replica Broker is in use (in a Hyper-V Cluster), you can’t use protection on VMs that are not configured as highly available, running locally on one of the nodes.

Back in the portal, we must create a recovery plan.

Creating Recovery Plans in HVR

Now that we have a VM enabled for protection, it is time to create one or several recovery plans.
A recovery plan gathers virtual machines into groups and specifies the order in which the groups fail over. Virtual machines you select will be added to the default group (Group 1). After you create the recovery plan, you can customize it and add additional groups.
This is very useful if you have distributed applications (everyone have this!) or specific workload you would like to group. The power of HVR is the ability to orchestrate and facilitate the failovers.

Click on recovery plans in the portal, and start the wizard to create a new one.
First, you must select source and target. In my example, since using only a single VMM server, I can use the same on both source and target. Specify a name and continue.


Select virtual machines that should participate in the recovery plan. We can see the VM I enabled previously at this stage.


Once the job has completed, you should have successfully enabled a recovery plan for the virtual machine(s) and is able to perform the workflows like failover (planned, unplanned) and test failover.


Thanks for reading – and in the next blog post or so, we will look closer at DR operations at scale and how to use groups together with recovery plans to meet critical business requirements.

Happy new year!

Friday, December 20, 2013

Bringing Windows Azure into NIC 2014

I am hoping to see you at the Nordic Infrastructure Conference in January again.

It looks like we are into yet another good conference in the cold north, and this time my focus will be on the Window Azure Pack.

In details: I will cover Windows Azure Pack – under the hood, where we will look closely at the architecture around a distributed production deployment.
We will also look at the dependencies and how the communication among the components are in use.
Windows Azure Pack is truly an interesting area where we can leverage all sort of new technologies delivered through the foundation in Windows Server and System Center. Specifically Hyper-V and Virtual Machine Manager together with SPF (Service Provider Foundation) for VM Clouds.

My focus will be solely on VM Clouds to deliver Infrastructure as a Service based on your own resources. You could be a service provider that want to learn about this solution, that also wants to bring network virtualization into your environment so that you can have a secure multi-tenant infrastructure for your tenants, or you can be an enterprise customer that want to provide your users with a superb self-service experience and help them to deploy complex workloads like Exchange, SQL, Sharepoint or a domain controller.

By looking at the tenant portal and what you can do, it sure looks very simple. Behind the scenes, there is a lot of cool stuff going on that I am sure you will want to know more about.

I hope to see you at NIC, and if you have any questions before, during – or after the show, I will be around to assist you as good as I can.