Are you a Microsoft Partner and want to dig into the great new contents that ships with System Center 2012?
Then you should sign up for the System Center Boot Camp in Tønsberg (Norway) at http://blogs.technet.com/b/partnerbloggen/archive/2012/03/01/er-du-klar-for-fremtiden-bli-med-p-229-lanseringsbootcamp-p-229-system-center-2012.aspx
I`ll have quite a few sessions during the boot camp where I`ll be touching Data Protection Manager, App Controller and...behold... Virtual Machine Manager.
At least, that`s my agenda, but I`ll also show the components in the context of a private cloud that also includes Orchestrator, Operations Manager and Service Manager - it`s all a part of my demo environment, so I can give the audience the demos they need and expect, and a true understanding of how to increase the value they`re already giving to their customers and clients.
By the way, I`m also counting the days for next week where I`ll talk about Windows Server 2012 and Hyper-V 3.0 for hosters as well as SC 2012 during the "Hosting Day" at Microsoft HQ at Lysaker.
Alright, I have some slides to polish.
Showing posts with label Windows Server 8. Show all posts
Showing posts with label Windows Server 8. Show all posts
Monday, April 23, 2012


Wednesday, April 18, 2012
Cluster-Aware updating in Windows Server 2012 ("8)
It`s not
new that Microsoft have made some significant improvements in the private cloud
fabric recently, where you can integrate WSUS with System Center 2012 – Virtual
Machine Manager, so you can on-demand
update your Hyper-V hosts and Hyper-V Clusters, in an automated fashion.


VMM will
place the hosts (one at a time) in maintenance mode, live migrate the VMs to
the other nodes, patch the node, eventually reboot the node and take it out of
maintenance mode before it goes on with the next host.
So, this
is brilliant. I can`t tell how many times I`ve done this manually prior to VMM
2012, when I rather should be home watching some random Barcelona match on TV.
So with
Windows Server 2012 (yes- Windows Server “8” will be named Windows Server
2012), you have an inbuilt role for patching your failover cluster, that will
work in a similar fashion.
Let`s
take a look at the easy configuration for Cluster-Aware updates.
1.
Connect
to your cluster that you want to enable for Cluster-aware updating. In my case,
I have a cluster that hosts my highly available VMs, connected to a Windows
Server 2012 iSCSI target.
2.
Click
‘Configure cluster self-updating options’ to configure this role

3.
You`ll
be able to add the CAU clustered role if this is not already added on the
server. Click next

4.
Configure
the frequency of self-updating. I`m leaving it with the defaults in this case

5.
During
the page for advanced options, you can use the settings based on a configuration
you have created elsewhere (xml file) if you want the same options to be
applied across your clusters, or specify new parameters in this view. I have
enabled the ‘RequireAllNodesOnline’ and ‘MaxFailedNodes’ in this example

6.
Additional
options lets you get recommended updates the same way that you receive important
updates through Windows Update

7.
Confirm
your choices, and if you scroll down you`ll see the PowerShell code workflow
that will take place during completion.

8.
The
Clustered Role is completed

Now,
let`s wait for some new updates for Windows Server 2012 J
Friday, April 13, 2012
What I`m going to do next week with Windows Server "8"
I have
just received a HP Proliant Microserver for my lab.
This
tiny little sexy thing is about to leverage some cool features in Windows
Server “8”.
Current setup:
HP Proliant Microserver – installed with 4 x 1 TB SATA disks with RAID 0 and RAID
I have
installed Windows Server “8” Beta and played around with storage pools and
storage spaces.I have
also tested the built-in iSCSI target in Windows Server “8”, which is currently
hosting my Hyper-V 2008 R2 clustered VMs.
The
Microserver has currently only 1 NIC, which should give you a hint that it`s
possible to simulate the foundation of a private cloud using budget hardware.
As I
stated in my previously post, I will have 2 clusters. One 2008 R2 running
System Center 2012 workloads for POC, and one Windows Server “8” cluster with
the new and improved version of Hyper-V.
So while
it`s currently running the SC 2012 workloads (which works pretty good, and I
was able to deliver 4 hours of presentations/demos today, using this environment),
I am looking forward to build the next generation of Hyper-V clusters next week
with Windows Server “8”.
I have
currently all my W8 workloads running on my lap top (yeah, Windows Server “8”
directly on my lap top, forcing me to deal with powershell and other stuff that
I wanna be able to manage), and I will use/test/play with the different
migration options to move my workloads over to the Hyper-V 3.0 Cluster, with no
downtime, using my WiFi.
I`ll
post the examples and demos next week.
Monday, April 2, 2012
Windows Server "8" with Hyper-V and Powershell
I`m just
about to get my hands on my SAN to be able to do some cool things covering both
the SC 2012 suite (Private Cloud scenarios) and Windows Server “8” with
Hyper-V.

Clean up your environment after some heavy Storage Migration demos
I need
access to both environments since I`ll deal a lot with both of them in
different scenarios, like proof of concept, demos and researching. Sounds fun? –
it is!
Below is
a very simple overview of my environment, showing you that I have 2 clusters in
a single domain. 1 Windows Server “8” Hyper-V cluster and 1 Windows Server 2008
R2 Sp1 Hyper-V Cluster with the current SC 2012 components installed and
orchestrating the magic.

To run a
SAN, I`ll use Windows Server “8” with the inbuilt iSCSI target, and i`m looking
forward to test and play with Storage Pools and Storage Spaces.
So what
have I done to this point, with no SAN for my VMs? People who know me also know
that I`m addicted to clusters. I need them in my life. But the life has treated
me good because I`ve been running Windows Server “8” directly on my laptop.
There
are several reasons for this. Here`s a couple of them.
1.
Kristian,
you better start learning Powershell. No discussion. Do it.
2.
Do
all the possible research related to Hyper-V, and especially by using
Powershell.
3.
Remember
to learn well, since this will be your bread and butter.
So,
let`s talk a bit about Powershell in this blog post.
Several
top dogs at Microsoft have stressed that it is extremely important for the
technologist to be able to manage things through Powershell. And if you see
this in the cloud context where as much as possible should be considered for
automation, powershell is the key since the robust API towards SC 2012 and
Windows Server “8” would be …. Powershell!
So
here`s some handy Powershell cmdlets that I have been using the last days.
(Note,
this is not rocket science but it`s very handy)
Start all your VMs
Get-VM *
| start-VM
Shut down all your VMs
Get-VM *
| stop-VM
Move storage
Move-VMStorage
“VM name” “Destination” (Example:
Move-VMStorage “SCOM2012” “E:\VHDs\SCOM2012”
Enable Dyanmic Memory on every VM
Get-VM *
| set-VMMemory –Dynamicmemoryenabled $true –startupbytes 512MB –minimumbytes 100MB
–maximumbytes 6GB
(Thanks to Aidan Finn)
Clean up your environment after some heavy Storage Migration demos
Get-VM |
% { Move-VMStorage $_.Name “E:\VMs\$($_.Name)” }
(Thanks to Benjamin Armstrong)
And of
course, there`s a lot of new cmdlets related to the Hyper-V Role.
To get
an overview, type:
Get-commands
–module Hyper-V
This
will list all the cmdlets for you. You can also play around and use Powershell
ISE tool to help you to build, test, and evaluate scripts that you create by
using Powershell.
Oh, I
have created some scripts as well, but I`ll save them for later in another blog
post.
So my
next step would be to move all my VMs with SC 2012 installed from my laptop
over to the newly created lab. I will show the examples of how this was done in
another blog post later.
Cheers,
Monday, March 12, 2012
System Center 2012 SP1 CTP
Currently
available, VMM and DPM.
To quick verify what`s new in the VMM build, read the rest of this blog post.
This setup will only work on Windows Server "8" Beta, so you have do install the server prior to this setup, along with SQL Server 2008 R2.
Network Virtualization
VHDX Support
SMB 2.2 File Shares
Live Migration Enhancements
In addition, VMM can perform simultaneous
live migrations (live, live VSM or live storage). This is especially useful
when you want to evacuate a host for maintenance.
For more information about live migration in Windows Server "8" Beta, see the following topics:
Start
exploring some of the new features in Hyper-V in Windows Server “8” by using
the premium management tool – Virtual Machine Manager.
To quick verify what`s new in the VMM build, read the rest of this blog post.
This setup will only work on Windows Server "8" Beta, so you have do install the server prior to this setup, along with SQL Server 2008 R2.
Virtual Machine Manager (VMM) in the
community technology preview (CTP) of System Center 2012 SP1 provides the
following new features:
Network Virtualization
VMM in the CTP release of System Center
2012 SP1 provides support for the network virtualization capabilities available
in Windows Server "8" Beta.
Network virtualization provides the ability
to run multiple virtual network infrastructures, potentially with overlapping
IP addresses, on the same physical network. With network virtualization, each
virtual network infrastructure operates as if it is the only one running on the
shared network infrastructure. This will allow two different business groups
using VMM to use the same IP addressing scheme without conflict. In addition,
network virtualization provides isolation, so that only those virtual machines
on a specific virtual network infrastructure can communicate with each other.
Network virtualization in Windows Server
"8" Beta is designed to remove the constraints of VLAN and
hierarchical IP address assignment for virtual machine provisioning. This
enables flexibility in virtual machine placement, because the virtual machine
can keep its IP address regardless of which host it is placed on. Placement is
not necessarily limited by physical IP subnet hierarchies or VLAN configurations.
To virtualize the network in Windows Server
"8" Beta, each virtual machine is assigned two IP addresses:
· A customer
address, which is visible to the virtual machine and is used by customers to
communicate with the virtual machine.
· A provider
address, which is used by the Hyper-V computer that is hosting the virtual
machine, but is not visible to the virtual machine.
VMM in the CTP release of System Center
2012 SP1 creates the necessary IP address mappings for virtual machines to take
advantage of the network virtualization capabilities in Windows Server
"8" Beta. VMM uses an IP address pool associated with a logical
network to assign provider addresses and uses an IP address pool associated
with a VM network to assign customer addresses. VM networks are a new addition
to VMM in the CTP release of System Center 2012 SP1.
For more information about network
virtualization in Windows Server "8" Beta, including an explanatory
diagram, see Hyper-V
Network Virtualization Technical Preview.
|
|
Not all the capabilities of network
virtualization in Windows Server "8" Beta are supported in this CTP.
VHDX Support
VMM in the CTP release of System Center
2012 SP1 supports the new version of the virtual hard disk (VHD) format that is
introduced in Windows Server "8" Beta. This new format is referred to
as VHDX.
VHDX has a much larger storage capacity (up to 64 TB) than the older VHD
format. It also provides data corruption protection during power failures.
Additionally, it offers improved alignment of the virtual hard disk format to
work well on large-sector physical disks.
By default, VMM in the CTP release of
System Center 2012 SP1 uses the VHDX format when you create a new virtual machine
with a blank virtual hard disk. The VMM library automatically indexes .vhdx
files. In addition to the small and large blank .vhd files that were available
in previous versions of VMM, the VMM library in System Center 2012 SP1 also
contains both a small (16 GB) and large (60 GB) blank .vhdx file.
|
|
For the CTP release, the library server
must be a Hyper-V host to automatically index .vhdx files.
For more information about the benefits of
the VHDX format in Windows Server "8" Beta, see Hyper-V Virtual Hard
Disk Format Technical Preview.
SMB 2.2 File Shares
VMM in the CTP release of System Center
2012 SP1 adds support for designating network file shares on Windows Server
"8" Beta computers as the storage location for virtual machine files,
such as configuration, virtual hard disk (.vhd/.vhdx) files and checkpoints.
This functionality leverages the new 2.2 version of the Server Message Block
(SMB) protocol that is introduced in Windows Server "8" Beta.
SMB 2.2 file shares provide the following
benefits when used with VMM in the CTP release of System Center 2012 SP1:
· Hyper-V over SMB
supports file servers and storage at a reduced cost compared to traditional
storage area networks (SANs).
· If you use SMB 2.2
file shares as the storage location for virtual machine files, you can live
migrate running virtual machines between two stand-alone Hyper-V hosts or
between two stand-alone Hyper-V host clusters. Because the storage location is
a shared location that is available from both source and destination hosts,
only the virtual machine state must transfer between hosts. For more
information, see the “Live Migration Enhancements” section of this topic.
You can create SMB 2.2 file shares on both
stand-alone Windows Server "8" Beta file servers and on clustered
Windows Server "8" Beta file servers. In this step-by-step guide,
only SMB 2.2 file shares on a stand-alone file server are used to demonstrate
the concepts. If you use a stand-alone file server, you can designate an SMB
2.2 file share as the virtual machine storage location on a Windows Server
"8" Beta Hyper-V host cluster. However, this is not a
highly-available solution.
|
|
For more information about how to create a
highly-available SMB 2.2 file share, see the Windows Server "8" Beta
topic File Server for
scale-out application data overview, and steps 1 and 2 of the “Deploy
Scale-Out File Server” scenario that is linked to from that topic.
For more information about SMB 2.2 in
Windows Server "8" Beta, see Server Message Block
overview.
Live Migration Enhancements
VMM in the CTP release of System Center
2012 SP1 includes several live migration enhancements that enable the migration
of a running virtual machine with no downtime. The following table summarizes
the live migration options that are available.
|
Transfer Type
|
Description
|
|
Live
|
During live migration, only the virtual
machine state is transferred to the destination server.
VMM in System Center 2012 SP1 supports
the following new live migration options:
· Live migration between two stand-alone Windows Server
"8" Beta Hyper-V hosts.
· Live migration between two Windows Server "8" Beta
Hyper-V host clusters.
This includes both highly
available virtual machines and non-highly available virtual machines that are
running on a cluster node.
To live migrate a virtual machine between
two stand-alone hosts or two separate host clusters, the virtual machine
(including virtual hard disks, checkpoints, and configuration files) must
reside on an SMB 2.2 file share that is accessible from both the source and
destination stand-alone hosts or host clusters.
VMM in System Center 2012 SP1 also
supports the live migration of a highly available virtual machine between two
nodes in the same host cluster. Support for this exists in
System Center 2012 – Virtual Machine Manager, when
the virtual machine resides on available storage or on a cluster shared
volume (CSV). In System Center 2012 SP1, the virtual machine can also reside
on an SMB 2.2 file share.
|
|
Live (VSM)
|
Live virtual machine and storage
migration (live VSM) is new in System Center 2012 SP1. During live VSM, both
the virtual machine state and the virtual machine storage are transferred.
For the live VSM option to be available, the virtual machine must reside on
storage that is not visible to the destination host.
VMM in the CTP release of System Center
2012 SP1 supports the following:
· Live VSM between two stand-alone Windows Server "8" Beta
Hyper-V hosts. This transfer can occur between local disks or SMB 2.2 file
shares.
· Live VSM between two Windows Server "8" Beta Hyper-V
host clusters. The virtual machine can be transferred to either a CSV or an
SMB 2.2 file share on the destination host cluster.
|
|
Live Storage
|
Live storage migration is new in VMM in
System Center 2012 SP1. During live storage migration, only the virtual
machine storage is transferred.
VMM in the CTP release of System Center
2012 SP1 supports the following:
· Live storage migration within the same Windows Server
"8" Beta stand-alone host. Storage can be transferred between two
SMB 2.2 file share, between an SMB 2.2 file share and a local disk, or
between two local disk locations.
· Live storage migration on a cluster node from a CSV or SMB 2.2
file share to a different CSV or SMB 2.2 file share that is accessible from
the cluster node.
|
For more information about live migration in Windows Server "8" Beta, see the following topics:
Wednesday, March 7, 2012
Hyper-V Replica by example (part one)
Hyper-V Replica by example
Since this unique individual has already documented the fun bits (the technical stuff), I won`t do it again (as other people seems to do, copy him:-) ), but rather focus on the setup.


Next, we have to configure replication on the VMs we want to replicate to this Hyper-V cluster, on our stand-alone Hyper-V server. (Note: you can also configure the stand-alone Hyper-V server to receive replication too, but you do this in Hyper-V Manager on Hyper-V settings, and configure the same settings as in step 6 above.


Follow this blog for part two.
Cheers.
One of
the major game changer of a feature in Hyper-V 3.0 is called «Hyper-V Replica».
To get a
jump start on this feature, read Aidan`s blog post here.Since this unique individual has already documented the fun bits (the technical stuff), I won`t do it again (as other people seems to do, copy him:-) ), but rather focus on the setup.
In my
lab I have a Hyper-V Cluster running Windows Server “8” Beta in my datacenter
site.
I also
have a stand-alone Windows Server “8” running Hyper-V. Every server has running
VMs on them, and should be ideal for a proof of concept.
Let`s
start with our datacenter.
1.
In
Failover Cluster Manager, right click Roles and configure roles

2.
Select
Hyper-V Replica Broker

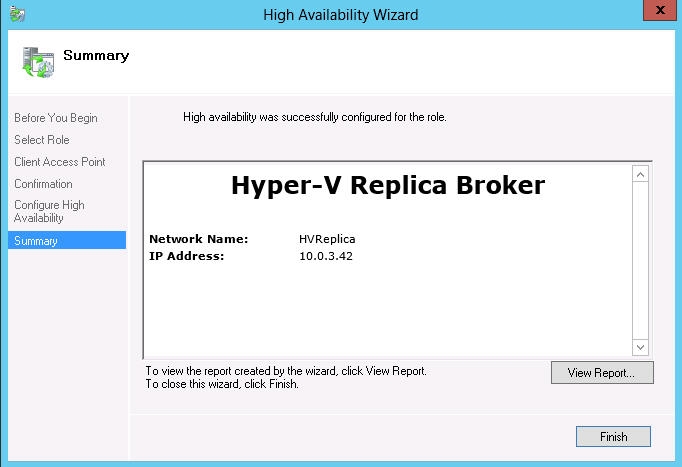
3.
Complete
the wizard and type the required information like IP address and name for this
object.

4.
Once
this is done, you can see the Hyper-V Replica Broker alive and kicking in this
particular cluster


5.
After
the creation, right click the Hyper-V Replica Broker in Failover Cluster
Manager and configure replication.
6.
For
the sake of demonstration, I have selected Kerberos, port 80 and allow
replication from every authenticated server (AD authentication via Kerberos),
and specified the location on one of my Clustered Shared Volumes.

7.
Once
this is done, you`d probably like to configure the firewall to allow
communication on the dedicated port. I selected port 80 since this port is free
and available in my environment for these cluster nodes, and allows communication
using this simple line of command: netsh advfirewall
firewall add rule name=”HVReplica” dir=in action=allow protocol=TCP
localport=80
Remember to run this cmd on
every node that is a part of this cluster. What? Of course you could use PowerShell as well, yes.
Next, we have to configure replication on the VMs we want to replicate to this Hyper-V cluster, on our stand-alone Hyper-V server. (Note: you can also configure the stand-alone Hyper-V server to receive replication too, but you do this in Hyper-V Manager on Hyper-V settings, and configure the same settings as in step 6 above.
1. Right click the
VM and click Enable Replication.

2. Type the name of
the Hyper-V Replica Broker you`ve created earlier

3. Specify the
connection parameters and if you want to compress the data that is transmitted
over the network. The connection parameters should represent the initial
configuration you entered during the setup of the replica broker.

4. Select which
virtual hard disks you want to replicate. In this example, this particular VM
has only one virtual hard disk associated with it.

5. Configure
recovery history. If you have needs to have additional recovery points
available (for example on your LOB applications that’s runs in a VM) you can
configure it here. In addition, you can replicate incremental snapshot using
the known VSS service and define the frequency these snapshots are taken.

6. How would you
start the initial replication? Either over the network or using external media.
Since I`m several hundred miles from the actual datacenter and the branch
office for instance, I will replicate this over the network. But it`s a good
idea to use external media so you`re not overloading your network if this is a
big VM or several VMs. You can also use existing VM on the replicate server as
the initial copy if you have restored a
copy of this VM.

7. Check the
overview of the configuration and finish.

8. If the
communication is allowed and the configuration is completed in a sufficient
manner, you`re good to go.

Follow this blog for part two.
Cheers.
Tuesday, March 6, 2012
Live Storage Migration in Windows Server "8" Hyper-V
Demonstrating
one of the migration options in
Hyper-V in Windows Server «8» Beta
This blog post will cover the Live Storage Migration.
Live storage migration allows you to migrate the storage of a VM (VHD and also the new VHDX) and the configuration files to be moved to new locations. And this will be performed live, while the VM is still running!


This blog post will cover the Live Storage Migration.
Live storage migration allows you to migrate the storage of a VM (VHD and also the new VHDX) and the configuration files to be moved to new locations. And this will be performed live, while the VM is still running!
So
basically, you can move it between SANs, SMB shares, DAS and so on with no downtime.
The
migration will copy every file (virtual hard disks, snapshots and
configurations) and the VM will write and read to its destination during this
process, and after the copy is completed, the VM will write to both locations
(source and destination) while its copying the blocks that has been changed
during the copy process. At last there is a clean-up process where the data is
synced and the source is finally deleted.
1.
Right
click on the VM in Hyper-V Manager (if your Hyper-V host is a node in a Hyper-V
Cluster, you`ll get a message indicating that you have to use Failover Cluster
Manager to perform this action. It`s a hard block by design, which is good!)

2.
Select
Move the virtual machine`s storage and click next

3.
In
this example, I`ll move every related file for this particular VM. But also
notice you`re able to select files individually if you have special needs for
not placing the files on same share/disk/LUN. This is a cheap lab environment
and I have nothing to lose.

4.
Enter
the location. In this example, I`ll move it to a network share, running on a
Windows Server 2008 R2. Click next

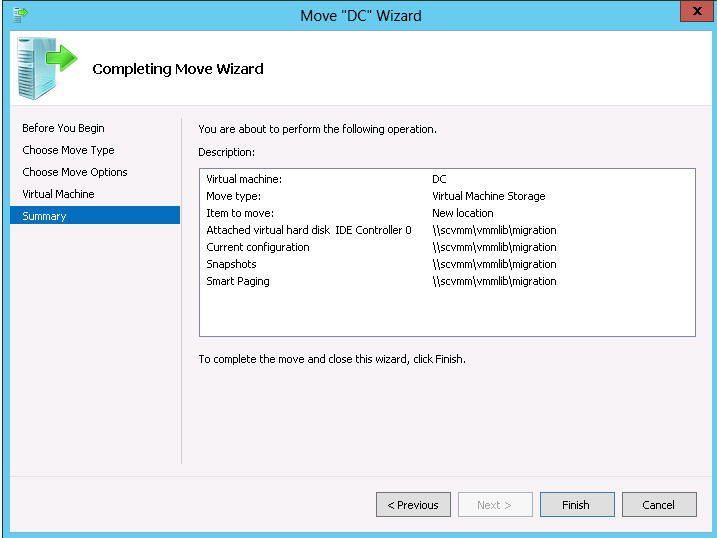
5.
See
the summary of the options you have specified and hit the finish button once
you are ready
6.
The
process has started
7.
And
it`s done!

Subscribe to:
Posts (Atom)