Showing posts with label VM Roles. Show all posts

Wednesday, April 15, 2015

Why I am investing in DSC

In order to get a good grasp on something new, like a technology, it is always important to find a use case.

Once you have a use case, I can ensure you that the learning process is much more interesting, fun – and perhaps easier too.

That is what I did when I went deep into Desired State Configuration. I found a use case.
My use case was to leverage DSC as part of VM Roles in Azure Pack in a way that would be valid for the future too.

Here comes some reasons for my decision. 


Powershell has been around for some time now, and one of the best benefits by learning and using the shell is the amount of work you are able to do, combining modules, components, technologies and much more through the same API. Considering that everything that MS builds and do – regardless of cloud, will be accessible and manageable through Powershell in addition to other options, ensures that this is a real no-brainer.

With Windows Management Framework 4.0, we also got Powershell Desired State Configuration added to our table.
Powershell Desired State Configuration is Microsoft’s way to implement an idempotent configuration that ensures that the “desired state” will be reached by applying the entire configuration, regardless of the current state.

-          But, what does this really mean? Aren’t we able to do everything using native Powershell scripts already?

That is correct. There’s no “limits” by using Powershell natively today.
However, with native Powershell scripts you are responsible for building all the error handling and logic into your scripts. And as you probably know, that can be both very time consuming and challenging.

Desired State Configuration handles this automatically for you, letting you make and deploy any incremental changes to your configuration over time without risking the system to be put in a bad state.
If you have any configuration drift? Depending on how the Local Configuration Manager is configured – the engine that’s responsible for applying the configuration and follow the instructions, the system can heal itself by enforcing the desired state.

Think of Powershell Desired State Configuration as a contract between you and your nodes (manageable objects).

In order to create and deliver this “contract”, Desired State Configuration is based on CIM – and use WinRM for communicating. CIM uses a language called Manaed Object Format – often referred to as “MOF”. Powershell Desired State Configuration is a way to create and distribute MOF files that can be applied to systems supporting this standard.

The way it’s applied to the node(s) is either through “Push” or “Pull”.

(The difference between Push and Pull is out of scope right now and deserves a dedicated blog post later on. I promise).

To put it short, the Pull mechanism requires some infrastructure in order to work, where the node(s) are talking to the Pull server – either through SMB, Http or Https.

The Push method is pretty straight forward and what you can start using right out of the box. DSC requires that WinRM listeners are configured so that the CIM can push the configuration to the remote systems.

Here’s an example of how a Powershell DSC Configuration looks like:


configuration DNS
{
    node kndsc006
    {
        WindowsFeature DNS
        {
            Name = "DNS"
            Ensure = "Present"
            IncludeAllSubFeature = $true
        }
    }
}

DNS

Start-DscConfiguration -wait -force -Verbose .\DNS

As you can see, the format here is quite easy to read.
We can easily see that we will install (Ensure = "Present") DNS (Name = "DNS") on the target node (kndsc006). 

Actually, it is so easy to read that Powershell newbies like me are able to manage J

Hopefully this gave you some more context about the “why”, but we are not done yet.

In Azure today, we are able to leverage DSC as part of the VM extension, meaning we can create – upload – and apply our DSC configuration to Azure IaaS virtual machines. The method of applying the config for these VMs are “Push”.

As you probably know, we don’t have the exact same capabilities on-prem in order to leverage DSC as part of Azure Pack. However, we are able to simulate the same experience at some extent, by using the combination of DSC, SMA and VM Roles (http://kristiannese.blogspot.no/2015/03/application-modeling-with-vm-roles-dsc.html )

Moving forward, we know that the consistency across clouds will be as near as 1:1 with the introduction of Azure Resource Manager that will introduce us for a complete new way to interact with our cloud services – regardless of location. Also worth to note, the Azure Resource Manager itself will be idempotent.

What about your existing DSC scripts?
Exactly, that is the main point here. These configurations will be valid using Azure Resource Manager too J

So in essence, you invest in DSC now and use it both for Azure Pack (VM Roles + SMA) and Azure (VM Extension), and later on you can reuse the investment you’ve made into the era of Azure Resource Manager.


Hopefully this gave you some inspiration to start learning Desired State Configuration, available in Windows Management Framework 4.0 – but also available in 5.0 (which is in Preview).
Please note that everything you do in Azure when using the DSC VM Extension there is based on the 5.0 version.

Monday, March 16, 2015

Application Modeling with VM Roles, DSC and SMA

Earlier this year, I started to go deep into DSC to learn more about the concept, possibilities and most important, how we can improve what we already have and know, using this new approach of modeling.

For more information and as an introduction to this blog post, you can read my former blog post on the subject: http://kristiannese.blogspot.no/2015/03/dsc-with-azure-and-azure-pack.html

Desired State Configuration is very interesting indeed – and to fully embrace it you need to be comfortable with Powershell. Having that said, Desired State Configuration can give you some of what you are requiring today, but not everything.

Let me spend some minutes trying to explain what I am actually saying here.

If you want to use DSC as your primary engine, the standard solution to configure and deploy applications and services across clouds throughout the life cycle, there is nothing there to stop you from doing so.
However, given the fact that in many situations, you won’t be the individual who’s ordering the application, server and dependencies, it is important that we can make this available in a world full of tenants with a demand for self-servicing.

Looking back at how we used to do things before to handle the life-cycle management of applications and infra, I think it is fair to say it was something like this (in context of System Center):

1)      We deployed a Virtual Machine based on a VM Template using SCVMM
We either
a)      Manually installed and configured applications and services within the guest post VM deployment
b)      Used SCCM to install agents, letting the admin interact with the OS to install and configure applications using a central management solution
2)      If we wanted to provide monitoring, we then used SCOM to roll out the agents to our servers and configured them to report to their management group
3)      Finally yet importantly, we also wanted to be secure and have a reliable set of data. That’s why we also added backup agents to our servers using SCDPM

In total, we are talking about 4 agents here (SCVMM, SCCM, SCOM and SCDPM).
That is a lot.

Also note that I didn’t specify any version of System Center, so this was probably even before we started to talk about Private Clouds (introduced with System Center 2012).

And that’s the next topic, all of this in the context of cloud computing.

If we take a walk down the memorial lane, we can see some of Microsoft’s least proud moments, all the attempts in order to bring the private cloud a fully functional self-service portal.

-        We’ve had several self-service portals for VMM that later was replaced by different solutions, such as Cloud Service Process Pack and App Controller
-        Cloud Service Process Pack – which was introduced with SC 2012 – where all the components were merged into a single license, giving you out-of-the-box functionality related to IaaS.
The solution was one of the worst we have seen, and the complexity to implement it was beyond what we have seen ever since.
-        AppController was based on Silverlight and gave us the “single-pane of glass” vision for cloud management. With a connector to Azure subscriptions (IaaS) and to private and service provider clouds (using SPF), you could deploy and control your services and virtual machines using this console

Although it is common knowledge that AppController will be removed in vNext of System Center (https://technet.microsoft.com/en-us/library/dn806370.aspx?f=255&MSPPError=-2147217396 ), AppController introduced us to a very interesting thing: self-service of service templates.

The concept of service templates was introduced in System Center 2012 – Virtual Machine Manager, and if we go back to my list of actions we needed to perform, we could say that service templates at some point would replace the need of SCCM.
Service Templates was an extension to the VM template. It gave us the possibility to design, configure and deploy multi-tier applications – and deploy it to our private clouds.
However, I have to admit that back then; we did not see much adoption of service templates. Actually, we did not see some serious adoption before Microsoft started to push some pre-configured service templates on their own, and that happened last year – at the same time as their Gallery Items for Azure Pack was released.

To summarize, the service template concept (which was based on XML) gave the application owners and the fabric administrators a chance to interact to standardize and deploy complex applications into the private clouds, using AppController. In the same sentence there we found AppController (Silverlight) and XML.

If we quickly turn to our “final destination”, Microsoft Azure, we can see that those technologies aren’t the big bet in any circumstances.

VM Roles are replacing service templates in the private cloud through Windows Azure Pack.

A VM Role is based on JSON – and define a virtual machine resource that tenants can instantiate and scale according to their requirements.

We have in essence two JSON files. One for the resource definition (RESDEF) and one for the resource extension (RESEXT).
The resource definition describes the virtual machine hardware and instantiation restrictions, while the resource extension definition describes how a resource should be provisioned.

In order to support user input in a user friendly way, we also have a third JSON file – the view definition (VIEWDEF), which provides the Azure Pack details about how to let the user customize the creation of a VM Role.

These files are contained in a package, along with other files (custom resources, logo’s etc) that describe the entire VM Role.

You might ask yourself why I am introducing you to something you already know very well, or why I am starting to endorse JSON. The answer lays in the clouds.

If you have every played around with the Azure preview portal, you have access to the Azure Resource Manager.
ARM introduced an entirely new way of thinking about you resources. Instead of creating and managing individual resources, you are defining a resource model of your service – to create a resource group with different resources that are logically managed throughout the entire life cycle.

-        And guess what?

The Azure Resource Manager Templates is based on JSON, which describes the resources and associated deployment parameters.

So to give you a short summary so far:

Service Templates was great when it came with SCVMM 2012. However, based on XML and AppController for self-service, it wasn’t flexible enough, nor designed for the cloud.

Because of a huge focus on consistency as part of the Cloud OS vision by Microsoft, Windows Azure Pack was brought on-premises and should help organizations to adopt the cloud at a faster cadence. We then got VM Roles that should be more aligned with the public cloud (Microsoft Azure), compared to service templates.

So we might (so far) end up with a conclusion that VM Roles is here to stay, and if you are focusing too much on service templates today, you need to reconsider that investment.

The good, the bad and the ugly

So far, the blog post has been describing something similar to a journey. Nevertheless, we have not reached the final destination yet.

I promised you a blog post about DSC, SMA and VM Roles, but so far, you have only heard about the VM Roles.
Before we proceed, we need to be completely honest about the VM Roles to understand the requirement of engineering here. To better understand what I am talking about, I am comparing a VM Role with a stand-alone VM based on a VM Template:


As you can see, the VM Role gives us very much more compared to a stand-alone VM from a VM template. A VM Role is our preferred choice when we want to deploy applications in a similar way as a service template, but only as single tiers. We can also service the VM Role and scale it on demand.

A VM on the other hand, lacks all these fancy features. We can purely base a stand-alone VM on a VM Template, giving us a pre-defined HW template in VMM with some limited settings at the OS level.
However, please note that the VM supports probably the most important things for any production scenarios: backup and DR.
That is correct. If you use backup and DR together with a VM Role, you will end up in a scenario where you have orphaned objects in Azure Pack. This will effectively break the relationship between the VM Role (CloudService in VMM) and its members. There is currently no way to recover from that scenario.

This got me thinking.

How can we leverage the best from both worlds? Using VM Role as the engine that drives and creates the complexity here, supplemented by SMA and Desired State Configuration to perform the in-guest operations into normal VM templates?

I ran through the scenario with a fellow MVP, Stanislav Zhelyazkov and he nodded and agreed. “-This seems to be the right thing to do moving forward, you have my blessing” he said.


The workflow

This is where it all makes sense. To combine the beauty of VM Roles, DSC and SMA to achieve the following scenario:

1)      A tenant logs on to the tenant portal. The subscription includes the VM Cloud resource provider where the cloud administrator has added one or more VM Roles.
2)      The VM Role Gallery shows these VM Roles and provides the tenant with instructions on how to model and deploy the application.
3)      The tenant provides some input during the VM Role wizard and the VM Role deployment starts
4)      In the background, a parent runbook (SMA) that is linked to the event in the portal kicks in, and based on the VM Role the tenant chose, it will invoke the correct child runbook.
5)      The child runbook will deploy the (stand-alone) VMs necessary for the application specified in the VM Role, join them to the proper domain (if specified) and automatically add them to the tenant subscription.
6)      Once the stand-alone VMs are started, the VM Role resource extension kicks in (which is the DSC configuration, using push) that based on the parameters and inputs from the tenant is able to deploy and model the application entirely.
7)      Once the entire operation has completed, the child runbook will clean-up the VM Role and remove it from the subscription


In a nutshell, we have achieved the following with this example:

1)      We have successfully been able to deploy and model our applications using the extension available in VM Roles, where we are using Desired State Configuration to handle everything within the guests (instead of normal powershell scripts).
2)      We are combining the process in WAP with SMA Runbooks to handle everything outside of the VM Role and the VMs.
3)      We are guaranteed a supported life-cycle management of our tenant workloads


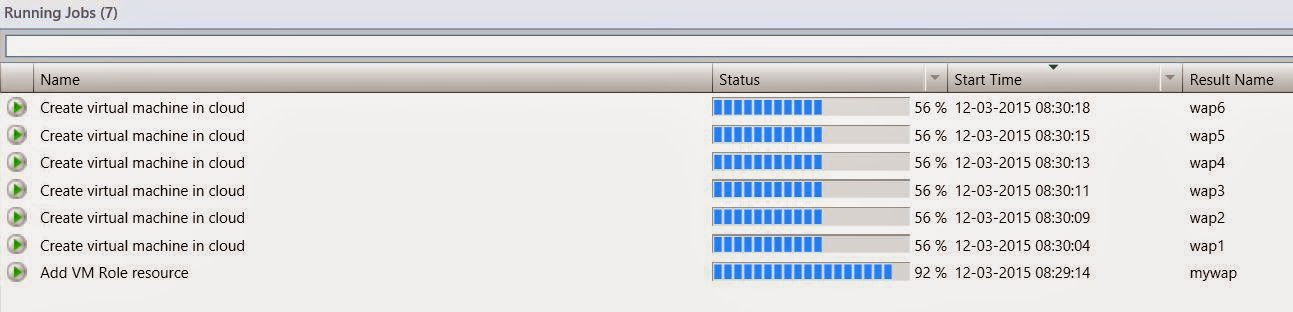
Here you can see some screenshots from a VM Role that will deploy Windows Azure Pack on 6 stand-alone VMs, combining DSC and SMA.


In an upcoming blog post, we will start to have a look at the actual code being used, the challenges and workarounds.


I hope that this blog post showed you some interesting things about application modeling with VM Roles, SMA and DSC, and that the times are a-changing compared to what we used to do in this space.

Tuesday, March 4, 2014

Authoring VM Roles for Windows Azure Pack

You may be aware of VM Roles within Windows Azure Pack.
The ability to extend your service offering with services and applications, using the rich framework in VMM is really a killer and a “must” for those who adopt Windows Azure Pack in these days, and when they want to have a VM Cloud.

For more information about how to get started, please see an older blog post:

Microsoft is creating ready-to-use gallery items that you can download with Web Platform Installer.
One of the good things with these packages, is that you can edit them directly using the VM Authoring tool. (Download VMAuthoring Tool from Codeplex: https://vmroleauthor.codeplex.com/ )

The VM Role in WAP and System Center 2012 R2 introduces an application model to deploy virtual machine workloads. The tool is used to author VM Role artifacts – Resource Definitions and Resource Extension Packages.

In this blog post, we will create a basic VM Role that can be joined to an existing Active Directory Domain.

We need to create both a Resource Definition – and a Resource Extension for the VM Role.

Resource Definition is the package that speaks a language that Windows Azure Pack is able to understand. (RESDEF) is a versioned template that describes how a resource should be provisioned, and includes information such as VM size, OS settings, OS image, Allowable Extensions and Resource Extension References. In addition, the Resource Definition also contains the view definition (VIEWDEF) which presents the tenants for a user interface in the portal, providing them with descriptions to the input fields and prompt them for required information.

Resource Extension is the package that speaks a language that VMM is able to understand. The extensions contains information about the requirements for the resource definitions towards the building blocks in the VMM library, and describes how a resource should be installed and configured described by a Resource Definition File. The resource extension can only be imported with Powershell, and may have requirements to its VHD’s in order be used in Windows Azure Pack.
For instance, a VM Role that should work as a SQL server would have certain criteria’s that must be met in the resource extension, like a VHD tagged with “SQL”, so that the resource definition and its view definition will list the valid disks within the portal during the creation wizard.

For more information and a good guidance on how to create VM Roles with VMAuthoring Tool, please check these great tutorials by Charles:

VM Role Resource Extension: http://www.youtube.com/watch?v=iCilD2P8vhE

VM Role Resource Definition: http://www.youtube.com/watch?v=66zznivfh_s

Consider this as mandatory before you proceed with this blog post J

I will create a new VM Role that will join an existing Active Directory Domain and also enable the File Service within the guest post deployment.

1)      Start VM Authoring tool and create a new Resource Definition Package and a new Windows Resource Extension Package


2)      As you can see, we have both artifacts presented in this tool, and we will mainly be focusing on the resource definition since we are not putting so much applications within the VM Role.


3)      On the resource requirements for the resource exention, I have added a tag for the VHD, which is “WindowsServer2012”. That means that the vhd used with with extension must be tagged with this tag


4)      On the Roles & Features section, I have simply enabled “File Server” so that VMM will configure the guests as part of the process with this server role


5)      On the Resource Definition, we also have ‘Extension References’ that will link to the resource extension we will import into VMM library. The references here are important, so that the definition file know where to look, and VMM know what to present to the portal when the VM Role is selected. As you can see, I have referenced to my resource extension file in the upper left corner.


6)      At the operating System Profile in the resource definition, I want to configure the VM role to join an Active Directory Domain. Default, the profile is configured with “Workgroup”, so select “JoinDomain” and from the drop-down list side-by-side with DomainToJoin and DomainJoinCredentials, click generate a new parameter on both. Navigate to the “parameter” in the Resource Definition afterwards

7)      We have now two new parameters and the tools is auto creating the data type recommended for these fields. In this case, string and credentials are mapped with the new parameters


8)      Moving over to the section for the View Definition, we can see the OSVirtualHardDisk and the requirement for tags. In this case, a tag of “WindowsServer2012” is required on the vhd used for this VM role, and we must tag this vhd with powershell in VMM

Save the packages to a location on your HDD. Note that you can always verify your input and the tool will point out any errors in the configuration for you to fix.

This was some very small modifications, but we now have the basics in place in order to have a new VM Role that will join the domain during deployment, and also install and configure the file server.

Let us move over to the service management portal in Windows Azure Pack and import the resource definition.

1)      Log on to the Windows Azure Pack Administrator portal. This is considered as a high privileged server and should be located behind your corporate firewall.
2)      On the VM Clouds, go to Gallery and click import. Browse to the location of your newly created gallery item and import the resource definition.


3)      Make the Gallery Item Public and save the changes.


Before we can add the gallery item to a Plan created in Windows Azure Pack, we must first import the resource extension to VMM so that the resource definition know what to look for.

1)      Navigate to VMM and launch Powershell

The following script can be used to import a resource extension, and also to verify the content afterwards.

### Sample script that imports the Web VM Role into VMM Library

### Get Library share
### Get resource extensions from folder
### Import resource extension to VMM library

$libraryShare = Get-SCLibraryShare | Where-Object {$_.Name -eq 'MSSCVMMLibrary'} 

$resextpkg = $Env:SystemDrive + "\Users\administrator.INTERNAL\Desktop\GalleryTemp\KNDemo-03-03-2014-18-36-06\KN.resextpkg"

Import-CloudResourceExtension –ResourceExtensionPath $resextpkg -SharePath $libraryshare -AllowUnencryptedTransfer


### Get virtual hard disk that should be associated with the resource extension
### Ask VMM for operating systems equal to 64-bit edition of Windows Server 2012 Datacenter
### Set virtual hard disk to be tagged as Windows Server 2012 Datacenter

$myVHD = Get-SCVirtualHardDisk | where {$_.Name –eq 'webg1.vhdx'} 
$WS2012Datacenter = Get-SCOperatingSystem | where { $_.name –eq '64-bit edition of Windows Server 2012 Datacenter' } 
Set-scvirtualharddisk –virtualharddisk $myVHD –OperatingSystem $WS2012Datacenter

### Define tags
### Tag vhd with familiy name (Windows Server 2012) and extension requirements (.NET3.5)
### Set properties on vhd

$Tags = $myvhd.tag
if ( $tags -cnotcontains "WindowsServer2012" ) { $tags += @("WindowsServer2012") }
if ( $tags -cnotcontains ".NET3.5" ) { $tags += @(".NET3.5") }
Set-SCVirtualHardDisk -VirtualHardDisk $myvhd -Tag $tags
Set-SCVirtualHardDisk -VirtualHardDisk $myvhd -FamilyName "Windows Server 2012 Datacenter" -Release "1.0.0.0"

### Verify cloud resource extensions

Get-CloudResourceExtension | Format-List -Property State, Description, Name

### Verify cloud resources deployed

Get-CloudResource | Format-List -Property name

### Verify tags on vhds

Get-SCVirtualHardDisk | Format-List -Property familyname, OperatingSystem, VHDFormatType, release

This script is for your reference.

Once this has completed, we should be able to add the gallery item to an existing Plan in WAP.

1)      Navigate back to the service management portal and locate your newly imported gallery item
2)      On plans, click add and select the Plan you want this to be added.
Note: based on the number of subscriptions accessing this plan, it can take a minute or two before everything is populated and exposed to them.

Now, let us logon as a tenant and deploy or new VM Role.

Note: If you are using NVGRE and want the VM Role to join an Active Directory Domain, you must specify the right DNS server for the network in the portal prior to deployment of this role. If you are only using a public DNS for internet connectivity for your tenants, you won’t be able to join.

1)      Logon to the tenant portal
2)      Launch the wizard, select new Virtual Machine Role and select ‘from gallery’


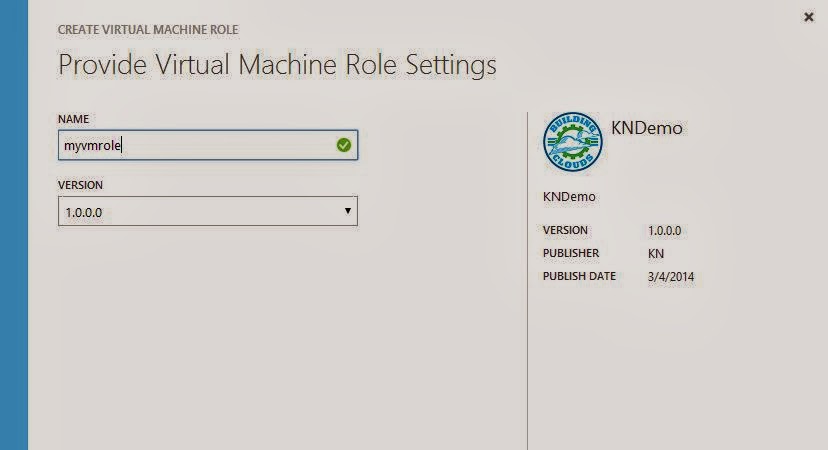
3)      Since we have imported both the resource definition file and the resource extension file, that also have the corresponding requirements to see each other, we can see the newly created VM Role “KNDemo” which has a version of “1.0.0.0”. Click to proceed


4)      Assign a unique name for the VM role and continue


5)      The view definition will present us with the required input fields and map this back to the configuration of the VM role. As you can see, I am able to specify my Active Directory Domain to join, and which credentials I should use. Once this is done, we can deploy the VM Role.
Note that you could also separate different configuration tasks in different sections/windows in this wizard, so that everything is not placed in a long list as in this example.


6)      The VM Role will now be provisioned, joined to my network (NVGRE in this context) and my domain


Once the VM is deployed, we can log on (using the great Remote Console feature) remotely and verify the configuration.

First, we see that the VM has joined the domain, and I am able to log on with domain credentials:


Next, we can verify that we have installed the File Server role:


I hope this blog post was useful in how to get started with authoring your own VM Roles using VMAuthoring tool.
If times allow, I will be back with other examples in the near future.