Showing posts with label ASR. Show all posts

Monday, May 4, 2015

Azure Site Recovery: Generation 2 VM support

For almost a year ago, Microsoft announced the preview of a cloud service that has turned out to be the leading star when it comes to Hybrid Cloud scenarios, out of the box from Microsoft.

Microsoft Azure Site Recovery let customers extend their datacenter solutions to the cloud to ensure business continuity and availability on-demand.
The solution itself is state of the art and covers many different scenarios – and can rather be seen as their “umbrella” when it comes to availability and recovery in the cloud, as it has several different offerings in different flavors under its wings. 

Besides supporting DR protection of VMware and Physical computers (newly announced), Azure Site Recovery is considered as mandatory for organizations that need DR for their Hyper-V environments, regardless whether the cloud or a secondary location on-prem is the actual DR target.

Just recently, Microsoft announced support for protecting Generation 2 Virtual Machines to Azure.
This is fantastic good news and shows that the journey towards cloud consistency is established for sure.

Let me add some context before we look into the details.

I’ve been working with the brilliant Azure Site Recovery Product Group at Microsoft for a long time now, and I have to admit that these guys are outstanding. Not only do they ship extremely good quality of code, but they also listen to feedback. And when I say listen, they actually engage with you and really tries to understand your concern. In the end of the day, we are all on the same team, working towards the best experience and solution possible.

During TechEd in Barcelona, I was co-presenting “Microsoft Azure Site Recovery: Leveraging Azure as your Disaster Recovery Site” (http://channel9.msdn.com/Events/TechEd/Europe/2014/CDP-B314 ) together with Manoj, and this is when our real discussion started.
Using Azure as the secondary site for DR scenarios makes perfect sense and many customers would like to take benefit from this as soon as possible. However, we often saw that these customers had deployed their virtual machines as Generation 2 VMs – which wasn’t suited for the Azure platform. This was a blocker and the amount of Gen2 VMs were increasing every day.

Earlier in January this year, I made a community survey around the topic and the result was very clear:

Yes – people would love to use Azure as their secondary site, if there was support of Generation 2 VMs in the Cloud.

I am glad to say that the Product Group listened and now we can start to protect workloads on Gen2 VMs too.
But, how does this work?

When you enable a VM for protection, the data is sent to an endpoint in Azure, and nothing special has happened so far.

However, the ASR service will perform a conversion in the service at the time of failover to Gen1.

What?

Let me explain further.

In case of a disaster where you need to perform a failover to Azure, the VM(s) is converted and started as Gen1, running in Azure.
The ASR backend services used during failover has the conversion logic. At failover time, backend service reads Gen2 OS disk and convert the disk to Gen1 OS disk (hence the requirements of the OS disk in Azure).
If you need/want/have to failback to your on-prem Hyper-V environment, the VM will of course be converted back to Gen2.

For more details – check out the official blog post by one of the PM’s, Anoob Backer


Monday, January 19, 2015

Business Continuity with SCVMM and Azure Site Recovery

Business Continuity for the management stamp

Back in November, I wrote a blog post about the DR integration in Windows Azure Pack, where service providers can provide managed DR for their tenants - http://kristiannese.blogspot.no/2014/11/windows-azure-pack-with-dr-add-on-asr.html

I’ve been working with many service providers over the last months where both Azure Pack and Azure Site Recovery has been critical components.

However, looking at the relatively big footprint with the DR add-on in Update Rollup 4 for Windows Azure Pack, organizations has started in the other end in order to bring business continuity to their clouds.

For one of the larger service providers, we had to dive deep into the architecture of Hyper-V Replica, SCVMM and Azure Site Recovery before we knew how to design the optimal layout to ensure business continuity.

In each and every ASR design, you must look at your fabric and management stamp and start looking at the recovery design before you create the disaster design. Did I lost you there?

What I’m saying is that it’s relatively easy to perform the heavy lifting of the data, but once the shit hit the fans, you better know what to expect.

In this particular case, we had a common goal:

We want to ensure business continuity for the entire management stamp with a single click, so that tenants can create, manage and operate their workloads without interruption. This should be achieved in an efficient way with a minimal footprint.

When we first saw the release of Azure Site Recovery, it was called “Hyper-V Recovery Manager” and required two SCVMM management stamps to perform DR between sites. The feedback from potential customers were quite loud and clear: people wanted to leverage their existing SCVMM investment and perform DR operations with a single SCVMM management stamp. Microsoft listened and let us now perform DR between SCVMM Clouds, using the same SCVMM server.

Actually, it’s over a year ago since they made this available and diving into my archive I managed to find the following blog post: http://kristiannese.blogspot.no/2013/12/how-to-setup-hyper-v-recovery-manager.html

So IMHO, using a single SCVMM stamp is always preferred whenever it is possible, so that was also my recommendations when it came to the initial design for this case.

In this blog post, I will share my findings and workaround for making this possible, ensuring business continuity for the entire management stamp.

The initial configuration

The first step we had to make when designing the management stamp, was to plan and prepare for SQL AlwaysOn Availability Groups.
System Center 2012 R2 – Virtual Machine Manager, Service Manager, Operations Manager and Orchestrator does all support AlwaysOn Availability Groups.

Why plan for SQL AlwaysOn Availability Groups when we have the traditional SQL Cluster solution available for High-Availability?

This is a really good question – and also very important as this is the key for realizing the big goal here. AlwaysOn is a high-availability and disaster recovery solution that provides an enterprise-level alternative to database mirroring. The solution maximizes the availability of a set of user databases and supports a failover environment for those selected databases.
Compared to a traditional SQL Cluster – that can also use shared VHDXs, this was a no brainer. A shared VHDX would have given us a headache and increased the complexity with Hyper-V Replica.
SQL AlwaysOn Availability Groups let us use local storage for each VM within the cluster configuration, and enable synchronous replication between the nodes on the selected user databases.

Alright, the SQL discussion is now over, and we proceeded to the fabric design.
In total, we would have several Hyper-V Clusters for different kind of workload, such as:

·       Management
·       Edge
·       IaaS
·       DR


Since this was a Greenfield project, we had to deploy everything from scratch.
We started with the Hyper-V Management Cluster and from there we deployed two VM instances in a guest cluster configuration, installed with SQL Server for Always On Availability Groups. Our plan was to put the System Center databases – as well as WAP databases onto this database cluster.

Once we had deployed a Highly-Available SCVMM solution, including a HA library server, we performed the initial configuration on the management cluster nodes.
As stated earlier, this is really a chicken and egg scenario. Since we are working with a cluster here, it’s straightforward to configure the nodes – one at a time, putting one node in maintenance mode, move the workload and repeat the process on the remaining node(s). Our desired state configuration at this point is to deploy the logical switch with its profile settings to all nodes, and later provision more storage and define classifications within the fabric.
The description here is relatively high-level, but to summarize: we do the normal fabric stuff in VMM at this point, and prepare the infrastructure to deploy and configure the remaining hosts and clusters.

For more information around the details about the design, I used the following script that I have made available that turns SCVMM into a fabric controller for Windows Azure Pack and Azure Site Recovery integration:


Once the initial configuration was done, we deployed the NVGRE gateway hosts, DR hosts, Iaas hosts, Windows Azure Pack and the remaining System Center components in order to provide service offerings through the tenant portal.

If you are very keen to know more about this process, I recommend to read our whitepaper which covers this end-to-end:


Here’s an overview of the design after the initial configuration:


If we look at this from a different – and perhaps a more traditional perspective, mapping the different layers with each other, we have the following architecture and design of SCVMM, Windows Azure Pack, SPF and our host groups:


So far so good. The design of the stamp was finished and we were ready to proceed with the Azure Site Recovery implementation

Integrating Azure Site Recovery

To be honest, at this point we thought the hardest part of the job was done, such as ensuring HA for all the workloads as well as integrating NVGRE to the environment, spinning up complex VM roles just to improve the tenants and so on and so forth.
We added ASR to the solution and was quite confident that this would work as a charm since we had SQL AlwaysOn as part of the solution.

We soon found out that we had to do some engineering before we could celebrate.

Here’s a description of the issue we encountered.

In the Microsoft Azure portal, you configure ASR and perform the mapping between your management servers and clouds and also the VM networks.

As I described earlier in this blog post, the initial design of Azure Site Recovery in an “Enterprise 2 Enterprise” (on-prem 2 on-prem) scenario, was to leverage two SCVMM management servers. Then the administrator had the opportunity to duplicate the network artifacts (network sites, VLAN, IP pools etc) across sites, ensuring that each VM could be brought online on the secondary site with the same IP configuration as on the primary site.

Sounds quite obvious and really something you would expect, yeah?

Moving away from that design and rather use a single SCVMM management server (a single management server, that is highly-available is not the same as two SCVMM management servers), gave us some challenges.

1)      We could (of course) not create the same networking artifacts twice within a single SCVMM management server
2)      We could not create an empty logical network and map the primary network with this one. This would throw an error
3)      We could not use the primary network as our secondary as well, as this would give the VMs a new IP address from the IP pool
4)      Although we could update IP addresses in DNS, the customer required to use the exact IP configuration on the secondary site post failover


Ok, what do we do now?
At that time it felt a bit awkward to say that we were struggling to keep the same IP configuration across sites.

After a few more cups of coffee, it was time to dive into the recovery plans in ASR to look for new opportunities.

A recovery plan groups virtual machines together for the purposes of failover and recovery, and it specifies the order in which groups of VMs should fail over. We were going to create several recovery plans, so that we could easily and logically group different kind of workloads together and perform DR in a trusted way

Here’s how the recovery plan for the entire stamp looks like:


So this recovery plan would power off the VMs in a specific order, perform the failover to the secondary site and then power on the VMs again in a certain order specified by the administrator.

What was interesting for us to see, was that we could leverage our Powershell skills as part of these steps.

Each step can have an associated script and a manual task assigned.
We found out that the first thing we had to do before even shutting down the VMs, was to run a powershell script that would verify that the VMs would be connected to the proper virtual switch in Hyper-V.

Ok, but why?

Another good question. Let me explain.

Once you are replicating a virtual machine using Hyper-V Replica, you have the option to assign an alternative IP address to the replica VM. This is very interesting when you have different networks across your sites so that the VMs can be online and available immediately after a failover.
In this specific customer case, the VLAN(s) were stretched and made available on the secondary site as well, hence the requirement to keep the exact network configuration. In addition, all of the VMs had assigned static IP addresses from the SCVMM IP Pools.

However, since we didn’t do any mapping at the end in the portal, just to avoid the errors and the wrong outcome, we decided to handle this with powershell.

When enabling replication on a virtual machine in this environment, and not mapping to a specific VM network, the replica VM would have the following configuration:


As you can see, we are connected to a certain switch, but the “Failover TCP/IP” checkbox was enabled with no info. You probably know what this means? Yes, the VM will come up with an APIPA configuration. No good.

What we did

We created a powershell script that:

a)       Detected the active Replica hosts before failover (using the Hyper-V Powershell API)
b)      Ensured that the VM(s) were connected to the right virtual switch on Hyper-V (using the Hyper-V Powershell API)
c)       Disabled the Failover TCP/IP settings on every VM
a.       Of all of the above were successful, the recovery plan could continue to perform the failover
b.       If any of the above were failing, the recovery plan was aborted


For this to work, you have to ensure that the following pre-reqs are met:

·        Ensure that you have at least one library server in your SCVMM deployment
·        If you have a HA SCVMM server deployment as we had, you also have a remote library share (example: \\fileserver.domain.local\libraryshare ). This is where you store your powershell script (nameofscript.ps1)  Then you must configure the share as follow:
a.       Open the Registry editor
b.       Navigate to HKEY_LOCAL_MACHINE_SOFTWARE\Microsoft\Microsoft System Center Virtual Machine Manager Server\DRAdaper/Registration
c.        Edit the value ScriptLibraryPath
d.       Place the value as \\fileserver.domain.local\libraryshare\. Specify the full fully qualified domain name (FQDN).
e.       Provide permission to the share location

This registry setting will replicate across your SCVMM nodes, so you only have to do this once.

Once the script has been placed in the library and the registry changes are implemented, you can associate the script with one or more tasks within a recovery plan as showed below.


Performing the recovery plan(s) now would ensure that every VM that was part of the plan, was brought up at the recovery site with the same IP configuration as on the primary site.

With this, we had a “single-button” DR solution for the entire management stamp, including Windows Azure Pack and its resource providers.


-kn

Thursday, January 1, 2015

Azure Site Recovery - Survey

Happy New Year!

Now, let us get back to work.

I have made a very short survey just to get a better understanding of the potential DR scenarios with Microsoft Azure Site Recovery.

As you already know, Azure can be your DR site today, where you can have ongoing replication from your private cloud(s) to Azure, which eliminates the need for a secondary site that you have to manage and operate yourself.

However, there are some limitations when using Azure, such as lack of support for Generation 2 VMs and the advance usage of VHDX.

Please take 30 seconds to complete this short survey - and I will be very grateful.

https://no.surveymonkey.com/s/KWSCD6W

-kn

Tuesday, November 4, 2014

Sessions from TechEd 2014 Barcelona

If you didn’t have time to attend TechEd in Barcelona, or for some reasons missed an important session, you can now watch them all live on-demand on Channel9.

I had the honor to present during this TechEd, and had two sessions.

Planning & Designing Management Stamps for Windows Azure Pack
A topic that I personally think is very interesting, and work with on a day to day basis when designing real world private and public clouds.


Microsoft Azure Site Recovery: Leveraging Azure as Your Disaster Recovery Site
Together with a living legend, Manoj Jain, we showed how both enterprises as well as hosting services providers (new) can leverage Azure as their DR site for Hyper-V workloads.


Hopefully you’ll find them interesting.


See you soon!

Sunday, June 22, 2014

Microsoft Azure Site Recovery

In January, we had a new and interesting service available in Microsoft Azure, called “Hyper-V Recovery Manager”. I blogged about it and explained how to configure this on-premises using a single VMM management server. For details you can read this blog post: http://kristiannese.blogspot.no/2013/12/how-to-setup-hyper-v-recovery-manager.html

Hyper-V Recovery Manager provided organizations using Hyper-V and System Center with automated protection and orchestrating of accurate recovery of virtualized workloads between private clouds, leveraging the asynchronous replication engine in Hyper-V – Hyper – V Replica.

In other words, no data were sent to Azure except the metadata from the VMM clouds.
This has now changed and the service is renamed to Microsoft Azure Site Recovery that finally let you replicate between private clouds and public clouds (Microsoft Azure).

This means that we are still able to utilize the automatic protection of workloads that we are familiar with through the service, but now we can use Azure as the target in addition to private clouds.
This is also a door opener for migration scenarios where organizations considering moving VMs to the cloud, can easily do this with almost no downtime using Azure Site Recovery.

Topology

In our environment, we will use a dedicated Hyper-V cluster with Hyper-V Replica. This means we have added the Hyper-V Replica Broker role to the cluster. This cluster is located in its own host group in VMM and the only host group we have added to a cloud called “E2A”. Microsoft Azure Site Recovery requires System Center Virtual Machine Manager, which will be responsible for the communication and aggregation of the desired instructions made by the administrator in the Azure portal.


Pre-reqs

-          You must have an Azure account and add Recovery Services to your subscription
-          Certificate (.cer) that you upload to the management portal and register to the vault. Each vault has a single .cer certificate associated with it and it’s used when registering VMM servers in the vault.
-          Certificate (.pfx) that you import on each VMM server. When you install the Azure Site Recovery Provider on the VMM server, you must use this .pfx certificate.
-          Azure Storage account, where you will store the replicas replicated to Azure. The storage account needs geo-replication enabled and should be in the same region as the Azure Site Recovery service and associated with the same subscription
-          VMM Cloud(s). A cloud must be created in VMM that contains Hyper-V hosts in a host group enabled with Hyper-V Replica

-          Azure Site Recovery Provider must be installed on the VMM management server(s)
In our case, we had already implemented “Hyper-V Recovery Manager”, so we were able to do an in-place upgrade of the ASR Provider.
-          Azure Recovery Services agent must be installed on every Hyper-V host that will replicate to Microsoft Azure. Make sure you install this agent on all hosts located in the host group that you are using in your VMM cloud.

Once we had enabled all of this in our environment, we were ready to proceed and to the configuration of our site recovery setup.

Configuration


Login to the Azure management portal and navigate to recovery services to get the details around your vault, and see the instructions on how to get started.

We will jump to “Configure cloud for protection” as the fabric in VMM is already configured and ready to go.
The provider installed on the VMM management server is exposing the details of our VMM clouds to Azure, so we can easily pick “E2A” – which is the dedicated cloud for this setup. This is where we will configure our site recovery to target Microsoft Azure.


Click on the cloud and configure protection settings.


On target, select Microsoft Azure. Also note that you are able to setup protection and recovery using another VMM Cloud or VMM management server.


For the configuration part, we are able to specify some options when Azure is the target.

Target: Azure. We are now replicating from our private cloud to Microsoft Azure’s public cloud.
Storage Account: If none is present, then you need to create a storage account before you are able to proceed. If you have several storage accounts, then choose the accounts that are in the same region as your recovery vault.
Encrypt stored data: This is default set to “on”, and not possible to change in the preview.
Copy frequency: Since we are using Hyper-V 2012 R2 in our fabric – that introduced us for additional capabilities related to copy frequencies, we can select 30 seconds, 5 minutes and 15 minutes. We will use the “default” that is 5 minutes in this setup.
Retain recovery points: Hyper-V Replica is able to create additional recovery points (crash consistent snapshots) so that you can have a more flexible recovery option for your virtual workload. We don’t need any additional recovery points for our workloads, so we will leave this to 0.
Frequency of application consistent snapshots: If you want app consistent snapshots (ideally for SQL servers, which will create VSS snapshots) then you can enable this and specify it here.
Replication settings: This is set to “immediately” which means that every time a new VM is deployed to our “E2A” cloud in VMM with protection enabled, will automatically start the initial replication from on-premises to Microsoft Azure. For large deployments, we would normally recommend to schedule this.

Once you are happy with the configuration, you can click ‘save’.


Now, Azure Site Recovery will configure this for your VMM cloud. This means that – through the provider, the hosts/clusters will be configured with these settings automatically from Azure.
-          Firewall rules used by Azure Site Recovery are configured so that ports for replication traffic are opened
-          Certificates required for replication are installed
-          Hyper-V Replica Settings are configured
 Cool!

You will have a job view in Azure that shows every step during the actions you perform. We can see that protection has been successfully enabled for our VMM Cloud.


If we look at the cloud in VMM, we also see that protection is enabled and Microsoft Azure is the target.


Configuring resources

In Azure, you have had the option to create virtualized networks for many years now. We can of course use them in this context, to map with our VM networks present in VMM.
To ensure business continuity it is important that the VMs that failover to Azure are able to be reached over the network – and that RDP is enabled within the guest. We are mapping our management VM network to a corresponding network in Azure.


VM Deployment

Important things to note:
In preview, there are some requirements for using Site Recovery with your virtual machines in the private cloud.

Only support for Gen1 virtual machines!
This means that the virtual machines must have their OS partition attached to an IDE controller. The disk can be vhd or vhdx, and you can even attach data disks that you want to replicate. Please note that Microsoft Azure does not support VHDX format (introduced in Hyper-V 2012), but will convert the VHDX to VHD during initial replication in Azure. In other words, virtual machines using VHDX on premises will run on VHD’s when you failover to Azure. If you failback to on-premises, VHDX will be used as expected.

Next, we will deploy a new VM in VMM. When we enable protection on the hardware profile and want to deploy to a Cloud, intelligent placement will kick in and find the appropriate cloud that contains Hyper-V hosts/clusters that meet the requirements for replica.


After the deployment, the virtual machine should immediately start with an initial replication to Microsoft Azure, as we configured this on the protection settings for our cloud in Azure. We can see the details of the job in the portal and monitor the process. Once it is done, we can see – at a lower level that we are actually replicating to Microsoft Azure directly on the VM level.


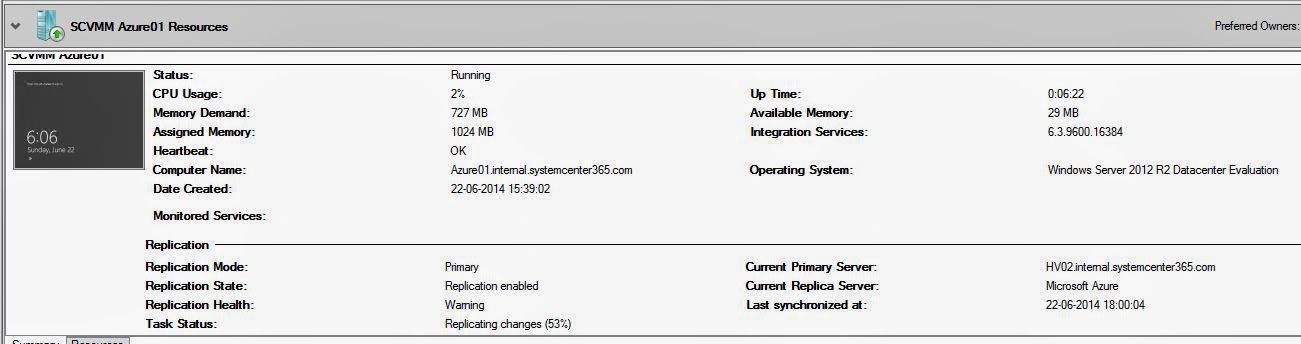
After a while (depending on available bandwidth), we have finally replicated to Azure and the VM is protected.


Enabling protection on already existing VMs in the VMM cloud

Also note that you can enable this directly from Azure. If you have a virtual machine running in the VMM cloud enabled for protection, but the VM itself is not enabled in VMM, then Azure can pick this up and configure it directly from the portal.


If you prefer to achieve this by using VMM, it is easy by open the properties of the VM and enable for protection.


One last option is to use the VMM powershell module to enable this on many VMs at once.

Set-SCVirtualMachine –VM “VMName” –DRProtectionRequired $true –RecoveryPointObjective 300

Test Failover

One of the best things with Hyper-V Replica is that complex workflows, such as test failovers, planned failovers and unplanned failovers are integrated into the solution. This is also exposed and made available in the Azure portal, so that you easily can perform a test failover on your workloads. Once a VM is protected – meaning that the VM has successfully completed the initial replication to Azure, we can perform a test failover. This will create a copy based on the recovery point you select and boot that virtual machine in Microsoft Azure.


Once you are satisfied with the test, you can complete the test failover from the portal.
This will power off the test virtual machine and delete it from Azure. Please note that this process will not interfere with the ongoing replication from private cloud to Azure.


Planned failover

You can use planned failover in Azure Site Recovery for more than just failover. Consider a migration scenario where you actually want to move your existing on-premises workload to Azure, planned failover will be the preferred option. This will ensure minimal downtime during the process and start up the virtual machine in Azure afterwards.
In our case, we wanted to simulate planned maintenance in our private cloud, and therefore perform a planned failover to Azure.


Click on the virtual machine you want to failover, and click planned failover in the portal.
Note that if the virtual machine has not performed a test failover, we are recommending you to do so before an actual failover.
Since this is a test, we are ready to proceed with the planned failover.


When the job has started, we are drilling down to the lowest level again, Hyper-V Replica, to see what’s going on. We can see that the VM is preparing for planned failover where Azure is the target.


In the management portal, we can see the details for the planned failover job.


Once done, we have a running virtual machine in Microsoft Azure, that appears in the Virtual Machine list.


If we go back to the protected clouds in Azure, we see that our virtual machine “Azure01” has “Microsoft Azure” as its active location.


If we click on the VMs and drill into the details, we can see that we are able to change the name and the size of the virtual machine in Azure.


We have now successfully performed a planned failover from our private cloud to Microsoft Azure!

Failback from Microsoft Azure

When we were done with our planned maintenance in our fabric, it was time to failback the running virtual machine in Azure to our VMM Cloud.
Click on the virtual machine that is running in Azure that is protected, and click planned failover.
We have two options for the data synchronization. We can either use “Synchronize data before failover” that will perform something similar as “re-initializing replication” to our private cloud. This means synchronization will be performed without shutting down the virtual machine, leading to minimal downtime during the process.
The other option “Synchronize data during failover only” will minimize synchronization data but have more downtime as the shutdown will begin immediately. Synchronization will start after shutdown to complete the failover.
We are aiming for minimal downtime, so option 1 is preferred.


When the job is started, you can monitor the process in Azure portal.


Once the sync is complete, we must complete the failover from the portal so that this will go ahead and start the VM in our private cloud.


Checking Hyper-V Replica again, we can see that the state is set to “failback in progress” and that we currently have no primary server.


The job has now completed all the required steps in Azure.


Moving back to Hyper-V Replica, we can see that the VM is again replicating to Microsoft Azure, and that the primary server is one of our Hyper-V nodes.


In VMM, our virtual machine “Azure01” is running again in the “E2A” cloud


In the Azure management portal in the virtual machines list, our VM is still present but stopped.

Thanks for joining us on this guided tour on how to work with Azure Site Recovery.
Next time we will explore the scenarios we can achieve by using recovery plans in Azure Site Recovery, to streamline failover of multi-tier applications, LOB applications and much more.