I’ve been diving into Windows Azure Pack lately, to
explore some of the cloud characteristics this solution will bring to your
organization together with System Center 2012 R2 (SCVMM, Orchestrator and SPF).
Recently, Microsoft announced some cool stuff on their
codeplex (community) site.
During TechEd, you may have seen the presentation by Eric
Winner and Marc Umeno on the subject, and where they talked about gallery items
in Windows Azure Pack.
What is gallery
items?
Gallery items in Windows Azure Pack is a set of
predefined services that you can
offer to your tenants.
Interesting is the relation to service templates in VMM
with the design, but currently they are very different.
A service template in VMM can be authored with both
PowerShell and the console, and is still the most flexible and powerful
solution. However, service templates isn’t exposed to the tenant API/portal in
Windows Azure Pack.
Hence, we get gallery items.
The story has been clear by now. This R2 release is a
result of huge investments in Windows Azure and Microsoft are first building
for the cloud (Azure) and then for bits you are able to purchase and run on
your own. Gallery items is basically “service templates” that is built to serve
a service, like web server, application server and any other server
role/application.
If you have little or none experience with Windows Azure,
please continue to read where I will try to explain in a bit more detail.
Windows Azure when first released, was all about Platform
as a Service. This service model (referring to the definition of cloud
computing) is basically based to provide developers with a scalable framework,
where they can write their code, upload the code and packages to Azure, where
Microsoft’s high-tech datacenters is able to execute the application in an
architecture where everything is loosely coupled.
Personally, this is perhaps the most interesting service
model as it ‘forces’ you to modernize you applications to fit into this model. If
you are looking for a place to run highly scalable internet application,
Windows Azure was a very good option back in 2008-2010.
We now got some new services in Windows Azure, and we can
leverage the more traditional Infrastructure as a Service – service model. This
gives us virtual compute, virtual networks, virtual storage and virtual
machines that we can manage as they were running on-premise.
As Infrastructure as a Service was introduced back in
2011, we saw some changes to the Platform as a Service mode, or to be more precisely,
we got something called ‘Cloud Services’.
Cloud Services was either a worker role, web role or a
virtual machine role.
Together with traditional virtual machines, we now had
options when creating applications and services for the public cloud.
Back to Windows Azure Pack.
In Windows Azure Pack, we can create traditional virtual
machines (infrastructure as a service) together with virtual networks. All of
this are running on Windows Server 2012 R2 (Hyper-V) and System Center 2012 R2
(SCVMM, Orchestrator with SPF).
New in this release, is support for both Service Bus and Virtual Machine Roles. Both of these
are related to platform as a service, and we are now focusing on Virtual
Machine Roles.
The gallery items are the building blocks for your
virtual machine roles.
Let’s explore this and see how we can get things running
in our cloud (either private cloud or service provider cloud).
Download gallery
items from Codeplex
A few sample gallery items are now available in the Web
Platform Installer now:
1) Install WebPI: http://www.microsoft.com/web/downloads/platform.aspx
2) Click the "options" link at the bottom of the
WebPI UI.
3) In the custom feed field, enter the following URL: http://www.microsoft.com/web/webpi/partners/servicemodels.xml.
4) Click "Add Field" and dismiss the dialog.
Please note that
only the three Windows Server 2012 * resources are related to gallery items.
Both Service Template Example Kit and Sharepoint 2013 Service Template are only
suited for service templates in SCVMM.
Once downloaded, we can navigate to the folder we placed
it into and see the items. Included with every resource, we have a readme file.

Note: there are some important
steps missing in the readme file to get this working, so pay attention to the
instructions later when importing and customizing the resources in the SCVMM
library.
How to import and
use Windows Server 2012 R2 Web Server Gallery Resource
In order to publish the gallery resources as a gallery
item, you must
Import
the resource extension package into System Center Virtual Machine Manager.
Ensure
the virtual hard disks in SCVMM are properly prepared and have all the
necessary properties set.
Import
the resource definition package as a gallery item.
Make
the gallery item public.
Add
the gallery item to a plan.
1)
Import
the recourse extension package into System Center Virtual Machine Manager
Using Powershell, you must import the resource extension
package into the virtual machine manager library.
Sample Windows Powershell:
$libsharepath = <you
must set the library sharepath from your environment>
Example: $libsharepath = “\\vmmserver\library\”
$resextpkg =
$Env:SystemDrive +
“\GalleryResources\WS2012WebServer-VMRole-Pkg\WS2012WebServer.resextpkg”
Import-CloudResourceExtension
–ResourceExtensionPath $resextpkg –SharePath $libsharepath
-AllowUnencryptedTransfer
The import can only be done using Powershell.
To verify the import, run the get-CloudResourceExtension Powershell
command and locate the newly imported extension.
Get-CloudResourceExtension
2)
Prepare the
virtual hard disk
Since you have
landed on this blog, I already assume you are familiar with sysprep and how to
take action on this, either manually or by using SCVMM.
You must
provide a virtual hard disk from which the virtual machine role will be
created. If you already have a vhdx file in your library, go ahead and use
this.
Note: to
actual get this working, you must have two disks in your library. One disk
containing the operating system, and one disk for the data partition. You only
have to prepare the partition used for the operating system in this guide. The disk
for data partition will be explained in a bit.
Since the
resource extension will only work with Windows Server 2012 /R2, use one of the
following operating system values on your Windows Server 2012/R2 hard disk:
64-bit edition of Windows Server 2012 Datacenter
64-bit edition of Windows Server 2012 Standard
64-bit edition of Windows Server 2012 Essentials
Windows Server 2012 R2 Datacenter Preview
Windows Server 2012 R2 Standard Preview
Windows Server 2012 R2 Essentials Preview
Sample Powershell
$myVHD = <you
must set to the virtual hard disk in your environment>
Example: $MyVHD = get-SCVirtualHardDisk
–id “your virtual hard disk ID”
$WS2012R2Datacenter
= Get-SCOperatingSystem | where { $_.name –eq “Windows Server 2012 R2
Datacenter Preview” }
Set-scvirtualharddisk
–virtualharddisk $myVHD –OperatingSystem $WS2012R2Datacenter
The Operating System
value can be set using Powershell or the virtual machine manage administrator
console.
3)
Familyname
and Release
These properties
must be set in order for the Windows Azure Pack portal to display the virtual
hard disk as an available disk for this gallery resource. The Familyname and Release
properties are shown in the portal drop-down list, so set them to values that
will make sense to your user.
Familyname property values should indicate the contents
of the virtual hard disk, including the Windows Server release and
edition. For this gallery resource, you
should consider the following Familyname values.
Windows Server 2012 Datacenter
Windows Server 2012 Standard
Windows Server 2012 Essentials
Windows Server 2012 R2 Datacenter Preview
Windows Server 2012 R2 Standard Preview
Windows Server 2012 R2 Essentials Preview
Release property values must conform to the Windows Azure
versioning scheme of n.n.n.n
1.0.0.0
1.0.0.1
etc
Sample Powershell
$myVHD = <you
must get the virtual hard disk in your environment>
Set-SCVirtualHardDisk
–VirtualHardDisk $myVHD –FamilyName “Windows Server 2012 R2 Datacenter Preview”
–Release “1.0.0.0”
Familyname and
Release values can be set using Powershell or the virtual machine manage
administrator console.
Note:
repeat these steps on your virtual hard disk for the data partition. The important
thing to note here is that you must not define any operating system on
this disk, as the portal then will consider it to contain the operating system
and hence not list it in the data partition field in the portal.
4)
Tags
The Windows Server 2012 gallery resource depends on a
virtual hard disk with the following tags
WindowsServer2012
.NET3.5
NOTE: this .NET3.5 tag indicates that you have
pre-installed .NET3.5 in your sysprepped VHD.
Sample Powershell
$myVHD = <you
must set to the virtual hard disk in your environment>
$tags = $myVHD.Tag
if ( $tags
-cnotcontains "WindowsServer2012" ) { $tags +=
@("WindowsServer2012") }
if ( $tags
-cnotcontains ".NET3.5" ) { $tags += @(".NET3.5") }
Set-SCVirtualHardDisk
–virtualharddisk $myVHD –Tag $tags
The tag property can
only be set using Powershell.
5) Windows
Azure Pack Service Administrator Portal
Once the resource extension and virtual hard disk are all
correctly set in SCVMM, you can import the resource definition package using
the Service Administrator Portal in the Windows Azure Pack.
Open the Service Admin Portal.
Navigate to the VM Clouds workspace.
Click the Gallery tab.
Click Import.
Select and import the WebServer(IIS).resdefpkg
file in the unzipped location.
The default unzip location is “c:\GalleryResources\WS2012WebServer-VMRole-Pkg\”
Note that the gallery item now is listed on
the Gallery tab.
Now that the packages for the Virtual Machine Role have been installed, you
can publish the gallery item to make it available to tenants.
To make the Virtual Machine Role available to the tenant, you need to add
it to a plan. In this procedure, you publish the Virtual Machine Role that you
installed.
On the Gallery tab, select the version of the
gallery item that you just imported.
Click the arrow next to the gallery item name.
Explore the details of the gallery item.
Navigate back and click Make Public.
Select the Plans workspace in the Service Admin
Portal.
Select the plan to which you want to add this gallery
item.
Select the Virtual Machine Clouds service.
Scroll to the Gallery section.
Click Add Gallery Items.
Select the gallery items that you imported, and then
click Save.
Brilliant, we
are almost done.
The last thing
to do, is to create a new tenant, or logon with an already existing tenant to
this portal.
The tenant
must then subscribe to a plan that is offering these gallery items.
Here’s some
screen shots on how to deploy a gallery item into a cloud defined in SCVMM,
presented by Windows Azure Pack:
6)
Deploying
Virtual Machine Roles in Windows Azure Pack
In the portal,
click new à Virtual
Machine Role à From
Gallery.
This will
bring up the available gallery items.

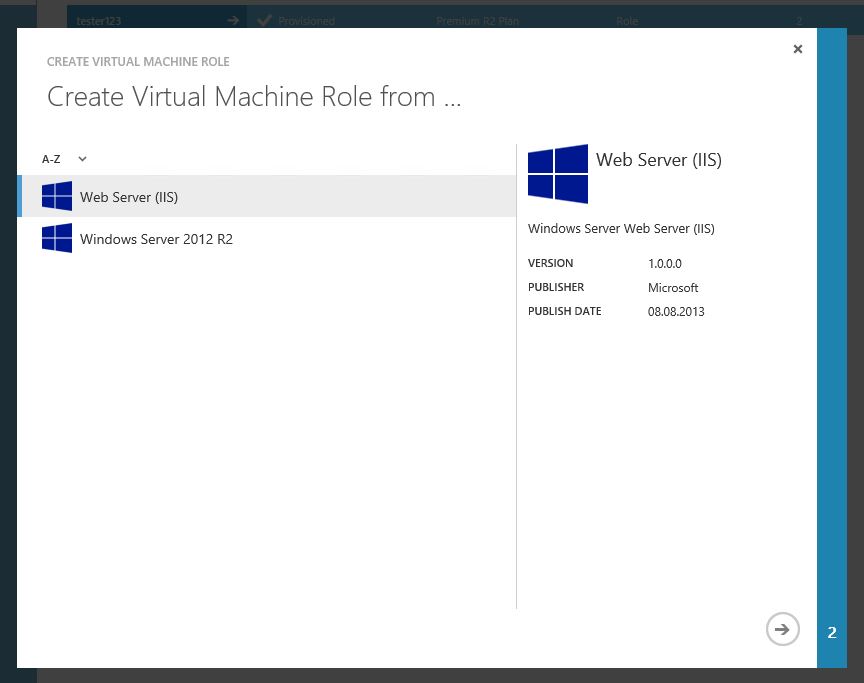
In the ‘Create
Virtual Machine Role from ...’ screen, please select the proper item. In my
case, I have both a web server and a stand-alone Windows Server 2012 R2
resource. I will select my Web Server and proceed.
Assign the
virtual machine role with a name (during this process, Windows Azure Pack will
check with SCVMM if the name is available or already taken).
Select the
right version and the right hosting plan. If the gallery item is not available
in a hosting plan, you are unable to proceed.

The next step
will require some input from the tenant.
You can define
the following:

Size
Choose the
size of the instance. Extra small, small, Medium, Large, Extra large.
Operating system disk
The disk you
prepared with powershell should be available here
Data disk
The other disk
(containing no operating system, remember?) is listed here
IP Address allocation method
Dynamic or
static is the option here
IP Address type
IPv4 or IPv6
Logical Network
The networks
you have made available both in the cloud in SCVMM and in the plan is available
here. I would strongly suggest you to leverage network virtualization in this
case, and provide the tenants to create their own virtual networks prior to
this, and deploy the virtual machine role to this network.
New user name
Specify the
username
New Password
Assign a
password to the user
Confirm
Confirm your
password
Virtual Machine Name Pattern
Default, you
will se ‘Computer###’ where the hashes refers to incremental numbers.
Workgroup
Name of the
workgroup this virtual machine role should be a part of
Time Zone
Choose the
proper time zone for your virtual machine role
Initial Instance Count
How many
virtual machines will you deploy at first? This is where you define it
Minimum Instance Count
What’s the
minimum instances of the virtual machine role
Maximum Instance Count
Decide how
many instances this virtual machine role can scale out to.
Click next to
proceed
In this
screen, you can assign website name and application pool together with your
preferred TCP port.
This is
because we are deploying a web server virtual machine role. Once you are done,
click finish to start the deployment
Note: if
your cloud in SCVMM has any
capability profiles associated, the deployment will fail.
You must
uncheck any capability profiles since gallery items doesn’t have this property.
In the portal,
we can now see that the virtual machine role is being provisioned.

Since I am the
SCVMM admin as well, I can check in the Jobs view in the console, that some
cool stuff are actually taking place in my environment.

Once the
deployment has succeeded, you can manage it further in the tenant portal.
This screen
shots illustrates that I am able to scale my instances for this virtual machine
role.

Hopefully this
was useful to get you started with gallery items in Windows Azure Pack.
4 comments:
Hi There,
Running into an error when trying to deploy the VM Role once imported - Did you come across this during your testing?
undefined
Error Code : AllBootAndSystemVolumesOnSCSINotSupportedOnHyperV ; Message : Hyper-V does not support boot and system volumes on a disk attached to SCSI adapter. All disks containing boot and system volumes must be moved to an IDE bus for the machine to boot up. ; Recommended Action : Modify the bus assignments so that boot and system volume disks are located on an IDE bus.
Error Code : AllBootAndSystemVolumesOnSCSINotSupportedOnHyperV ; Message : Hyper-V does not support boot and system volumes on a disk attached to SCSI adapter. All disks containing boot and system volumes must be moved to an IDE bus for the machine to boot up. ; Recommended Action : Modify the bus assignments so that boot and system volume disks are located on an IDE bus.
Cheers,
Hayden (fitzyhayden@hotmail.com)
Looks like your template has associated the boot VHD to a SCSI controller instead of an IDE controller, which is mandatory for Gen 1 VMs.
Hi, I am getting an error that says it cant deploy a non-ha vm to a clustered resource. How do I set the VM roles to high availability like the templates ?
thanks ryan
The host groups associated with your VMM cloud, does it contain any stand-alone hosts? Or only clusters?
Post a Comment