Showing posts with label dal. Show all posts

Wednesday, July 3, 2013

Building the Network Virtualization Gateway - Service Template (SCVMM 2012 R2)

As I promised, I will show how easy you can create a service template for the native virtualization gateway in Windows Server 2012 R2, and deploy it with SCVMM 2012 R2 in this blog post.

First of all, you’ll need a sysprep’ed virtual machine with Windows Server 2012 R2.
This is the basic building block you will use for this service.

Next, follow this recipe to create you network virtualization gateway Service Template.

1)      Navigate to the Library pane in your SCVMM console.

2)      Click on Service Templates, and ‘create service template’ from the ribbon menu. This will launch the service template designer for you.

3)      Assign a name to your service template, version, and the pattern you would like to use. As you can see, you can have some directions from Microsoft regarding how to create a multi-tier service or simply start with a blank service template. In my case, I would like to start with a blank service, and add the needed VM template directly in the designer (drag and drop in the canvas)


4)      Make sure your VM template has enough NICs presented, for connecting both to the internet and the management network. Ideally, the service template should have three NICs. Connect the to the right VM networks.


5)      Next, we must leverage the powerful settings within the guest OS profile, so click on your service tier instance in the canvas, and navigate to the OS configuration


6)      Assign a name to the tier (use double hash for being able to increment as you plan to scale).


7)      Click on Roles and Features to configure the actual Windows Server. To configure this as a network virtualization gateway, we must enable the following roles:
Remote Access > DirectAccess and VPN (RAS), Routing
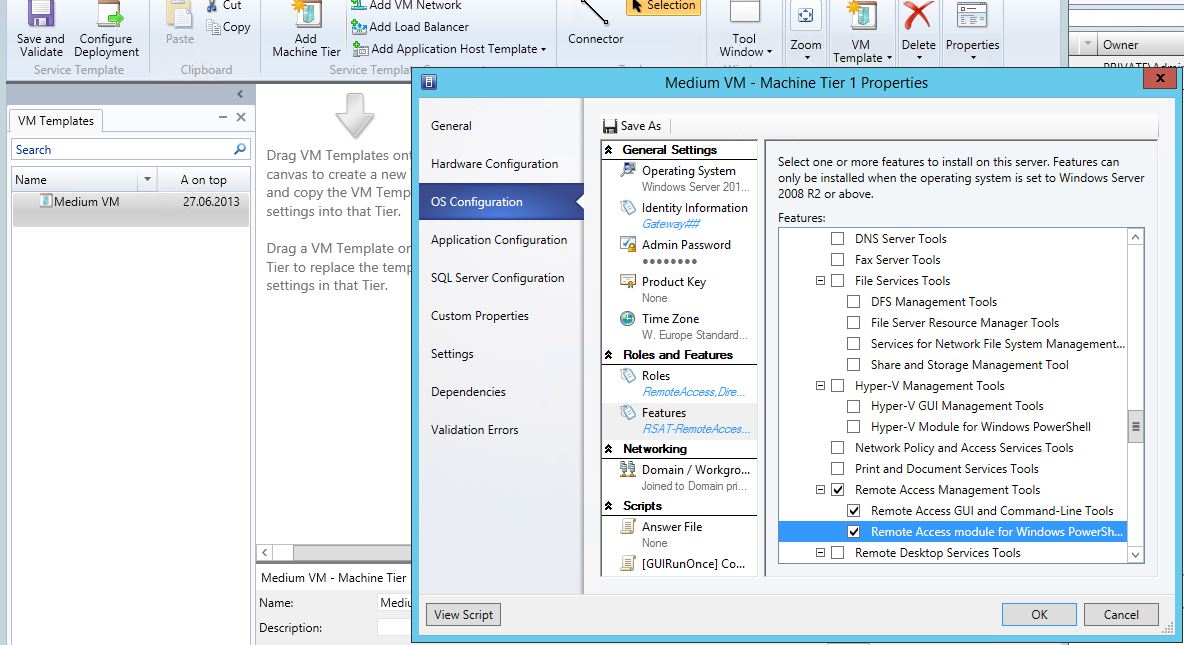

8)      Second, we must enable the following features:
Remote Access Management Tools > Remote Access GUI and Command-Line Tools, Remote Access module for Windows PowerShell

9)      Clic save and validate before you continue, as this will check the service for any errors and misconfiguration.

10)   Click ‘Configure Deployment’ from the ribbon. Choose destination for this service and assign a service name. (Remember that you must deploy this service on a dedicated physical Hyper-V host). Click OK and continue.

11)   If any errors appear on this screen (complaining about there is no suitable host, please click on the tier and then ‘ratings’ to get the details. Eventually go back to the canvas and fix these errors before you proceed with your deployment. If everything is in order, you can click ‘Deploy service’.

12)   When the deployment has completed, please follow this guide on how to add your virtualization gateway to your fabric in SCVMM: http://kristiannese.blogspot.no/2013/06/how-to-add-your-virtualization-gateways.html

We could always use some powershell scripts together with this service, to have consistent naming of NICs and so on, but please consider this blog post as 'fast publishing'. More details will come.

-kn

Tuesday, July 2, 2013

How to integrate IPAM with SCVMM 2012 R2

Integrating IPAM with SCVMM 2012 R2

This blog post will show how to integrate your IPAM infrastructure together with System Center Virtual Machine Manager 2012 R2.

For us who have been working quite a bit with the cloud infrastructure and fabric over the years, have noticed absence of integrated IP management. During projects, you will at some point need to know about the fabric infrastructure, and which IP’s, subnets, VLANs and so on to use.
It’s possible to model everything within VMM and have a single view into the relevant portions of your network infrastructure, however, the other way around has been painful.
So at one point, the network guys and the virtualization/cloud guys must sit down and have a chat with each other about this subject.

IPAM offers a unified, centralized administrative experience for network administrators to manage IP address space on a corporate network and in Microsoft-powered cloud networks.
The integration between IPAM and SCVMM 2012 R2 provides end-tp-end IP address space automation for your cloud networks. This means that a single IPAM server can detect and prevent IP address space conflicts, duplicates, and overlaps across multiple instances of SCVMM 2012 R2 deployed in the large datacenters (think fabric stamps).

1)     Navigate to the Fabric pane within the SCVMM console, right click on Network service and add a net Network service.

2)     Assign a name to your network service and eventually a description. Click next to continue.

3)     Specify manufacturer and model of network service. In this case the manufacturer is Microsoft, and the model is Microsoft Windows Server IP Address Management. Click next to proceed.


4)     Specify a Run as account that have access to your IPAM server role and continue by clicking next.


5)     The connection string should be the FQDN of your IPAM server. Click next.


6)     Test the configuration provider and ensure that the tests are passed for being able to add your IPAM server.


7)     Associate the network service with your desired host groups, and click next and finish to complete the wizard.


We have now integrated SCVMM 2012 R2 with IPAM, and can switch over to our IPAM server to see the data here.


As we can see, I have now all my logical networks and VM networks exposed in IPAM, and is also able to manage them from IPAM. This integration is bi-directional, and let the network admins have better control and view into the virtualization environment.


I will work in this area from now on to explore some of the possibilities here. Stay tunes.

Thursday, June 27, 2013

Storage management with datacenter abstraction layer (SCVMM 2012 R2)

Storage – with datacenter abstraction layer

I have recently blogged about the datacenter abstraction layer story in both Windows Server 2012 R2 and System Center 2012 R2.

In this blog post, I want to highlight some of the storage capabilities you are able to leverage through standard based management with Virtual Machine Manager 2012 R2.

Virtual Machine Manager takes care of the entire fabric.
A fabric may also be referred to as a stamp, or resource pools.
The fabric should contain the physical building blocks that make cloud computing possible for the organization, either if it is a private cloud or a service provider cloud.
Most organizations are handling their storage pools as single units, with no common management tools and must rely on manual documentation to see how everything is connected. I have ran into quite a few customers who are struggling to get an overview of their storage fabric in the context of virtualization and cloud computing.
This is where VMM comes to the rescue.

What VMM is able to do with your storage:

·         End-to-end mapping
·         Storage classification
·         Allocation and Assignment
·         Rapid provisioning
·         SAN migration
·         Array onboarding
·         Storage Automation
·         Scalable provisioning
·         Extensive array support
·         Standard based management
·         Validation
·         File server management
·         Scale-out server creation
·         File share management


As you can see, this is massive part of the lifecycle management of your datacenter, and this blog post will show how you can leverage the iSCSI Target Server role in Windows Server 2012 R2.

First, we need a Windows Server 2012 R2 server with the File Server role installed, and especially the iSCSI Target Server role enabled.
In a nutshell, you must do the following on your Windows Server 2012 R2 server:

·         Attach storage
·         Create storage pools
·         Create disks and volumes
·         Create iSCSI disk
·         Create iSCSI target

Once this is completed, we can start to do the magic within VMM.
Note: for Windows Server 2012 R2, it's no need to install the VMM storage provider on your Windows Server prior to adding it to VMM. Windows Server 2012 R2 supports this native.

1.       Navigate to Fabric—>StorageàProviders.
Right click and add storage device. Here, you must select ‘SAN and NAS devices discovered and managed by a SMI-S provider’.


2.       Make sure you select SMI-S WMI as the protocol, and specify your storage target, port and Run as account (since my storage server is within the same domain, I can use my domain account).


3.       Once the discovery process has completed, you will find your storage device listed with the available capacity.


4.       On the ‘Select Storage Device’ page, mark the storage you will manage with VMM and associate the proper classification (you can create classifications directly on this page.)


5.       Click complete and you can follow the process in the jobs pane in VMM and see what’s discovered and detected by VMM. In this case, VMM detects the target and the initiators you have created on the storage server.


We have now discovered and added a storage device to VMM and can view if under ‘arrays’ in Fabric.
The next step is to allocate storage to your compute resources which is located in the host groups in Fabric.


1.       Click on ‘Allocate Capacity’. This will fire up a new window where you can allocate both storage pools and LUNS to your host groups. I will add storage to my service provider cloud infrastructure host group.


2.       Next, I’ll navigate to the properties of this host group and find the storage tab. From here, I can see the associated storage for this host group. Note that I can also allocate both storage pools and LUNs directly from here.


3.       The next step will be to connect my hosts to the storage device. I will go to properties on one host at a time, click storage, and click ‘Add’. This will list the available storage connectors for you. In my case, iSCSI array is the available option.


4.       Connect to your storage array from the drop down list and eventually configure advanced settings for the connection. Once this is done, VMM will create iSCSI sessions between target and initiator.


5.       If we check the storage tab on the host once again, we can see my iSCSI array I just added. I can also create multiple sessions for MPIO.


This was a simple guide on how to add storage through standard based management with Virtual Machine Manager 2012 R2.
The next blog post will also show how to create clusters with VMM where we are using the available storage we added to VMM, to create disk witness and clustered shared volumes.