Network Management with datacenter abstraction layer (SCVMM
2012 R2)
This blog post will show some of the cool new stuff
related to network virtualization, and especially the support of network
virtualization gateways through standard based management with SCVMM 2012 R2
and Windows Server 2012 R2.
The Software Defined Datacenter story was alright, but
not good with Windows Server 2012 and
System Center 2012 SP1.
My personal take on that, was mostly because of the third
party requirements for virtualization gateways. Cisco have been working on some
stuff, and so have many others.
However, Microsoft has listened to the feedback from
their partners and customers, and made this native in both products.
You can now have your own virtualization gateway running
in a VM (Windows Server 2012 R2) and manage it, end-to-end with Virtual Machine
Manager 2012 R2.
First of all: You must have a dedicated physical Hyper-V server
for this in your fabric, which is hosting the virtual machines with the RRAS
role installed.
This Hyper-V host should be considered as an edge server,
and not joined to the domain.
The virtual machines hosting the RRAS role should be
joined to the domain and can be highly available in a cluster, and this is
quite critical for production environments.
If you have structured your host groups in VMM very well,
it could look something like this:
Next, let us add the Network Virtualization Gateway to
the fabric in VMM.
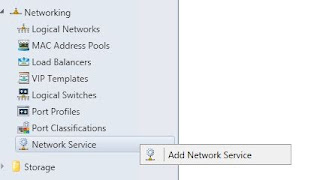
1. Navigate
to the fabric pane in the VMM console, expand Network and right click Network
Service to add a new network service
2. Give
your network service a name and a proper description.
3. Specify
manufacturer and model of the network service. Default, this is Microsoft and
we must select the proper Model. You can see from the drop down list that you
can add Microsoft Standards-Based Network switches, that will let you manage
your switches and TOR switches. Microsoft Windows Server IP Address Management
(IPAM) for a better integration with your entire Windows network
infrastructure, and last but not least; Microsoft Windows Server Gateway.
4. Specify
your Run As account that have permission on the VM to install the VMM agent and
configure the network service
5. Specify
the connection string. You can see the example in this step of the wizard. We
need the VM host (in my case, it is TomWaits), and the RRASServer, which is the
name of the virtual machine with the RRAS role installed. My RRAS server is
NVGRE. Click next to proceed.
6. If
the connection string would have included any ports for SSL, a certificate may
have been required. In my case, this doesn’t apply.
7. Test
and validate the network service configuration provider. This will run basic
validation tests of the provider. Click test and verify that the critical tests
are passed, and the others are implemented. Click next to proceed.
8. Specify
the host groups for which the network service will be available. In my case, I want
all of my hosts groups to have access to this service. Click next twice, and
VMM will add the network service to fabric.
9. The
last step that needs to be done, is to specify the configuration of each network
connection on the virtualization gateway.
10. Go
back to fabric, network service and right-click on your virtualization gateway
to list the properties. Click on connectivity and select both front end
connection and back end connection. We will dive more into this in the next
blog post.
Hopefully, this blog post shown how easy it was to
leverage the standard based management experience of network virtualization
gateways with SCVMM 2012 R2.
My next blog post will focus more on network
virtualization gateways, and how to create the service template for network
virtualization gateways.


