Thursday, November 25, 2010

Snapshots in Hyper-V - Ground Rules

“Snapshots are read-only “point-in-time” images of a VM. You can capture state and configuration of a VM at any point in time, and return the VM to that state with minimal interruption”

-          This is fantastic, but will this replace the need for a backup of our VMs ?

No, absolutely not. And I`ll stress in this post why you should not use Snapshots in production, and what the consequences will be.

Instead of just point at the reasons for why we should not use snapshots, I will also try to explain how it works, when you should consider a snapshot, and some common pitfalls.

Virtual Machine Snapshots – How it works

As stated earlier in this post, you can capture state and configuration of a VM at any point in time.
You can also create multiple snapshots, delete snapshots, and apply snapshots.

In Hyper-V manager, you can right-click a VM, and take a snapshot when the current state of the VM is:
·         On
·         Off
·         Saved

Let`s take a look what happens when you initiate a snapshots of a running VM:

1.       The VM pauses
2.       An AVHD is created for the snapshot
3.       The VM is configured
4.       The VM is pointed to the newly created AVHD
5.       The VM resumes (Point 1 and 5: This would not affect the end user)
6.       While the VM is running, the contents of the VM memory are saved to disk. (If a guest OS attempts to modify memory that has not yet been copied, the write attempt is intercepted and copied to the original memory contents)
7.       Now that the Snapshot is completed, the VM configuration, saved states files, and AVHD are stored in a folder under the VM snapshots directory.


 1. You initiate a snapshot In Hyper-V Manager. Right click a VM, and select ‘Snapshot’


2. The process starts
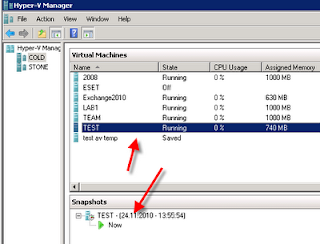


3. The snapshot is now completed


4. If we take a look at the settings of the VM virtual disk, we see that the newly created AVHD is the current disk for this vm. Also note the type “Differencing virtual hard disk”.


If we take another snapshot now, we will have another AVHD file that contains the changes of the VM since the last snapshot (AVHD).


If we browse explorer to find the Virtual Hard Disks - folder for this VM, we see the following:


What happens when you apply a Virtual Machine Snapshot?

When you apply a snapshot, you literally copy the entire VM state from the selected snapshot to the active VM. This will return your current working state to the previous snapshot state. In other words, you will lose every changes, configuration, data, and so on if you don’t take a new snapshot of the current state before applying the selected snapshot.

The process:

1.       The VM saved state files (.bin, .vsv) are copied
2.       A new AVHD is created and then linked to the parent AVHD

Applying a previous snapshot creates another snapshot to your hierarchy, starting at the applied snapshot

And last, what happens when you delete a Virtual Machine Snapshot?

When you delete a snapshot, you also delete all the saved state files (.bin and .vsv)

The process:

1.       The copy of the VM configuration taken during the snapshot process is removed
2.       The copy of the VM memory taken during the snapshot process is removed
3.       When the VM is powered off, the contents of any deleted AVHDs are merged with its parent (VHD)

Ok, so now we some basic facts about the Snapshot process.

What is best practice, and my personally recommendations ?

Don’t use snapshot in production.
The root reason for this is the downtime required for merging the snapshots.
If you create a snapshot of a VM with the default IDE size 127GB disk, you can consume additional 127GB of your storage. And this contiunes for the next snapshot, and so on.. Snapshots requires storage, and if you don’t have the free storage required and available when merging your snapshots, this will cause the merging process to fail. (In Hyper-V 2008 R2, you can take a new snapshot, export that snapshot, and import it as a VM – that will in some situations save you, or at least shorten the merge process)
So the keyword here is: Storage, and downtime.
The merge process is writing the VMs history back to the VHD file, and that can take hours. You don’t want to find yourself in that situation (believe me J ).

Snapshots are great for testing, and give you the ability to test and devastate your VMs.
But also for testing, I would not recommend using snapshots on a DC, even it`s in a test environment.
That may lead to inconsistency of the Active Directory Database, and as you know – every part of an Active Directory Domain would be affected.

Another tip is to try to name your snapshots with some useful names, so that when you have a snapshot-hierarchy you are able to sort them to find out what is what.

And last, let the Hyper-V manager take care of your snapshots. Don’t rename, edit, move, replace, or delete the associated snapshot files.

Drive carefully when considering snapshots, and have fun.

Thursday, November 18, 2010

Failover Clustering and Domain Requirements (by example)

In my last post about this subject, I simply referred to things that might happens if you don’t place a DC outside your cluster. Today, we will take a look at it in more detail. 
My lab:
·         2 identical nodes with the Hyper-V role enabled
·         Both nodes are member servers of my domain
·         Cluster configured with CSV
·         ISCSI with MPIO enabled
·         Quorum: File Share Witness
·         One Domain Controller (as a VM on the cluster J )

I`ve simulated the following scenario:

1.       The entire cluster shuts down
2.       Both nodes comes online again
3.       Now what ?

(Ok, I have to admit, that I have cheated a bit so I could demonstrate the stage AFTER you are able to log on to your hosts. Since the DC was powered off, both nodes hade some troubles to login. And if you speculate what opportunities you have if you log on locally, well, here is the answer):

Anyhow, we are now logged in to both nodes, and the cluster service is in the state of ‘stopped’.

Let’s try to start it on both nodes:

Ok ! So far, so good.

Now, let’s try to start up the Failover Cluster Manager Console:


The console shows us that it`s empty. No cluster to manage, so we have to try to add our cluster.
As the error message indicate, we have a DNS lookup problem. That makes sense, since the only DC is powered off.

If we run the cmd ‘cluster node’ on both hosts, you can see that they indicate that everything is fine as far they concern, but don’t know that the other node is ‘joining’ as well.


(When you tell the Cluster Service to start in Windows 2008 R2 Failover Cluster, it just immediately starts. Then it sends out notifications to the other nods that it wants to join the Cluster. It is also calculating the number of ‘votes’ needed to achieve ‘quorum’.  Since there is no DNS connection between the nodes in this example, both nodes will be in a ‘joining’ type mode. They just wait for each other. If both nodes in this example and the witness could come online, the cluster would achieve quorum and go on its way).

Ok, so we have a DNS issue.

Since I know the IP address of my cluster, nodes, and also the witness share, and know that the first thing the DNS client does, is that it checks the local hosts file (c:\windows\system32\drivers\etc\hosts), I will add the DNS names of the involved servers here, and hopefully get the quorum.
(COLD and STONE are nodes in the cluster, CLASH is the cluster name, and SCVMM has the File Share Witness)

Now, I`m able to ping the servers by name, and let`s try to run the cluster node command again:


OK, looking good.

Let us try to add the cluster in Failover Cluster Manager again:

Are we saved ?

- What happens if we try to bring one of our VM online ?

Nothing, you cant.

If we take a look at the event log on one of our nodes, it shows some important information right here:

So, after all this struggle you are still unable to start you VMs. Moral ?
Please plan your cluster configuration carefully, and where you want to place your Domain Controller. This would easily be solved if we had a Domain Controller outside the cluster. And since I already have that, I would like to show what happens after I boot this machine.


My VMs comes online again, ready to play.


Wednesday, November 17, 2010

Live Migration process in Windows Server 2008 R2

- Windows Server 2008 R2 support a feature called ‘Live Migration’, said one of my students.

Yes it does, but there are some requirements you need to meet before you are able to live migrate your VMs.

Let us take a quick look at the requirements:

·         Windows Server 2008 R2 Enterprise/Datacenter (You can also use the Microsoft Hyper-V Server 2008 R2)
·         Failover Cluster feature installed on every node that will use live migration (supports up to 16 nodes per cluster)
·         Use dedicated network for live migration
·         The nodes in the cluster must use a processor from the same manufacturer
·         The nodes must be on the same subnet
·         Access to shared storage
·         Clustered Shared Volume enabled (CSV)
·         Identical names on the Virtual Networks in Hyper-V

(The CSV feature is maybe the best invention since sliced bread)

After explaining the requirements, they insisted to try a live migration in our lab  (our lab meets all the requirements J )

-          Ok, let`s get started with the Live Migration process.

What happens when you initiate a live migration from node 1 to node 2 in Failover Cluster Manager ?

1.       The source node makes a connection (TCP) with the destination node to transfer the VM configuration data. A ‘copy’ of the VM is created on node 2 and memory is allocated.
2.       Memory is transferred from source node to destination node. The memory copies over the network, and the migrating VM continues to run.
3.       A final memory copy process copies the remaining modified memory pages to the destination node. In this stage the network between source and destination is critical to the speed of the live migration. (1GB is recommended) Also, if the VM is heavily accessed under the live migration, that might affect the speed as well.
4.       Move the ‘storage’ from source node to destination node (.vhd files, pass-through disks)
5.       The VM is online on the destination node since it now has the updated working set and access to the VM storage.
6.       Time to cleanup! A message is sent to the physical network switch telling him to re-learn the MAC address of the migrated VM. Now the VM can use the correct switch port.

The benefits this feature gives us, is that it provides us with the opportunity to build a dynamic datacenter, easier maintenance of the nodes, and a hot topic in these days: green IT

Monday, November 15, 2010

Failover Clustering and Domain Requirements

If you plan for Failover Clustering in Windows Server 2008 R2, you also have to dive into Active Directory and install a Domain Controller. Why ? And what if you plan to run your DC as a HA VM ?

Why do you need a Domain?

Systems running Windows Server 2008 R2 Failover Cluster services must be members of a domain. This ensures a common authorization framework for services as they fail over from one node another. It also means that the clients accessing the services of the Failover Cluster can participate in this same authorization framework.
It is recommended that the cluster nodes be member servers and NOT domain controllers.
(The Active Directory are already ‘Highly Available’ in its design and does not need something like Failover Cluster to be HA).
When creating a cluster, the process also creates a Cluster Name Object for the cluster in Active Directory, so the account that creates the Cluster needs to be a Local Administrator on the nodes, and have permission to create objects (computer) in Active Directory.

Run your DC as a HA VM ?

No. Period.
I have to stress that if your entire cluster shuts down, you`re in serious trouble.
You might not be able to start the cluster service, VMs, and you are finished.
Since your VMs is placed on a shared storage and the access here is granted through your cluster, and your cluster won’t come online to play, you might call it a day.

But do not panic, you only need to place your VM outside your cluster. You can even run it as a VM in Hyper-V manager on one of your nodes, but do not make it HA, or place it on shared storage. Also make sure to configure the Auto-Start Action, so your DC boots up with the host.

It`s always best practice to have at least a second domain controller as well, so you are able to support the rest of your infrastructure that require Active Directory to function. It`s a good idea to place this on a dedicated machine, outside your virtual environment.

Article in IDG: Network & Communication

Last week I got an article published in the IDG: Network & Communication magazine (Nettverk & Kommunikasjon (NORWAY)).
I wrote about the similarities, differences, and the consequences of cloud computing and virtualization.

It was a quite interesting task, and the article started with a brief overview of the various ‘as a Service’ models. Also a short summary of what the main purpose of virtualization is, and the great benefits of virtualizing your datacenter.

I`ve received many feedbacks from co-workers, partners, and friends who have red my article. They especially liked the ending, where I mention some consequences about cloud computing and virtualization and how every job-role should look at the benefits and possibilities, instead of being insecure and scared J

Configuring Constrained Delegation (SCVMM)

Once in a while, people at the forums having trouble to access their ISO-files on their Library server from their Hyper-V hosts.
Here is a quick ‘how-to’:
1.       Verify that the VMM Server (vmmservice.exe) is running under a domain account and not the LocalSystem account
2.       Open Active Directory Users and Computers MMC (dsa.msc)
3.       Connect to a domain controller
4.       Locate the computer accounts for your servers running the Hyper-V role
5.       Right click the account and select ‘Properties’
6.       Select the ‘Delegation’ tab
7.       Select ‘Trust This Computer for Delegation to Specified Services Only’
8.       Select ‘Use Any Authentication Protocol’
9.       Click ‘Add’
10.   Click ‘Users or Computers’ and search for the computer account of the server with the VMM library
11.   Select the ‘cifs’ service type.
12.   And finally, accept the changes and you`re done. Remember to repeat these steps for every Hyper-V server in your domain you want to link ISOs to the library

Tuesday, November 9, 2010

Getting started with Dynamic Memory in Windows Server 2008 R2 SP 1

With Windows Server 2008 R2 SP1, the new Dynamic Memory feature provides a means to increase the virtual machine density on your Hyper-V host, and use system memory more effectively by dynamically adding and removing memory from virtual machines as required by workloads. In order to start testing Hyper-V Dynamic Memory, I would like to mention some basic things about the Dynamic Memory feature in SP1 for Windows Server 2008 R2.

First thing first: Which guest operating system will support this feature (also after beta/RC)

·         Windows Server 2003 Web, Standard, Enterprise, Datacenter (x86 and x64)
·         Windows Server 2003 R2 Web, Standard, Enterprise, Datacenter (x86 and x64)
·         Windows Server 2008 Web, Standard, Enterprise, Datacenter (x86 and x64)
·         Windows server 2008 R2 Web, Standard, Enterprise, Datacenter (x86 and x64)
·         Windows Vista Enterprise and Ultimate (x86 and x64)
·         Windows 7 Enterprise and Ultimate (x86 and x64)

You can download the SP1 RC from here
(If you have installed the Beta version of SP1, you have to uninstall this one before the RC version)

After the install, configure the important registry setting in Windows, so that your parent will have enough RAM to function.

If we take another look at the supported guest operating systems above, we know that we have to mention for them as well, that the host now supports dynamic memory. To do this, we have to install the new version of IC.
This is relative simple.

1.       Start up your VMs
2.       Click ‘Action’ à ‘Insert the Integration Services Setup Disk’

3.       Choose to install this new version, and shut down your VMs.

Now, lets take a look at the settings on a VM.

In Hyper-V Manager, select one of your VMs that has the updated version of IC installed, and select ‘Settings..’
Select Memory, and configure the Dynamic setting.
In this example, I set 512MB as the Startup RAM. This amount of RAM is allocated from the host every time the VM starts up. The ‘Maximum RAM’ setting is as it mention, - the maximum RAM that the VM can use  from the parent.
(You can also set priority on your VMs, on how they will line up for available memory from the parent based on their needs.)

Now, let us start up this VM, and try to stress the use of RAM.
As you can see, the VM demand some extra RAM (in this case I am installing SQL Express on my VM).

Congratulate, you are now ready to play around with the Dynamic Memory feature.

I also have to mention that there are some new performance counters related to Dynamic Memory in the parent partition.


Also check out Brian`s post for a great perspective of how you can use the Dynamic Memory feature for better understanding of your applications: http://itproctology.blogspot.com/2010/09/hyper-v-dynamic-memory-as-tool-for.html


Monday, November 1, 2010

The Resource Hosting Subsystem (Rhs.exe)...

Today I added my fourth node to my Windows Server 2008 R2 Cluster.

The cluster validation reported none errors, and I was about to Live Migrate one VM over to this new node.

It resulted in the following error:
The cluster resource host subsystem (RHS) stopped unexpectedly. An attempt will be made to restart it. This is usually due to a problem in a resource DLL. Please determine which resource DLL is causing the issue and report the problem to the resource vendor.

Strange, I thought, since my host was identical as the others, with every patch and updates installed.

I came across this Hotfix from MSFT: http://support.microsoft.com/kb/978527

Additional info about the RHS.exe can be found here: http://blogs.msdn.com/b/clustering/archive/2009/06/27/9806160.aspx

But in my case, there was an error related to NOD Eset Anti-Virus software.
After running Procmon, I found some registry keys that referred to Eset that caused the operation to fail.
After manually removing those entries, my Live Migration started to behave.
In general I must say, that I usually don’t install Anti-Virus on my Hyper-V hosts, since there is so much instability related to Hyper-V and especially when it comes  to Failover Clustering and Live Migration. But this server was recently used as a stand-alone Hyper-V host, and the uninstall procedure of NOD Eset did not remove everything as it should.

Moral: Be careful if you consider Anti-Virus on your Hyper-V hosts.

You will have some interesting problems with Hyper-V if you are using Anti-Virus on your host and do not configure it to exclude certain files and folders related to Hyper-V

Remember to exclude the following in your Anti-Virus software:
      *    VMMS.exe
·         MMS.exe
·         VMWP.exe
·         VMSWP.exe
Also exclude the root directory that contain your virtual machines and configuration files, and the following file extensions:
·         VHD
·         AVHD
·         VSV
·         ISO
·         VFD
·         XML