As I promised, I will show how easy you can create a
service template for the native virtualization gateway in Windows Server 2012
R2, and deploy it with SCVMM 2012 R2 in this blog post.
First of all, you’ll need a sysprep’ed virtual machine
with Windows Server 2012 R2.
This is the basic building block you will use for this
service.
Next, follow this recipe to create you network
virtualization gateway Service Template.
1) Navigate
to the Library pane in your SCVMM console.
2) Click
on Service Templates, and ‘create service template’ from the ribbon menu. This
will launch the service template designer for you.

3) Assign
a name to your service template, version, and the pattern you would like to
use. As you can see, you can have some directions from Microsoft regarding how
to create a multi-tier service or simply start with a blank service template.
In my case, I would like to start with a blank service, and add the needed VM
template directly in the designer (drag and drop in the canvas)

4) Make
sure your VM template has enough NICs presented, for connecting both to the
internet and the management network. Ideally, the service template should have
three NICs. Connect the to the right VM networks.

5) Next,
we must leverage the powerful settings within the guest OS profile, so click on
your service tier instance in the canvas, and navigate to the OS configuration
6) Assign
a name to the tier (use double hash for being able to increment as you plan to
scale).


7) Click
on Roles and Features to configure the actual Windows Server. To configure this
as a network virtualization gateway, we must enable the following roles:
Remote Access >
DirectAccess and VPN (RAS), Routing
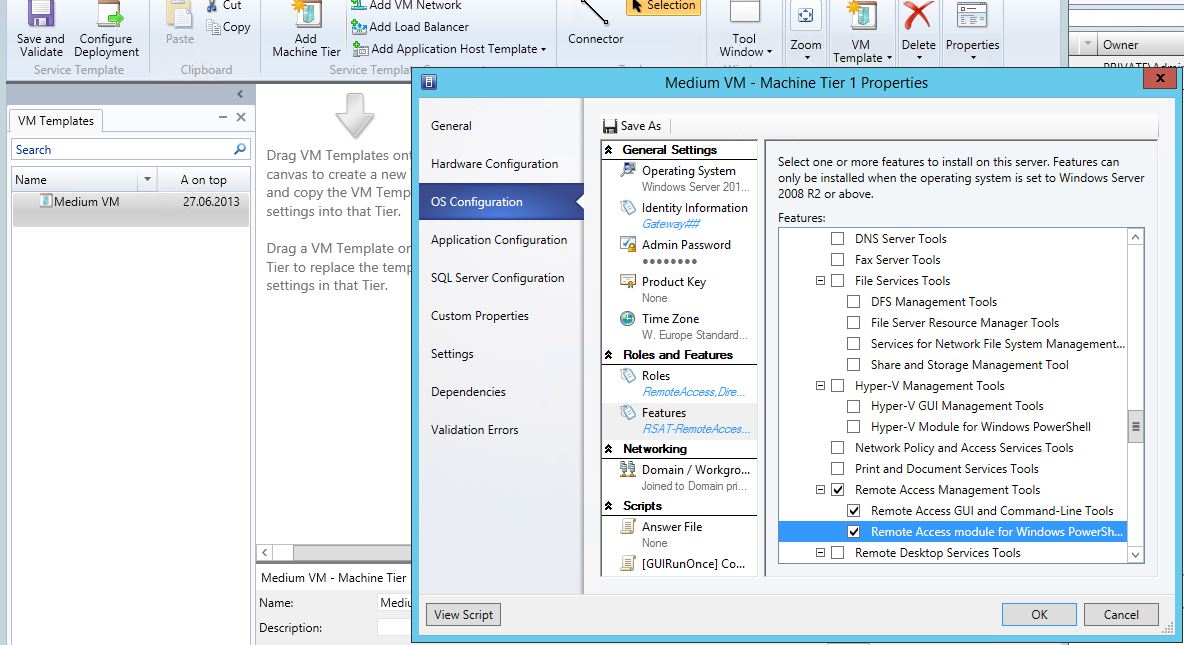
8) Second,
we must enable the following features:
Remote Access
Management Tools > Remote Access GUI and Command-Line Tools, Remote Access
module for Windows PowerShell


9) Clic
save and validate before you continue, as this will check the service for any
errors and misconfiguration.
10) Click
‘Configure Deployment’ from the ribbon. Choose destination for this service and
assign a service name. (Remember that you must deploy this service on a
dedicated physical Hyper-V host). Click OK and continue.
11) If
any errors appear on this screen (complaining about there is no suitable host,
please click on the tier and then ‘ratings’ to get the details. Eventually go
back to the canvas and fix these errors before you proceed with your
deployment. If everything is in order, you can click ‘Deploy service’.


12) When
the deployment has completed, please follow this guide on how to add your
virtualization gateway to your fabric in SCVMM: http://kristiannese.blogspot.no/2013/06/how-to-add-your-virtualization-gateways.html
-kn
2 comments:
This is useful and interesting concept about Online Reputation Management services and usefulness. Strategies is great and is one of the very strong benfits.You can also visit my site. Building Plans I am impresed form your blog.
I was surfing net and fortunately came across this site and found very interesting stuff here. Its really fun to read. I enjoyed a lot. Thanks for sharing this wonderful information. http://goo.gl/Tc5L9j
Post a Comment