Monday, December 9, 2013

Explaining Port Classifications in VMM 2012 R2

When you have installed VMM, you have probably noticed all the different settings and options in fabric, located under Networking.
In order to streamline the configuration on the hosts by using port profiles and logical switches, we also have something called port classifications that you will find useful in your cloud.

A port classification is an abstraction of the virtual port profile, that let both the administrator and the tenants (using VMM console) choose for their virtual machines virtual network interfaces, that is bundled in a logical switch in VMM.

If we take a look the default classifications, we have the following:

And if we take a look at the port profiles (virtual port profiles), we can see that these profiles match the port classification.

To get a better understanding of the classification, we must take a closer look into the virtual port profiles.
These profiles should contain configuration related to virtual network adapters. A virtual network adapter can be a vNIC on the VMs, or a vNIC on the hosts, created on a NIC team (logical switches).

We have offload settings, security settings and bandwidth settings. All of this could be different (and should be different) depending on the workload associated with the virtual network interface.
Taking bandwidth settings for example, we know that storage (iSCSI or SMB) is quite critical in the context of virtualization, and therefore would like to configure the QoS settings here so we can ensure enough bandwidth for this workload.

If we take a look at our cloud in VMM, we also see that we can make port classifications available here, that indeed maps to virtual port profiles (in our logical switch).
That means that we can provide our tenants with port classifications – that are abstracted from the underlying port profile with detailed information, and let them specify the classification.


Hyper-V in Windows Server 2012 introduced us for QoS on the vNIC for the virtual machines. But these settings are not directly expose through VMM. In order to have QoS on our virtual machine, we must instead use port classifications.

This means that we can’t control each vNIC in the same way as in Hyper-V Manager, but instead manage this at scale through port classifications and port profiles.

Thursday, November 28, 2013

Updated Whitepaper for Hybrid Cloud with NVGRE (WSSC 2012)

Updated Whitepaper for Hybrid Cloud with NVGRE

We have finally updated the Whitepaper for Hybrid Cloud with NVGRE (WSSC 2012 R2) and you can now download it from http://gallery.technet.microsoft.com/Hybrid-Cloud-with-NVGRE-aa6e1e9a

What we have done:

·         Added some new content around best practices
·         Updated to 2012 R2 RTM/GA
·         Added HA Service Template for gateway VMs
·         Good old bug fixing
·         Troubleshooting

With this foundation, I can ensure that we are already working on something new in the context of cloud computing that will take advantage of NVGRE and the fabric setup we have.

If you have any feedback, questions etc, please use the Q&A at the TechNet site

Monday, November 11, 2013

How to create a GEN2 VM with SCVMM 2012 R2

Hopefully, you are a completely aware of the support of GEN2 VMs in Hyper-V in Windows Server 2012 R2.
The virtual machine generation determines the virtual hardware and functionality that is presented to the virtual machine.

Generation 1 VMs is the legacy VMs that we have been using over the last years, that provides the same virtual hardware to the virtual machine as in previous versions of Hyper-V.

Generation 2 VMs  provides a lot of new functionality on a virtual machine, like:

-          Boot from a SCSI virtual hard disk
A well-known topic about the architecture of Hyper-V is that the boot partition always had to be associated with an IDE controller in the virtual hardware profile. This was because it would bypass the integration service requirements, so that you could boot ‘any’ guest OS on Hyper-V. The performance was identical as to SCSI controller associated disk when integration services was present, but it was simply a bypass. This gave us some challenges regarding new features we got in 2008 R2, like hot-add/remove of virtual hard disk that could only be performed on VHD’s associated with the SCSI controller. In other words, only data-partitions could be added/removed on the fly. Since a GEN2 VM now can boot from a SCSI-controller, we can also add/remove and resize these disks associated, even if it’s the boot partition. Please note that VHDX is a requirement in order to use GEN2 VMs.

-          Secure Boot (this one is enabled by default)
Secure boot is enabled by default for GEN2 VMs and is a feature that helps prevent unauthorized firmware, operating systems, or UEFI drivers from running at boot time

-          Boot from a SCSI virtual DVD
Instead of using an IDE virtual DVD, we can now use SCSI Virtual DVD

-          PXE boot by using a standard network adapter (this is for real!)
If you wanted to boot a VM and to perform a remote installation of the guest operating system using PXE boot, you had to use a legacy virtual network adapter in the virtual hardware profile – in order to bypass the integration services (since they were not present at boot time). GEN2 VMs support PXE boot by using a standard virtual network adapter (aka synthetic device) so there is no need to install a legacy network adapter, which has been removed from GEN2 VMs.

-          UEFI firmware support
The Generation 2 VM has a much more simplified virtual hardware model and supports Unified Extensible Firmware interface (UEFI) firmware instead of BIOS-based firmware. This means that most of the legacy devices are removed from GEN2 VMs.

These are the guest operating systems that are supported as GEN 2 VMs:

-          Windows Server 2012
-          Windows Server 2012 R2
-          64-bit versions of Windows 8
-          64-bit versions of Windows 8.1

By reading this, I can assume that you can see the benefits of using GEN2 VMs.

In addition, SCVMM 2012 R2 support GEN2 VMs and we can create, deploy (newly VMs or/and based on templates) through powershell and the GUI.

Please note: Services in VMM in System Center 2012 R2 do not support generation 2 virtual machines. When you create a service template in VMM, if you have created virtual machine templates (VM templates) that specify generation 2 virtual machines, you cannot add those templates to the service template. You can only add virtual machine templates that specify generation 1 virtual machines. Also, within a service template, in the virtual machine (tier) properties sheet, properties for a generation 1 virtual machine appear, but properties that are unique to generation 2 virtual machines do not appear.

Since SCVMM is fully aware of your datacenter infrastructure, it will leverage intelligent placement during VM deployment. This means that SCVMM will identify which hosts that support GEN2 VMs prior to deployment (give you a star rating) and help you to avoid faulty placement of GEN2 VMs.


How to create a GEN2 VM with SCVMM 2012 R2

1.       Logon to your SCVMM server and navigate to ‘VMs and Services’
2.       Click ‘Create Virtual Machine -- > Create Virtual Machine’ from the ribbon menu

3.       Select ‘Create a new Virtual Machine with a blank hard disk’ and click next. This is important, as you can’t use any template with GEN1 as your source

4.       On the ‘Specify virtual machine identity’ page, assign the VM a name and also specify the generation of the virtual machine. Click on the drop down list and select Generation 2

5.       On the ‘Configure hardware for the virtual machine…’ page, add an ISO image to the DVD drive, and eventually adjust any of the other hw settings to meet your requirements. Please note the absence of the legacy hardware that we had in generation 1 VMs

6.       On the ‘select destination’ page, please specify the cloud or the host group where the VM should be deployed

7.       Intelligent placement will work out its magic and detect the best suited host to run the virtual machine. Click next 3 times and finish to start the deployment

You should now have successfully deployed a GEN2 VM with SCVMM 2012 R2

The next logical steps would be as follows:

1.       Install and customize the guest operating system within the VM
2.       Shut down the VM
3.       Remove the ISO attached to the VM

4.       Create a VM template with SCVMM 2012 R2 and place it in your library

Thursday, November 7, 2013

XenDesktop Service Template for SCVMM 2012 R2

This is just a heads up to show you some amazing work by a fellow MVP, Brian Ehlert.

Let me first spend some time to explain what Brian does.
Brian is probably one of the most skillful IT-pro I know, and was actually the individual who inspired me to become a Microsoft MVP.
By sharing his deep technical insight through forums, blogging and so on, he simply sets a standard that is hard to achieve.
If you have searched through the internet looking for answers related to Hyper-V/VMM, Brian and myself, are moderators in the VMM forums. And by looking at Brian’s score, you know that he shares a lot with the community.

One of the latest work by Brian, is that he has created a Service Template for SCVMM 2012 R2 that helps organizations to deploy XenDesktop with the service model in VMM.
Microsoft has just released several service templates for you to simplify the deployment process of server applications like SQL, Sharepoint, Lync and much more (more to come!)

Get your hands on the template – and read more about this at Brian’s blog:


Tuesday, October 22, 2013

Windows Azure Gallery Items - getting started with Domain Controllers


The feed of Windows Azure Pack Gallery Resources and SCVMM Service Templates which are compatible with the RTM releases is now LIVE at:


This release includes more than 40 deployable templates including:
·         SharePoint 2013
·         SharePoint Foundation 2010
·         Microsoft SQL Server 2013
·         IIS
·         Domain Controller
·         Windows Server 2012 R2 HA Network Gateway
·         Windows Server 2012 R2
·         Windows Server 2012
·         BlogEngine.NET
·         Database Servers
o   MySQL Server (Windows and Linux)
o   Oracle Self Service Kit
·         Linux applications including
o   CentOS6 LAMP
o   Drupla
o   Joomla
o   WordPress CentOS6
·         Samples to enhance authoring
o   Custom Script
o   Custom Script with Environment Variables
o   Linux Generic
o   Service Template Example Kit
·         and more

For information on how to use this feed and import items in the Windows Azure Pack you can use the following resources
·         Downloading and Installing Windows Azure Pack Gallery Resource

Please pay attention to the gallery items that you can use with Windows Azure Pack.
These items, (blogged about them here http://kristiannese.blogspot.no/2013/08/getting-started-with-gallery-items-in.html ) is quite neat to use in a IaaS scenario.

Instead of just offering standard virtual machines (you know, those sysprep’d VMs with nothing but the OS installed) we can climb up a bunch of levels and focus on applications instead.
The hard part is to understand the difference between Service Templates (native in SCVMM) and gallery items (native in Windows Azure Pack).

Service Templates is by design, meant for the enterprise/private cloud where you need to know (at some level) specific things about the infrastructure. At least you must have access to other networks that tenants usually don’t have, and in some cases, some shared storage either presented through iSCSI or virtual FC (yup, shared VHDX may solve some of the issues here).

Gallery items on the other side, is designed and optimized for the Windows Azure Pack, where tenants – as well as internal users may deploy virtual machine roles (virtual machines with additional services or/and applications). We saw the early beginning of this in preview, where we could rapidly deploy Windows Servers enabled with IIS, where some settings were exposed already prior to the setup, for the tenant to configure.

In this blog post, I would like to highlight how the domain controller template through Windows Azure Pack is working.

First, I assume you have downloaded the bits to some place on your SCVMM server, next we will import the items in SCVMM (nope, no GUI for this) through Powershell and add them to Windows Azure Pack.

1)      On SCVMM, open the Powershell module and type the following:

$libraryShare = Get-SCLibraryShare | Where-Object {$_.Name -eq 'MSSCVMMLibrary'}
$resextpkg = $Env:SystemDrive + "\Gallery Resources\DomainController_WS2012_VMRole_Pkg\DomainControllerWindows2012.resextpkg"
Import-CloudResourceExtension –ResourceExtensionPath $resextpkg -SharePath $libsharepath -AllowUnencryptedTransfer


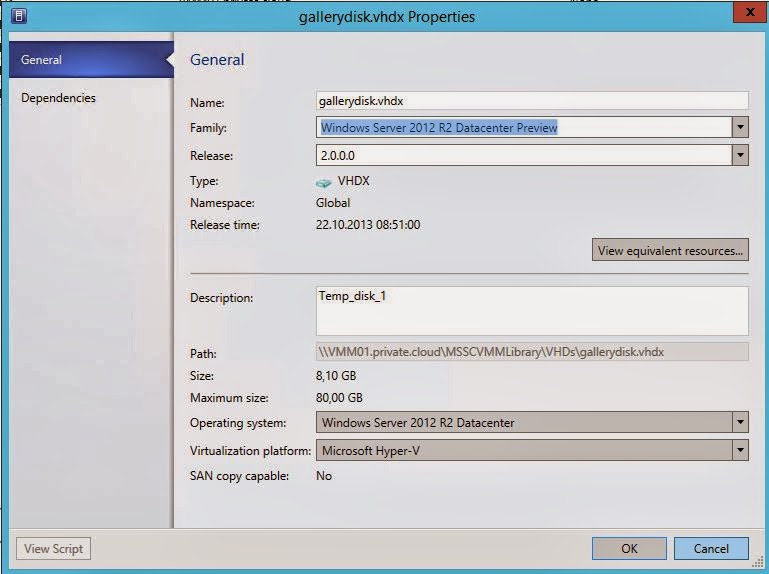
2)      Next, we must associate a VHDX with this cloud resource

$myVHD = Get-SCVirtualHardDisk | where {$_.Name –eq 'gallerydisk.vhdx'}
$WS2012Datacenter = Get-SCOperatingSystem | where { $_.name –eq '64-bit edition of Windows Server 2012 R2 Datacenter' }
Set-scvirtualharddisk –virtualharddisk $myVHD –OperatingSystem $WS2012Datacenter


3)      The Familyname and Release properties of the virtual hard disk must be set in order for the Windows Azure Pack portal to display the virtual hard disk as an available disk for this Gallery Resource. These values are shown in the portal drop-down list.
Familyname property values should indicate the contents of the virtual hard disk, including the Windows Server release and edition. The Readme file of the Gallery Resource should include appropriate Familyname values.
Release property values must conform to the Windows Azure versioning scheme of n.n.n.n. Examples include 1.0.0.0 and 1.0.0.1.
You can set this property using either the Virtual Machine Manager Administrator console or using Windows PowerShell.


4)      The last step in Powershell, is to perform the last tag

$myVHD = Get-SCVirtualHardDisk | where {$_.Name –eq 'gallerydisk.vhdx'}
$tags = $myVHD.Tag
if ( $tags -cnotcontains "WindowsServer2012R2" ) { $tags += @("WindowsServer2012R2") }
Set-scvirtualharddisk –virtualharddisk $myVHD –Tag $tags


Now, logon to your Windows Azure Pack Service Management portal, and perform the following tasks

1.  Open the Service Admin Portal.
2.  Navigate to the VM Clouds workspace.
3.  Click the Gallery tab.
4.  Click Import.
5.  Select and import the Resource Definition Package file for the gallery item. This will be the file with the extension resdefpkg.
6.  The gallery item should now be listed on the Gallery tab.

Finally, associate the gallery item with one of your ‘plans’ created in Windows Azure Pack.

1.  On the Gallery tab, select the version of the gallery item that you just imported.
2.  Click the arrow next to the gallery item name.
3.  Verify the details of the gallery item.
4.  Navigate back and click Make Public.
5.  Select the Plans workspace in the Service Admin Portal.
6.  Select the plan to which you want to add this gallery item.
7.  Select the Virtual Machine Clouds service.
8.  Scroll to the Gallery section.
9.  Click Add Gallery Items.
10.   Select the gallery items that you imported, and then click Save.
11.   The Virtual Machine Role is now available to the tenant as part of the selected plan.
The tenants can now logon to their tenant side, navigate to VMs, and create new.
They will have the option of using ‘Virtual Machine Roles’, and the DC item will appear with the following configuration options, shown below on the screenshots.
(This will indeed install a virtual machine with the forest/domain you specify)


Now, how cool is that?

Sunday, October 20, 2013

How to deploy Scale-Out File Server Clusters with SCVMM 2012 R2

How to deploy Scale-Out File Server Clusters with SCVMM 2012 R2

This blog post is meant to show you how easy you can deploy scale-units with SCVMM 2012 R2.

Storage is – of course, a critical component in the cloud, no matter if it’s private, public or the service provided cloud.

SCVMM is able to cover the entire aspect of your cloud infrastructure, and storage is one of them.

New in SCVMM 2012 R2 is that we now (finally) have an end-to-end solution for deploying scale-out file server clusters, using this System Center component.

From before, you may be familiar with bare-metal deployment of Hyper-V hosts. This is a good thing where you only need to rack your servers, give them Ethernet and power and SCVMM will pick them up to deploy the operating system and enable the hypervisor, in addition to deploy logical switches if that’s is applicable.

Now, we can use the same framework to provision physical computer nodes in a scale-out file server cluster, or we can fetch our already existing Windows file servers intended for this scenario, cluster them, and use them in our cloud infrastructure.

First, here’s an overview of my environment

Storage 02 – this is my storage appliance, running Windows Server 2012 R2 with JBOD, and I am truly levering the capabilities of Storage Spaces in this scenario.

Scale1 and Scale2 is my physical servers, running Windows Server 2012 R2 and should be nodes in my scale-out file server cluster. These servers are connected to my storage through iSCSI and this is done prior to picking up SCVMM.


1)      Navigate to the Fabric, and from the ribbon menu, click ‘Create’ and ‘File Server Cluster’


2)      Assign a cluster name (scale-out file server cluster name) and a file server name (this would be the name of the file cluster, running the scale-out role). Also, the cluster need one or more IP addresses, so specify them in order to succeed.


3)      In my example, I have already my servers present in the infrastructure. Therefore, I will choose ‘Use existing servers running Windows Server 2012 R2’. The requirements is that they are in the same domain and must use the same Run As Account. Also note that they should not have the Hyper-V role installed. In an ideal world, I would have servers ready to be managed out of band. This is not the case here, and therefore I am not able to demonstrate how to provision bare-metal computers with a new operating system by using a file server profile. I select my Run As Account and also choose to skip the cluster validation, since this is a lab. Please remember to validate everything prior to putting it into production. Click next


4)      On the next page, I click add to add my file servers. I will add both ‘scale1’ and ‘scale2’.


5)      Last but not least, you will get a summary view of your configuration. Make sure everything is correct before clicking finish.

Once you hit finish, the following will happen:

SCVMM will prepare the storage node, install VMM agents on every server, install the failover cluster feature, create the cluster, the scale-out role, publish DNS records and discover storage.

Now, after the job is completed, we can see that we have a new provider in our fabric


In my next blog post, I will show how to configure storage pools from SCVMM and create and assign file shares to my production cluster.

Tuesday, October 15, 2013

Expert 2 Expert Conference in Rome


First of all, I really hope to see you durng the E2E conference in Rome early in November.
I will be holding the keynote together with Michael.

The keynote (first part) will focus on what’s new in Windows Server 2012 R2, delivered by Michael, where I will eventually will come In to talk about the innovation in the Cloud OS with Hyper-V, System Center and last but not least – the Windows Azure Pack.

This will be a great conference with a lot of the best experts from the industry.

Here are some statistics:

1)      We got 18 countries visiting. Germany, Austria, Swiss, UK, Ireland, Netherlands, Belgium, France, Sweden, Norway, Jersey, USA, Denmark, Italy, Croatia, Spain, Malta, Israel
2)      We have 18 Microsoft MVP’s, 15 Citrix CTP’s and 6 vExperts. We cover all of the technologies!
3)      We have 110 people registered so far and from those are (figures are approximate):
a.       28% Dutch
b.      15% German
c.       15% Norwegian
d.      11% UK
e.      10% USA
4)      This is our 20th event and we are 10 years young this year J
5)      For Rome we have 28 sessions, 1 Master Class, 3 days :)
6)      Last time we had MVP Community Lead, this time we will have Citrix CTP community lead Perrine Crampton!

To summarize, this should be a great conference for those of you who are interested in virtualization and cloud computing, with a focus on the primary technology in the market.


I hope to see you all there.